background image

7108686.02 (1-11/12)

16

IN

S

T

A

L

L

E

R

 S

e

c

ti

o

n


(e

n

MAINTENANCE

P57

7045

Time after maintenance

month

xxx

0

240

P58

6704

View/Hide secondary fault internal code (0=no)

-

1

0

1

BURNER CONTROL

P59

9512

Required ignition speed

rpm

xxx

0

8000

P60

9524

Required minimum operating speed    

(low speed)

rpm

xxx

0

8000

P61

9529

Required maximum operating speed 

(high speed)

rpm

xxx

0

8000

BOILER CONTROL PANEL PARAMETERS


P62

-

Unit of measurement (1=bar, °C – 2=PSI, °F)

-

1

1

2

P63

-

Control panel operation: (1=central,  0=local)

-

1

0

1

P64

-

Software version

-

xx

0

999

 see “Accessories not included in supply”

xx

: the value depends on the software version    

    xxx

 : the value depends on the type of boiler

(a)

:


parameters read on the front boiler panel (fixed control panel)

        (b)

: parameters read on the Remote Control

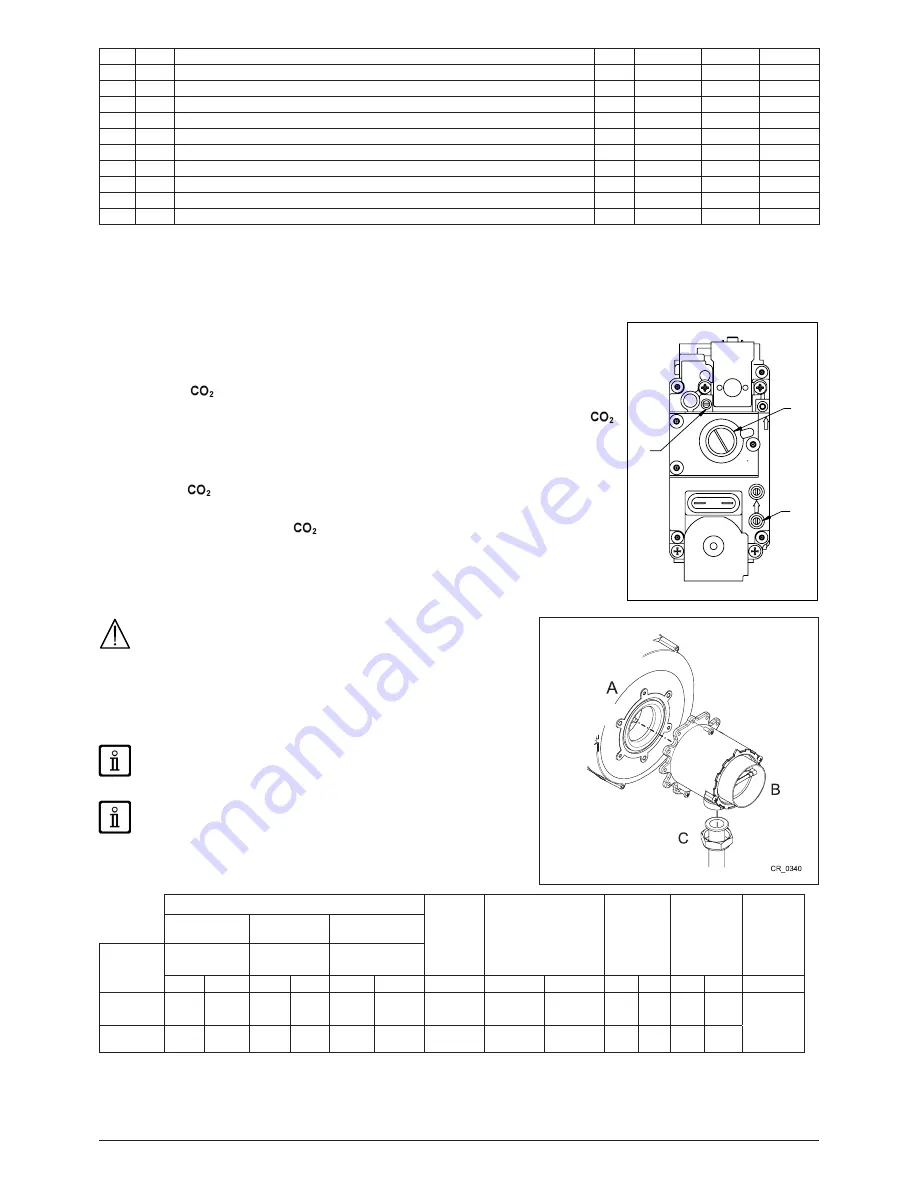
15. GAS VALVE COMMISSIONING

To commission the gas valve, enable the commission function as described in section 12.2 

and carry out the following operations:


1)


Commissioning


MAXIMUM heat output.

Check that the


 measured on the flue duct, with the boiler operating at maximum heat 

capacity, matches that indicated in table 2 (allowed tol/- 0.5%). If it does not, turn the 

adjustment screw (

V

) on the gas valve. Turn the screw clockwise to decrease the level of 


and anti-clockwise to increase it (allowed tol/- 0.2%).


2)


Commissioning


REDUCED heat output


Check that the 

 measured on the flue duct, with the boiler operating at minimum heat 

capacity, matches that indicated in table 2 (allowed tol/- 0.5%). If it does not, remove 

the threaded brass cap on the gas valve and turn the adjustment screw (

K

). Turn the screw 

clockwise to increase the level of 

 and anticlockwise to decrease it (allowed tolerance 

+/- 0.2%).


15.1  GAS CONVERSION

When converting from natural gas to propane (LPG), before calibrating 

the gas valve as described above, replace the venturi assembly ( B) as 

indicated in the figure. To achieve this, dismount the gas pipe (thre-

aded nut G1”) and remove the three screws securing the flange. Afterwards, 

make sure there are no gas leaks. Modify the parameters (fan rpm) as indicated 

in table 2 following the procedure described in section 14. 


To simplify commissioning of the gas valve, set the “commissioning 

function” directly on the boiler control panel as described in section 

12.2. 


For cascade ducts, change the parameter P60(a) increasing the num-

ber of fan revolutions (rpm) by 200 (see table in chapter 10.2).

TABLE 2

PARAMETERS - rpm

VENTURI

Ø  (mm)

GAS NOZZLES


Ø  (mm)

CO

2

 Min 

(%)

CO

2

 Max 

(%)

Max. CO 

(ppm)

P60 (a)

P30 – P61 (a)

P59 (a)

Boiler 

model

Min. power

Max. power 

Ignition power

G20

G31

G20

G31

G20

G31

G20-

G31

G20

G31

G20

G31

G20

G31

G20/G31

WH 90

1250

1500

6500 6200

2400

2400

34

5.6 (n°2)

4.5 (n°2)  *8,5 *9,9 *9,0

*10

< 250

WH 110

1300

1300

6900 6700

2500

3000

38

6.4 (n°2)

5.0 (n°2)

*9,0 *9,5 *9,2

*10

*  

CO

2

 with cover closed. Without cover (chamber open) the value is less than 

0.2%.

(a) 

  value read on the boiler front panel display to multiply 

x 10

 (e.g.: 160 corresponds to 1600 rpm)


Summary of Contents for Sirius two WH

Page 1: ...Working towards a cleaner future Sirius two WH 90 110 kW Instruction manual for users and fitters To be kept by the user November 2013 heating specialists ...

Page 2: ...N OF SYMBOLS 3 SAFETY WARNINGS 3 GENERAL PRECAUTIONS 4 ENERGY SAVING TIPS 4 1 COMMISSIONING THE BOILER 5 1 1 ADJUSTING THE CH AND DHW FLOW TEMPERATURE 5 1 2 OPERATING MODES 5 2 PROLONGED SHUTDOWN FROST PROTECTION 6 3 GAS CONVERSION 6 4 FAULTS 6 5 BOILER INFORMATION MENU 6 6 FILLING THE SYSTEM 7 7 ROUTINE MAINTENANCE INSTRUCTIONS 7 8 SWITCHING OFF THE BOILER 7 INSTRUCTIONS PRIOR TO INSTALLATION 8 9...

Page 3: ...ymbol SAFETY WARNINGS SMELL OF GAS Switch off the boiler Do not activate any electrical device such as switching on the light Put out any naked flames and open the windows Call an Authorised Service Engineer SMELL OF COMBUSTION FUMES Switch off the boiler Open all the doors and windows to ventilate the room Call an Authorised Service Engineer FLAMMABLE MATERIAL Do not use and or store highly flamm...

Page 4: ...e heating system can adversely affect boiler operation e g overheating and excessive noise of the heat exchanger Initial lighting of the boiler must be carried out by an authorised Service Engineer who must first ensure that The rated data correspond to the supply electricity water and gas data That the installation complies with current regulations The appliance is correctly connected to the powe...

Page 5: ...ater pressure low Heating mode enabled Technical Service Centre call in Programming menu Manually resettable fault Boiler information menu Fault in progress Set unit of measurement SI US 1 1 ADJUSTING THE CH AND DHW FLOW TEMPERATURE Press and respectively to adjust the CH and DHW flow temperature if an external storage tank is fitted When the burner is lit the display shows the symbol HEATING whil...

Page 6: ...g only model with storage tank 151 Boiler board internal fault 83 Communication problem between boiler board and control unit Probable short circuit on wiring 153 Hardware reset button pressed more than 10 seconds 84 Address conflict between control units 160 Fan fault 109 Air in boiler circuit temporary fault 164 Flow pressure switch faulty 110 Safety thermostat tripped due to over temperature pu...

Page 7: ... is no water If pressure drops occur frequently monthy basis have the system checked by the AUTHORISED TECHNICAL SERVICE CENTRE 7 ROUTINE MAINTENANCE INSTRUCTIONS To keep the boiler efficient and safe have it checked by the Authorised Service Centre at the end of every 12 months Careful servicing ensures economical operation of the system 8 SWITCHING OFF THE BOILER To turn off the boiler disconnec...

Page 8: ...ting system installing a new system as well as the above fit a strainer under the boiler on the system return line in order to collect any deposits and scale circulating in the system after flushing After fixing the boiler to the template connect the flue and air ducts supplied as accessories as described in the following sections Connect the siphon to a drain trap making sure the slope is continu...

Page 9: ...sed to discharge exhaust fumes and draw combustion air both outside the building The 87 concentric bend allows the boiler to be connected to a flue air in any di rection as it can be rotated by 360 It can also be used as a supplementary curve combined with a concentric flue or a 45 bend If fumes are discharged outside the building the flue air must protrude at least 200 mm from the wall to allow a...

Page 10: ... high voltage 230 V Before making connections make sure the appliance is disconnected from the power supply Check the input polarity on terminal block M1 L LINE N NEUTRAL TERMINAL BLOCK M1 L Live brown N Neutral light blue Earth yellow green 1 2 contact for Room Thermostat Put back the jumper on terminals 1 2 of boiler terminal block M1 if the room thermostat is not used or if the Remote Control i...

Page 11: ...ounting and operation instructions supplied with the kit A Proceed as follows Switch off the boiler Pass the three wires from the boiler terminal block M2 through the hole in the base A1 to apply to the wall Connect wires 1 2 3 of the boiler terminal block M2 to terminals 1 2 3 of the base terminal block A1 respectively Fix the base A1 to the wall using the expansion grips and screws supplied with...

Page 12: ...e new configuration Access menu 2 as indicated at the beginning of this section B Configuration B B programme row 6200 then B B Yes then B to confirm ZONE SYSTEM WITH INSTALLATION OF THE REMOTE CONTROL The electrical connection and the adjustments required to manage a system divided into zones with use of the Remote Control differs according on the accessories connected to the boiler To install an...

Page 13: ...d connect it to terminals 9 10 of terminal block M2 see annex SECTION B Make sure that the exchange capacity of the domestic hot water coil is appropriate for the power of the boiler OUTDOOR SYSTEM MANAGEMENT MODULES The boiler can independently manage up to three heating circuits by using external accessories such as room units remote controls and external modules AVS 75 The boiler electronics al...

Page 14: ...for high fire and 0 for low fire To exit press both buttons together for at least 6 seconds as described in point one Press to display the instantaneous flow temperature for 15 seconds 12 3 CHIMNEY SWEEP MODE When this function is enabled the boiler generates maximum heating power To enable the function proceed as follows press together for 6 seconds The display shows 303 alternated with the power...

Page 15: ... if P23 1 7 1 7 1 daily 2 6 intervals of 2 6 days 7 once a week P25 1663 Circulation temperature setpoint additional DHW pump C 45 8 80 P26 5470 Preheating time for DHW circuit 1 10 144 1440 min 0 0 144 BOILER PARAMETERS P27 2243 Minimum boiler off time min 3 0 20 P28 2217 Frost Protection setpoint C 5 20 20 P29 2250 Pump post circulation time min 3 0 240 P30 2441 Max fan speed heating rpm xxx 0 8...

Page 16: ...e flue duct with the boiler operating at minimum heat capacity matches that indicated in table 2 allowed tolerance 0 5 If it does not remove the threaded brass cap on the gas valve and turn the adjustment screw K Turn the screw clockwise to increase the level of and anticlockwise to decrease it allowed tolerance 0 2 15 1 GAS CONVERSION When converting from natural gas to propane LPG before calibra...

Page 17: ...causes the main burner to go out Antifreeze device The electronic boiler management system includes an antifreeze function for the heating and DHW systems which when flow temperature falls below 5 C operates the burner until a flow temperature of 30 C is reached This function is enabled when the boiler is switched on the gas supply is open and the system is correctly pressurised Pump anti block fu...

Page 18: ...semble the heat exchanger protect the electronic box and all the electrical components against sprayed water Proceed as follows to dismount the Heat Exchanger Isolate the unit from the electrical mains disconnect the boiler from the main elecrical supply Cut off the gas supply to the boiler Close the maintenance taps on the boiler Remove the front cover trom the boiler Unscrew the screw securing t...

Page 19: ...iciency and the emissions of the products of combustion the boiler is fitted with two dedicated test points One connection point is connected to the flue gas discharge circuit A and allows monitoring of the quality of the combustion products and the combustion efficiency The other is connected to the combustion air intake circuit B allowing checking of any recycling of the combustion products in c...

Page 20: ... Capacity of boiler circuit volume of water l 9 10 Temperature range in heating circuit C 25 80 Flue Types C13 C33 B23 Concentric flue duct diameter mm 110 160 Diameter of separate outlets mm 110 110 Max mass flow rate of flue G20 kg s 0 040 0 047 Min mass flow rate of flue G20 kg s 0 005 0 005 Max temperature of fumes C 70 NOx Class 5 EN 297 EN 483 mg kWh 39 5 24 7 Natural gas supply pressure 2H ...

Page 21: ...21 I N S T A L L E R S e c t i o n e n 7108686 02 1 11 12 ...

Page 22: ...and return 9 Safety overflow temperature thermostat 10 Flame detection electrode 11 Spark generator 12 Venturi 13 Pump 14 Hydraulic Safety valve 15 Boiler drain tap 16 Pressure gauge 17 Hydraulic Pressure Sensor 18 Gas pressure switch 19 Gas valve A Trap condensate drain B Gas inlet connection C Heating flow connection D Heating return connection 1 A B C D 2 3 5 4 6 8 16 9 7 14 10 12 13 15 18 17 1...

Page 23: ...3 L N L N 230 V 230 V 13 13 V N N R M C C M V N N R C C C M 12 11 10 9 8 7 6 5 4 3 2 1 N V R C C R R G V G V Y P N M 1 Fuses 2 230 V Power Supply 3 Room Unit RU 4 Heating flow sensor 5 Heating return sensor 6 Water pressure switch 7 Fumes sensor 8 DHW tank sensor 9 Auxiliary Sensor 1 10 Auxiliary Sensor 2 11 Outdoor sensor 12 Remote Control 13 Boiler pump 14 Flame sensor electrode 15 Ignition elec...

Page 24: ...8686 02 1 11 12 24 S E C T I O N C 7109986 01 G1 1 2 G1 1 2 G1 G 1 G1 1 2 198 100 100 100 102 90 5 419 90 5 600 30 245 5 951 809 50 70 72 584 600 112 354 5 245 5 952 112 170 184 5 245 5 G1 1 2 Ø 8 Ø 8 Ø 8 ...

Page 25: ...25 S E C T I O N C 7108686 02 1 11 12 ...

Page 26: ...7108686 02 1 11 12 26 S E C T I O N D A B Lmax 10 m Ø 110 160 mm C D Lmax 9 m Ø 110 160 mm E F Lmax 10 m Ø 110 160 mm G Lmax 8 m Ø 110 160 mm H Lmax 9 m Ø 110 160 mm ...

Page 27: ... l h WH 90 WH 110 0 1 2 3 4 5 6 7 8 0 4 0 0 8 0 0 1 2 0 0 1 6 0 0 2 0 0 0 2 4 0 0 2 8 0 0 3 2 0 0 3 6 0 0 4 0 0 0 4 4 0 0 Q l h H mH 2 O 0 1 2 3 4 5 6 7 8 0 4 0 0 8 0 0 1 2 0 0 1 6 0 0 2 0 0 0 2 4 0 0 2 8 0 0 3 2 0 0 3 6 0 0 4 0 0 0 4 4 0 0 4 8 0 0 Q l h H mH 2 O WH 90 WH 110 ...

Page 28: ...7108686 02 1 11 12 28 S E C T I O N F WEATHER COMPENSATION CURVE GRAPHS QAC34 ...

Page 29: ...29 S E C T I O N G 7108686 02 1 11 12 AGU 2 550 CR_0349 CR_0349 AVS 75 ...

Page 30: ...7108686 02 1 11 12 30 S E C T I O N G CG_2482 SAFETY THERMOSTAT Tmax 50 C free contact ...

Page 31: ...31 7108686 02 1 11 12 MODIFIED PARAMETERS Nr VALUE NOTE ...

Page 32: ...NOV2013 Baxi Commercial Wood Lane Erdington Birmingham B24 9QP Email potterton commercial baxicommercialdivision com www pottertoncommercial co uk heating specialists Sales 0845 070 1056 Technical 0845 070 1057 RS 33961 ...

Reviews: