Potterton Assure System 12 Installation And Service Manual Download Page 36

6.2.2 

Connecting the condensate drain

1. Remove the blanking cap, and using the elbow supplied, connect the

condensate drain pipework to the boiler condensate trap outlet pipe.

See

Ensure the discharge of condensate complies with any national or 

local regulations in force (see HHIC recommendations).

See

Condensate drain, page 27.

2. The elbow will accept 21.5mm (

3

/

4

 in) plastic overflow pipe which

should generally discharge internally into the household drainage

system. If this is not possible, discharge into an outside drain is

acceptable.

Important

The boiler condensate trap should be primed by pouring 

approximately 300ml of water into the flue spigot. Do not allow any 

water to fall into the air inlet.

6.3 

Air supply/flue gas connections

6.3.1 

Connecting the flue/chimney

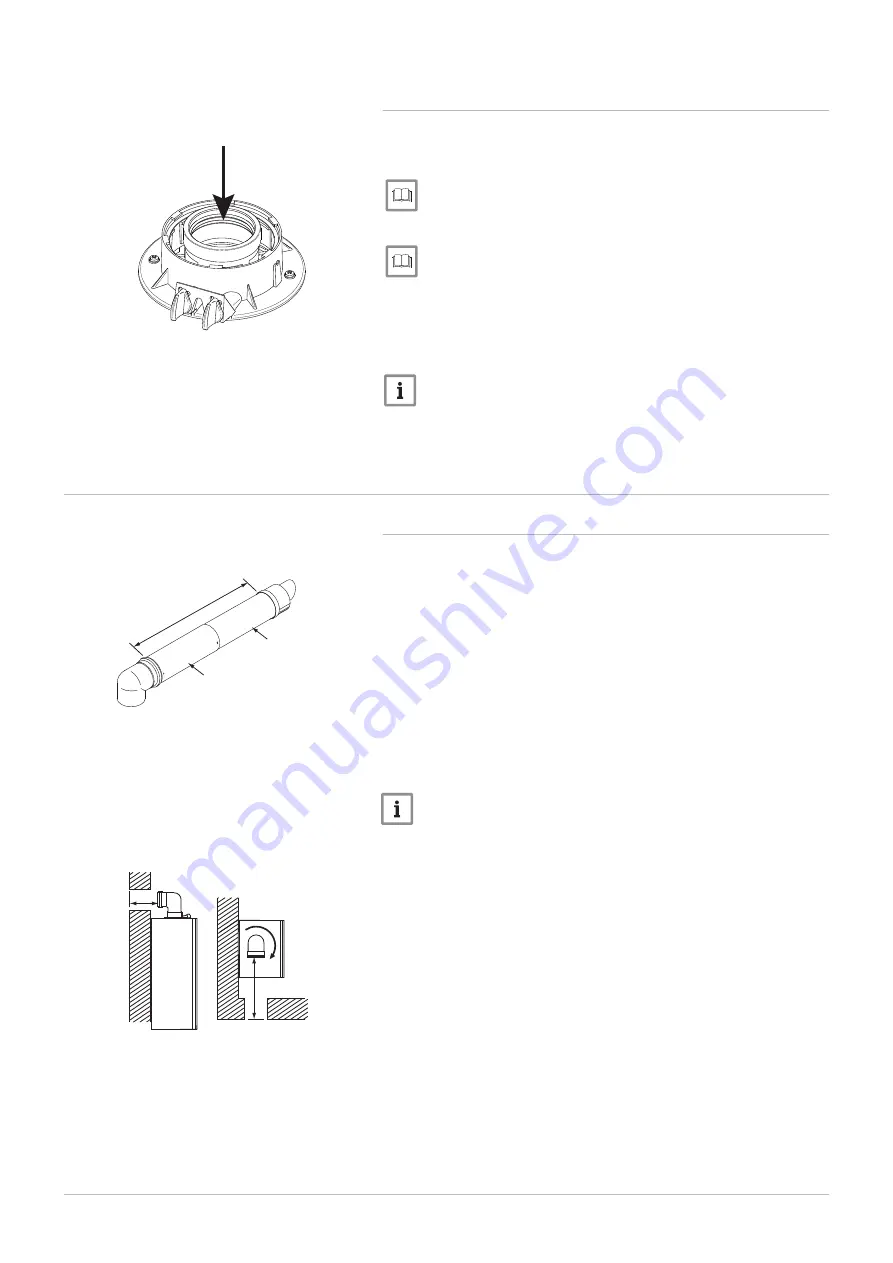
HORIZONTAL TELESCOPIC FLUE (concentric 60/100)
1

315mm to 500mm

2

Connection assembly

3

Terminal assembly

There are two telescopic sections, the terminal assembly and the 

connection assembly, a roll of sealing tape and two self tapping screws. A 

93° elbow is also supplied.
The two sections can be adjusted to provide a length between 315mm and 

500mm when measured from the flue elbow (there is 40mm engagement 

into the elbow).

1. Locate the flue elbow on the adaptor at the top of the boiler. Set the

elbow to the required orientation.

Important

The flue elbow is angled at 93° to ensure a fall back to the boiler.

2. Measure the distance from the outside wall face to the elbow. This

dimension will be known as " X" .

3. If the distance from the flue elbow to the outside face of the wall is

less than 250mm the connection assembly can be discarded and the

terminal assembly fitted directly into the elbow.

4. In instances where the dimension " X" is between 250mm and 315mm

it will be necessary to shorten the terminal assembly by careful cutting

to accommodate walls of these thicknesses.

Fig.28

Pour 300ml of water into flue spigot

PN-0000602

Fig.29

Telescopic flue

PN-0000462

3

1

2

Fig.30

Flue dimension X

PN-0000463

X

X

6  Installation

36

Summary of Contents for Assure System 12

Page 1: ...ist and should be left with the user for safe keeping They must be read in conjunction with the Flue Installation Guide United Kingdom en Installation and Service Manual High Efficiency Wall Hung Condensing Gas Boiler Potterton Assure System 12 15 18 24 18 24 LPG ...

Page 2: ...using the product and keep it in a safe place for later reference In order to ensure continued safe and efficient operation we recommend that the product is serviced regularly Our service and customer service organisation can assist with this We hope you enjoy years of problem free operation with the product ...

Page 3: ...rameters 15 3 3 Dimensions and connections clearances 16 3 4 Electrical diagram 17 4 Description of the product 18 4 1 General description 18 4 2 Operating principle 18 4 2 1 Air gas adjustment 18 4 2 2 Combustion 18 4 2 3 Heating and domestic hot water production 19 4 2 4 Central heating mode 19 4 2 5 Frost protection mode 19 4 2 6 Pump protection 19 4 3 Main components 20 4 3 1 List of component...

Page 4: ...n 40 6 5 3 Filling the condensate trap 40 7 Commissioning 41 7 1 General 41 7 2 Checklist before commissioning 41 7 2 1 Preliminary electrical checks 41 7 2 2 Checks 41 7 3 Commissioning procedure 42 7 3 1 De Aeration function 42 7 4 Gas settings 42 7 4 1 Check the operational working gas inlet pressure and gas rate 42 7 4 2 Checking combustion chimney sweep mode 43 7 5 Configuring the system 46 7...

Page 5: ...error codes 56 10 2 Fault finding 57 10 2 1 Central heating 57 10 2 2 Fault finding solutions sections A to E 58 10 2 3 Fault finding solutions sections F to H 59 10 2 4 Fault finding solutions sections I to M 60 11 Decommissioning 61 11 1 Decommissioning procedure 61 12 Disposal 62 12 1 Disposal and recycling 62 13 Spare parts 63 13 1 Short parts list 63 14 Appendix 64 14 1 Benchmark commissionin...

Page 6: ...aller The relevant section of Building Regulations only relates to dwellings Therefore the checklist only applies if the appliance is being installed in a dwelling or some related structure The flowchart opposite gives guidance for installers on the process necessary to ensure compliance with Building Regulations 1 1 2 The Benchmark Scheme Benchmark places responsibilities on both manufacturers an...

Page 7: ...nform the relevant LABC You must ensure that the certificate number issued by the Gas Safe Register is written onto the Benchmark Checklist Scheme Members only Call Gas Safe Register on 0800 408 5577 or log onto www gassaferegister co uk within 10 days If you notify via the Gas Safe Register the register will issue the Building Regulations certificate on members behalf Complete the Benchmark Check...

Page 8: ...ndows 3 Trace possible leaks and seal them immediately Warning Do not touch the flue gas pipes Depending on the boiler settings the temperature of the flue gas pipes may exceed 60oC Warning Do not touch the radiators for long periods Depending on the boiler settings the temperature of the radiators may exceed 60oC Warning Take precautions with the domestic hot water Depending on the boiler setting...

Page 9: ...e modified in any way 1 4 Specific safety instructions 1 4 1 Handling General The following advice should be adhered to from when first handling the boiler to the final stages of installation and also during maintenance Most injuries as a result of inappropriate handling and lifting are to the back but all other parts of the body are vulnerable particularly shoulders arms and hands Health Safety i...

Page 10: ... in the following cases Failure to abide by the instructions on installing the appliance Failure to abide by the instructions on using the appliance Faulty or insufficient maintenance of the appliance 1 5 2 Installer s liability The installer is responsible for the installation and initial commissioning of the appliance The installer must observe the following instructions Read and follow the inst...

Page 11: ...mprove user safety to prevent problems and to guarantee correct operation of the appliance Danger Risk of dangerous situations that may result in serious personal injury Danger of electric shock Risk of electric shock Warning Risk of dangerous situations that may result in minor personal injury Caution Risk of material damage Important Please note important information See Reference to other manua...

Page 12: ...as type Supply pressure mbar I2H G20 20 3 1 4 Standards Codes of Practice refer to the most recent version Tab 3 In GB the following Codes of Practice apply Standard Scope BS 6891 Gas Installation BS 5546 Installation of hot water supplies for domestic purposes BS EN 12828 Heating systems in buildings BS EN 12831 Heating systems in buildings Calculation of load BS EN 14336 Installation commissioni...

Page 13: ...e Net Qn Hi kW 15 5 18 6 Gross Qn Hs kW 17 2 20 6 Nominal heat input 80 60C Minimum rate Net Qn Hi kW 4 64 4 64 Gross Qn Hs kW 5 2 5 2 Nominal heat output 80 60 C central heat ing Maximum rate Pn kW 15 18 Nominal heat output 80 60 C central heat ing Factory setting Pn kW 15 18 Nominal heat output 80 60 C Minimum rate Pn kW 4 5 4 5 Nominal heat output 50 30 C central heat ing Maximum rate Pnc kW 16...

Page 14: ...s Degree of protection against humidity EN 60529 IP IPX5D Dimensions height width depth mm H 700 W 390 D 285 Tab 10 Connections copper tails Gas inlet mm 22 Heating flow mm 22 Heating return mm 22 Pressure relief discharge mm 15 Condensate discharge drain plastic waste pipe mm 21 5 Tab 11 Clearances Above casing mm 178 Below casing min mm 200 Front for servicing mm 450 Front for operation mm 5 Sid...

Page 15: ... rated heat output and low temperature regime ƞ1 97 8 97 8 Auxiliary electricity consumption Full load elmax kW 0 025 0 030 Part load elmin kW 0 011 0 011 Standby mode PSB kW 0 003 0 003 Other items Standby heat loss Pstby kW 0 040 0 040 Ignition burner power consumption Pign kW 0 0 Annual energy consumption QHE GJ 46 56 Sound power level indoors LWA dB 46 48 Emissions of nitrogen oxides NOX mg kW...

Page 16: ...se removal spanner access and air movement These should be observed at all times and kept clear of obstructions 1 Condensate trap sump 2 Condensate drain 3 Heating circuit water flow 4 Gas inlet 5 Pressure relief pipe 6 Heating circuit water return 7 Pump drain point 9 Cable entry points 10 Boiler drain point on flow isolation tap Fig 4 Flue position 160 106 1 5 Ø116 min 154 Ø100 PN 0000649 3 Tech...

Page 17: ...8 9 10 3 4 M2 b bk bk bk br g g g y bk black br brown b blue g green r red w while g y green yellow Key Description Key Description A Gas valve K Pump C Flue sensor L Terminal strip D Hydraulic pressure switch M Fan E Heating return sensor N Safety thermostat F Heating flow sensor O Earth point on boiler chassis H M2 low voltage external control connection P Printed circuit board PCB I Spark ignit...

Page 18: ...d in conjunction with the Flue Accessories and Fitting Guide supplied in the literature pack 4 2 Operating principle 4 2 1 Air gas adjustment The air is drawn in by the fan and gas injected directly at the top of the mixer valve The fan rotation speed is regulated automatically by the electronic board based on temperature adjustment and other parameters The gas and air are mixed in the manifold Th...

Page 19: ...ith automatic air vent 2 Boiler drain tap 3 Pressure gauge 4 Safety pressure relief valve 5 Hydraulic pressure switch 6 Gas valve 7 Safety thermostat 8 Heating flow sensor 9 Flue sensor 10 Flue adaptor 11 Primary heat exchanger 12 Electrode 13 Air gas collector 14 Heating return sensor 15 Burner door assembly 16 Air gas venturi 17 Expansion vessel 18 Fan Key to connections A Condensate drain B Hea...

Page 20: ...xchanger 11 Control box 19 Safety thermostat 4 DHW plate heat exchanger not on System Models 12 Condensate trap 20 Water Pressure Switch 5 Pump with automatic air vent 13 Safety pressure relief valve 21 Condensate outlet 6 CH system pressure gauge 14 Gas valve 22 Silencer 7 Fan assembly 15 Diverter valve motor not on System Models 23 Hall effect sensor not on Sys tem Models 8 Burner door assembly ...

Page 21: ...ure 4 5 Standard delivery 4 5 1 Contents of the carton The boiler is delivered in a carton comprising Wall hung gas boiler Wall bracket for fastening the boiler to the wall Clipping bracket for running pipes upwards Fitting kit including taps Literature pack containing Installation and service manual User guide manual Template Flue accessories fitting guide Warranty documentations ErP product and ...

Page 22: ...fit 2m Condensate drain pipe trace heating element 720664201 Multifit 3m condensate drain pipe trace Heating element 720664401 Multifit 5m condensate drain pipe trace heating element 5121379 Multifit remote secondary PRV kit 7683087 Multifit wired outdoor sensor System version For flue accessories elbows extensions clamps etc refer to the Flue Accessories Fitting Guide supplied in the literature p...

Page 23: ...k from the meter to the appliance is of adequate size and the demands of any other gas appliances in the property are taken into consideration Do not use pipes of a smaller diameter than the boiler gas connection 22mm UNLESS the stated gas rate can be achieved with pipe of lesser diameter and with all other gas appliances operating at maximum rate 5 2 2 Electrical supply External wiring must be co...

Page 24: ... The boiler is fitted with an automatic integral bypass 5 2 5 System control Further external controls e g room thermostat sensors MUST be fitted to optimise the economical operation of the boiler in accordance with Part L of the Building Regulations A range of optional controls is available Full details are contained in the relevant Sales Literature 5 2 6 Treatment of water circulating systems Al...

Page 25: ...el Adjust the pressure as required and repressurise the system 5 2 9 Safety pressure relief valve 1 Discharge pipe 2 Pressure relief valve A The end of the pipe should terminate facing down and towards the wall See BS 6798 for full details The pressure relief valve is set at 3 bar therefore all pipework fittings etc should be suitable for pressures in excess of 3 bar and temperature in excess of 1...

Page 26: ...s and the current ETCI rules If the boiler is to be fitted into a building of timber frame construction then reference must be made to the current edition of Institute of Gas Engineers Publication IGE UP 7 Gas Installations in Timber Framed Housing 5 3 2 Bath and shower rooms A Zone 0 B Zone 1 C Zone 2 D Window recess Zone 2 E Ceiling F Outside zones Important Where an optional plug in integral ti...

Page 27: ...imilar heated 11 Condensate pump 12 Unheated Location e g Garage Tab 17 Examples are shown of the following methods of termination Key Description A Termination to an internal soil and vent pipe B External termination via internal discharge branch e g sink waste downstream It is NOT RECOMMENDED to connect upstream of the sink or other waste water receptacle C Termination to a drain or gully D Term...

Page 28: ...hould be a minimum of 21 5mm diameter and must be supported using suitably spaced clips of the correct design to prevent sagging It is advisable that the full length of condensate pipe is run internally and preferably be less than 3 metres Internal runs greater than 3 metres or runs in cold areas should use 32mm waste pipe External runs MUST be a MINIMUM of 32mm and fully insulated with material s...

Page 29: ...siting balanced flue terminals For GB recommendations are given in BS 5440 Pt 1 For IE recommendations are given in the current edition of I S 813 Domestic Gas Installations Important Due to the nature of the boiler a plume of water vapour will be discharged from the flue This should be taken into account when siting the flue terminal Fig 16 Flue outlets R T U J K J K A D E C I I I A A S F H H B G...

Page 30: ...ent kit The terminal position must ensure the safe and nuisance free dispersal of combustion products If the terminal discharges onto a pathway or passageway check that combustion products will not cause a nuisance and that the terminal will not obstruct the passageway If a terminal is less than 2 metres above a balcony above ground or above a flat roof to which people have access then a suitable ...

Page 31: ...b 20 Their equivalent lengths are Concentric pipes 135 bend 0 5 metres 93 bend 1 0 metres The elbow supplied with the standard horizontal telescopic flue kit is not included in any equivalent length calculations Important Flue length is measured from point i to ii as shown See Read this section in conjunction with the Flue Installation Guide supplied with the boiler This document includes details ...

Page 32: ...d 5 3 10 Flue chimney deflector 1 Flue deflector Push the flue deflector over the terminal end It may point upwards as shown or up to 45 either way from vertical Secure the deflector to the terminal with screws provided 5 3 11 Flue chimney accessories See For full details of Flue Accessories elbows extensions clamps etc refer to the Flue Installation Guide supplied in the literature pack 5 4 Trans...

Page 33: ...on A filling point connection on the central heating return pipework must be provided to facilitate initial filling and pressurising and also any subsequent water loss replacement refilling The filling method adopted must be in accordance with all relevant water supply regulations and use approved equipment Your attention is drawn to for GB Guidance G24 2 and recommendation R24 2 of the Water Regu...

Page 34: ...uit and a supply pipe provided a Listed double check valve or some other no less effective backflow prevention device is permanently connected at the inlet to the circuit and the temporary connection is removed after use When the optional permanent filling link is fitted it is not necessary to remove any part of it after filling or re pressurising 5 Before installation 34 ...

Page 35: ...p to the heating flow and return gas supply 6 Always fit the tap with the drain point to the heating flow 7 Ensure all joints are tight Important Connect the pressure relief discharge pipe first before any other pipework 6 2 Assembly 6 2 1 Fitting the pressure relief discharge pipe 1 The valve and discharge pipe are assembled to the boiler terminating in a threaded male coupling 2 Determine the ro...

Page 36: ...copic sections the terminal assembly and the connection assembly a roll of sealing tape and two self tapping screws A 93 elbow is also supplied The two sections can be adjusted to provide a length between 315mm and 500mm when measured from the flue elbow there is 40mm engagement into the elbow 1 Locate the flue elbow on the adaptor at the top of the boiler Set the elbow to the required orientation...

Page 37: ... ease of assembly do not use any other type Ensure flue is fully engaged into elbow B Apply the lubricant supplied for ease of assembly do not use any other type Ensure elbow is fully engaged into boiler adaptor C Peak to be uppermost 9 Draw the flue back through the wall and engage it in the elbow It may be necessary to lubricate to ease assembly of the elbow and flue 10 Ensure that the terminal ...

Page 38: ...s OpenTherm Important When fitting external controls remove the yellow link wire from the Mains Terminal Block M1 Important Consideration must be given to Health and Safety Document 635 The Electricity at Work Regulations 1989 1 Remove the front panel See Specific maintenance instructions page 51 to remove the front panel 2 Hinge down the control box and unclip the terminal block cover 3 Slacken b...

Page 39: ...s be taken from terminal 2 at the boiler Live Neutral and Earth to power these controls must be taken from the Fused Spur 10 Reclip the terminal block cover back into position and hinge back the control box Important When an OpenTherm controller is connected adjustment of the boiler e g heating temperature is made using the OpenTherm controller rather than the boiler controls The boiler controls a...

Page 40: ...stallations 2 The sealed primary circuits may be filled or replenished by means of a temporary connection between the circuit and a supply pipe provided a Listed double check valve or some other no less effective backflow prevention device is permanently connected at the inlet to the circuit and the temporary connection is removed after use 3 Fill or replenish the sealed primary circuits by means ...

Page 41: ... close and disconnect the temporary filling loop except where a permanent loop is fitted Test for gas tightness turn the gas supply on and purge according to GB BS 6891 and in IE I S 813 Domestic Gas Installations 7 2 Checklist before commissioning 7 2 1 Preliminary electrical checks Important Consideration must be given to Health Safety Document 635 The Electricity at Work Regulations 1989 Prior ...

Page 42: ...n de aeration has completed the display will show the primary flow temperature and the CH symbols Important If during the first commissioning process the power to the boiler is interrupted the de aeration function will re start automatically at the point which it stopped once power is restored Caution If the system is drained in the future even partly when replacing a radiator for example the de a...

Page 43: ... checking combustion Ensure the system is cold and the gas and electric supplies are turned on Important The person carrying out a combustion measurement should have been assessed as competent in the use of a flue gas analyser and the interpretation of the results 1 Combustion test point 2 Incoming air for combustion test point Important Allow the combustion to stabilise before inserting the Combu...

Page 44: ...ppear in the display indicating maximum output 5 After checking at maximum turn the CH knob fully anticlockwise 0 will appear in the display indicating minimum output Measuring the combustion Turn on the domestic hot water tap Carry out inlet working gas pressure gas rate and combustion checks Once all relevant tests are completed take out of chimney sweep mode by turning the DHW control knob cloc...

Page 45: ...internal flue seals door case seals Replace any seals that appear unsound Is CO 350ppm and CO CO2 ratio 0 004 TURN APPLIANCE OFF Call 0344 871 1545 for advice The appliance MUST NOT be commissioned until all problems are identified and resolved If commissioning cannot be fully completed the appliance must be disconnected from the gas supply in accordance with the GSIUR Note Check record the CO com...

Page 46: ... in the User Guide 4 Hand over the User Guide and Installation and Servicing Instructions giving advice on the necessity of regular servicing 5 For IE it is necessary to complete a Declaration of Conformity to indicate compliance with I S 813 An example of this is given in I S 813 Domestic Gas Installations This is in addition to the Benchmark Commissioning Checklist 6 Set the central heating and ...

Page 47: ...orms a series of tests after which the installation is purged this takes approximately five minutes 8 3 Frost protection Where possible draining the system should be avoided If the system is to be unused during winter months several precautions must be taken Any parts of the system that are in unheated areas of the dwelling should be fitted with a device such as a pipe thermostat or frost thermost...

Page 48: ...cked The integrity of the complete flue system and the flue seals by checking air inlet sample to eliminate the possibility of recirculation O2 20 6 CO2 0 2 The integrity of the boiler combustion circuit and relevant seals The operational gas inlet pressure and the gas rate The combustion performance as described in Check the Combustion Performance below Competence to carry out checking combustion...

Page 49: ...iate 1 Ensure that both the gas and electrical supplies to the boiler are isolated and that the boiler is cool 2 Remove the case front panel and hinge down the control panel See Specific maintenance instructions page 51 3 Disconnect the pipe from the top of the condensate trap and the drain pipe from the condensate drain pipe connection Undo the screw securing the bracket and trap to the boiler lo...

Page 50: ...e boiler from the gas electrical supplies 2 Remove the front panel 3 Remove the silencer 4 Disconnect the spark electrode lead and earth wire from the detection spark electrode 5 Remove the clip securing the gas feed pipe to the fan Disconnect the pipe 6 Completely remove the combustion chamber burner door assembly by unscrewing the four M6 nuts and drawing it forwards to disengage it from the hea...

Page 51: ...key remove the retaining screws securing the electrode to the combustion chamber door and remove the electrode noting its orientation 3 Fit the new electrode with the sealing gasket 4 Reassemble in reverse order 9 3 2 NTC flue sensor 1 Turn the sensor 90 anticlockwise to remove it is a bayonet connection 2 Ease the retaining tab on the sensor away and disconnect the electrical plug 3 Fit new senso...

Page 52: ... the pressure gauge capillary replace if necessary 5 Reassemble in reverse order with the new pressure gauge 9 3 6 Safety pressure relief valve 1 Safety pressure relief valve 2 O ring seal 3 Sealing grommet 4 Discharge pipe 5 Grub screw 1 Drain the primary circuit 2 Disconnect the discharge pipe from the valve and remove the sealing grommet 3 Using a suitable hexagon key undo the grub screw suffic...

Page 53: ... 1 bar 9 3 8 Gas valve Tab 22 Characteristics of combustion Potterton Assure System Case front panel on CO2 maximum 9 0 0 3 0 2 minimum 8 5 0 1 0 4 Important After replacing the gas valve the CO2 must be checked and adjusted Only change the valve if a suitable calibrated combustion analyer is available operated by a competent person 1 Undo the screw and disconnect the electrical plug 2 Turn the ga...

Page 54: ...mum 8 8 0 3 0 2 6 It is possible to alter the CO2 by adjustment of the gas valve Remove the plastic cover from the Throttle Adjustment Screw At maximum rate the throttle adjustment screw should be turned using a suitable hexagon key until the correct reading is obtained Turning clockwise will reduce the CO2 Turning anticlockwise will increase the CO2 7 The CO2 must then be checked at minimum rate ...

Page 55: ...drain the boiler primary circuit 3 Disconnect the electrical plugs from the pump motor 4 Prise off the securing clip that is holding the pump return pipe in position Pull away the pipe 5 Pull out the securing clip that is holding the pump body to the hydraulic inlet assembly 6 Prise off the securing clip and disconnect the braided hose from the pump body taking care as water may still be in the ho...

Page 56: ...me failure during normal operation 125 is displayed in either of two situations If between 15 and 30 seconds of the burner lighting the primary water temperature has not changed by 1 C If within 10 minutes of the burner lighting the primary water temperature actual temperature twice exceeds the selected temperature by 30 In these instances poor primary circulation is indicated By pressing the Rese...

Page 57: ...or re occurs regularly check all PCB connections If this has no effect replace the PCB Fan runs at correct speed 160 flashing Go to section C Spark at ignition electrodes up to 5 seconds for 3 attempts Go to section F Press the reset button for 1 to 3 seconds Burner lights Go to section E Burner goes out after 5 seconds 128 flashing Go to section G NO 109 flashing 125 flashing after 1 min Go to se...

Page 58: ...minutes check 230V at PCB X13 connector between blue brown see Wiring Diagram NO Replace PCB YES 230V between PCB X13 connector blue and PCB X11 connector black see Wiring Diagram NO Replace PCB YES 230V at pump YES Replace pump NO Check wiring YES NO Replace PCB Replace fan or wire YES YES Temperature sensor faulty Check correct location and wiring NO D Replace sensor Cold resistance approximatel...

Page 59: ...ve CO2 values see instruction 2 Flame sensing electrode and lead connections 3 Flame sensing electrode position 1 2 G Replace flame sensing electrode or PCB Replace PCB YES Replace safety thermostat YES YES Safety thermostat operated or faulty Check for and correct any system faults H Allow to cool Continuity across thermostat terminals more than 1 5 ohm NO Check Flow Return Sensors see section D ...

Page 60: ...or NO System fault correct NO YES Ensure that the boiler and system are fully vented Check flow temperature sensor connections and position Cold resistance approximately 10k Ω 25 C CH sensors resistance reduces with increase in temp YES Go to section B K Is there 230V at Diverter valve motor Replace motor 1 YES PCB X13 connector terminals between Blue Black central heating mode Blue Brown domestic...

Page 61: ...sioning procedure Disconnect the gas electric supplies and isolate them Drain the primary circuit and disconnect the filling device Dismantle the chimney system and remove the boiler from the wall mounting frame 11 Decommissioning 61 ...

Page 62: ...12 Disposal 12 1 Disposal and recycling Caution Removal and disposal of the boiler must be carried out by a qualified person in accordance with local and national regulations 12 Disposal 62 ...

Page 63: ...ignition electrode 7686344 C Flow sensor and return sensor 7207471 D NTC flue sensor 7207892 F Auto air vent 7207776 G Burner door assembly 7686323 H Insulation rear 7661741 J Insulation front 7661745 K Pump assembly 7684006 L Expansion vessel 7683801 O Hydraulic pressure switch 5114748 P Gas valve 7683968 R Pump head 7686336 Q Fan 7683926 Fig 62 Spare parts PN 0000366 D A H J C B G O L P K R Q F ...

Page 64: ...n e p m o c start control Time and temperature control to hot water Cylinder thermostat and n o i t a n i b m o C r e m i t r e m m a r g o r p Boiler Heating zone valves t o N d e t t i F required Hot water zone valves t o N d e t t i F required Thermostatic radiator val t o N d e t t i F s e v required Automatic bypass to t o N d e t t i F m e t s y s required Boiler interlock Provided Customer ...

Page 65: ... register No Record At max rate CO ppm AND CO At min rate Where Possible CO ppm AND CO Comments Signature SERVICE 02 Date Engineer name Company name Telephone No Gas safe register No Record At max rate CO ppm AND CO At min rate Where Possible CO ppm AND CO Comments Signature SERVICE 03 Date Engineer name Company name Telephone No Gas safe register No Record At max rate CO ppm AND CO At min rate Wh...

Page 66: ...pany name Telephone No Gas safe register No Record At max rate CO ppm AND CO At min rate Where Possible CO ppm AND CO Comments Signature SERVICE 09 Date Engineer name Company name Telephone No Gas safe register No Record At max rate CO ppm AND CO At min rate Where Possible CO ppm AND CO Comments Signature SERVICE 10 Date Engineer name Company name Telephone No Gas safe register No Record At max ra...

Page 67: ...ing gas inlet pressure and gas rate 18 LPG 19 4 kW CH Pnc Condensing 24 LPG 25 8 kW CH Pnc Condensing 4 1 General description Tab 15 The boiler is set to give a maximum output of The boiler is factory set for use on Propane G31 Potterton Assure System Gas council numbers 3 1 3 Gas category Tab 2 Gas category type and supply pressure Gas category Gas type Supply pressure mbar II2H 3P G31 37 3 2 1 T...

Page 68: ...nd conditions visit www baxi co uk terms Failure to adhere to terms and conditions will void your manufacturer s warranty Baxi Brooks House Coventry Road Warwick CV34 4LL Please ensure the boiler is installed in accordance with these installation instructions and that you adhere to the Building Regulations e oe All descriptions and illustrations provided in this document have been carefully prepar...

Reviews: