


Voyager 9520/40
Voyager GS9590
Eclipse 5145
Quick Start Guide
VG-ECL-QS Rev B
10/11
Aller à
www.honeywellaidc.com
pour le français.
Vai a
www.honeywellaidc.com
per l'italiano.
Gehe zu
www.honeywellaidc.com
für Deutsch.
Ir a
www.honeywellaidc.com
para español.
Para Português, acesse
www.honeywellaidc.com.br
.
Перейти
на
русскоязычный
сайт
www.honeywellaidc.com
.
日本語 :
www.honeywellaidc.com
をご覧ください。
如要到中国
www.honeywellaidc.com
(
简体)
。
한글
www.honeywellaidc.com
로
이동합니다
.
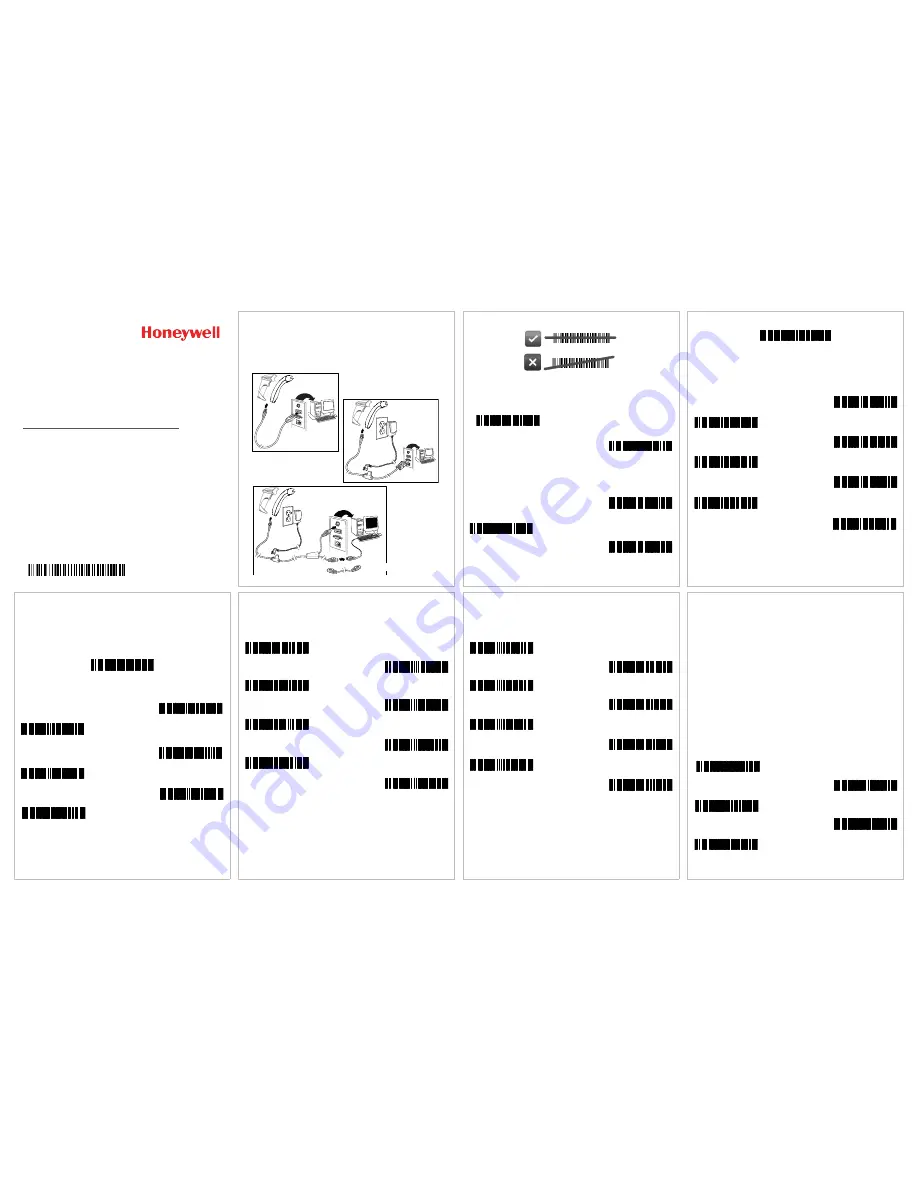
Getting Started
Turn off the computer’s power before connecting the scanner, then
power up the computer once the scanner is fully connected.
Connecting the Scanner
USB:
Serial
(RS232):
Keyboard
Wedge:
optional adapter cable
Reading Techniques
Recall Defaults
Scan
Enable Factory Defaults
, then
Recall Defaults
to reset all
standard product default settings.
Interface Selections
USB
³
9 9 9 9 9 8
Recall Defaults
³
8 4 6 6 0 0
Enable Factory Defaults
³
9
9
9
9
7
0
³
3
1
6
4
0
0
USB Keyboard
Emulation
Load Integrated Full
Speed USB IBM/OEM
Defaults
³
3
1
6
4
6
0
USB Serial Emulation
Keyboard Wedge
Keyboard Country
Scan a bar code to select one of the following keyboard country
templates. Refer to your Configuration Guide for additional keyboard
country settings.
³
5
1
5
5
1
4
3
Keyboard Wedge Emulation
³
4
1
6
2
1
0
³
4
1
6
2
2
0
United Kingdom
³
4
1
6
2
3
0
Germany/Austria
France
³
4
1
6
2
6
0
United States
³
4
1
6
2
0
0
Belgium
³
4
1
6
2
5
0
Spain
³
4
1
6
2
4
0
Italy
ALT Mode
If your bar code contains special characters from the extended ASCII
chart, for example, an e with an accent grave (è), scan the
ALT Mode
On
bar code. The data is then output with the special character(s).
Note: Scan ALT mode after scanning the appropriate Keyboard
Country code.
RS232 Communication Commands
³
1
1
6
2
1
7
ALT Mode On
³
1
1
5
8
1
6
RTS/CTS
Handshaking On
³
1
1
5
9
1
4
XON/XOFF On
³
1
1
5
9
1
3
ACK/NAK On
³
1
1
6
0
1
3
8 Data Bits
³
1
1
6
0
1
4
1 Stop Bit
³
3
1
6
0
4
5
No Parity
Prefix
Scan one of the following bar codes to program your scanner to add
or remove a start of text character, or AIM, NCR, or Nixdorf
identification characters before each bar code.
³
1
1
6
6
1
5
³
1
1
6
6
0
5
³
1
0
7
9
0
5
³
1
0
7
9
0
1
STX Prefix On
STX Prefix Off
³
1
0
7
9
1
5
AIM ID Prefix On
AIM ID Prefix Off
³
1
0
7
9
1
1
NCR Prefix On
NCR Prefix Off
³
1
0
7
9
0
7
³
1
0
7
9
1
7
Nixdorf Prefix On
Nixdorf Prefix Off
Suffix
Scan one of the following bar codes to program your scanner to add
or remove a carriage return, line feed, tab, or end of text after each
bar code.
³
1
1
6
6
1
3
³
1
1
6
6
0
3
³
1
1
6
6
0
4
CR Suffix On
CR Suffix Off
³
1
1
6
6
1
2
LF Suffix On
³
1
1
6
6
0
2
LF Suffix Off
³
1
1
6
6
1
0
Tab Suffix On
³
1
1
6
6
0
0
Tab Suffix Off
³
1
1
6
6
1
4
ETX Suffix On
ETX Suffix Off
User Configurable Prefix/Suffix
One or two prefix or suffix characters can be added and assigned for
data transmission. Use one of the codes below with a 3 code byte
sequence that represents the desired character (see
ASCII
Conversion Chart
, end of document) for your prefix or suffix. (To add
additional prefix/suffix characters, refer to your Single-Line
Configuration Guide.)
Scan the
Enter/Exit Programming
bar code to begin. Then scan
the 3 digit decimal equivalent of the ASCII character into the
appropriate character location with the code byte bar codes (see
Code Bytes
, end of document). To save, scan the
Enter/Exit
Programming
bar code again.
Example: To add an asterisk (*) as a prefix, scan the bar codes:
1. Enter/Exit Programming
2. Configurable Prefix #1
3. Code Byte 0
4. Code Byte 4
5. Code Byte 2
6. Enter/Exit Programming
³
9
0
4
5
0
0
Configurable Suffix #1
³
9
0
4
6
0
0
Configurable Suffix #2
³
9
0
3
5
0
0
Configurable Prefix #1
³
9
0
3
6
0
0
Configurable Prefix #2
³
9
9
9
9
9
9
Enter/Exit Programming


