background image


Part 13

resolve the auto cutter problems per description in next item and then come 
back to deal with the paper jam. 

Never force open the top hood.

 Please also 

clear away any contaminants accumulated in the cutter track above the thermal 
elements. 


Auto Cutter Problems


In case any foreign materials like a staple or paper clip or excessive 

paper scraps fall into the auto cutter mechanism the auto cutter may lock up 
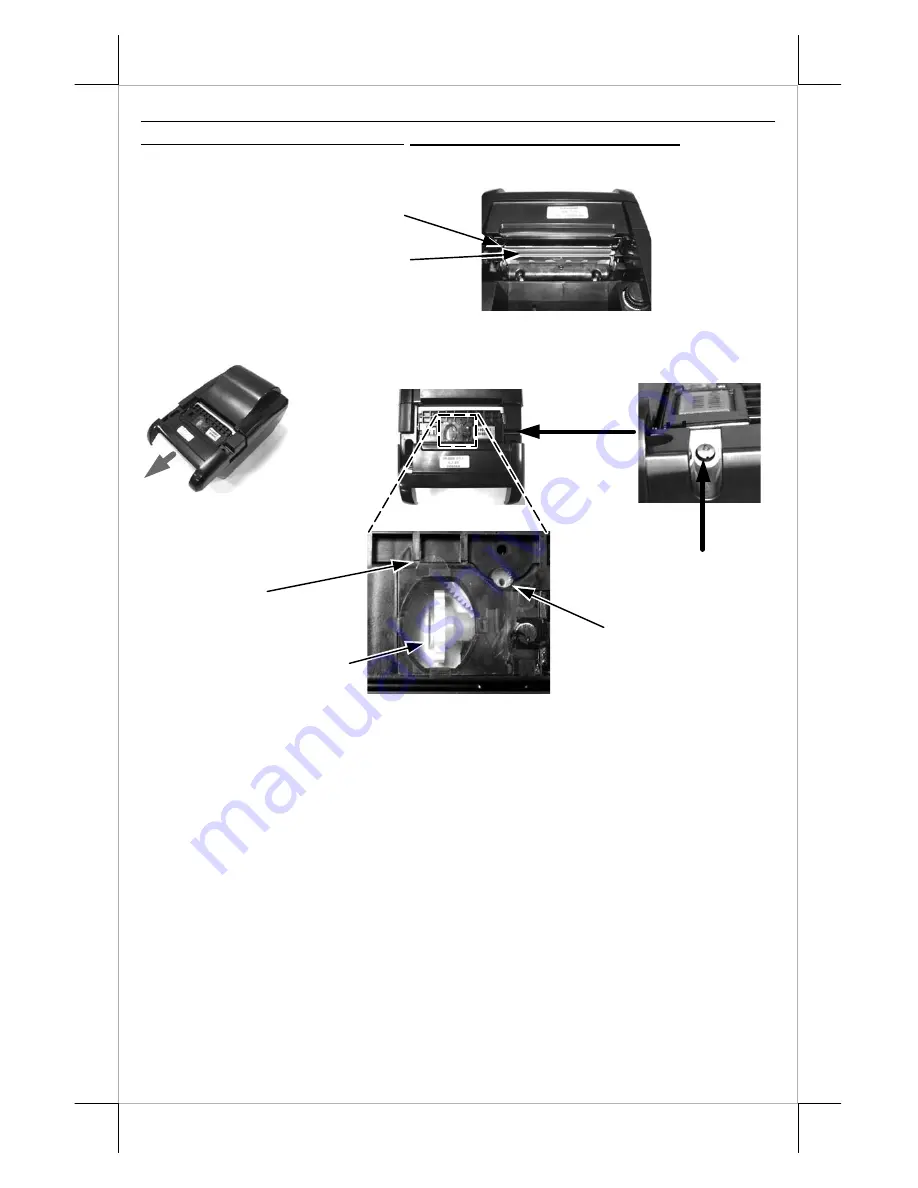
and so does the print hood. In such case, please pull the cutter cover forward to 
expose the cutter adjustment area. Apply some mechanical assistance in below 
procedures to help resetting the cutter blade back to its home position. Please 
lift up a transparent protective cover over the adjustment wheel with the printer 
powered off. Turn this wheel downward for 4 or 5 strokes. Close the cutter 
cover back and turn the printer power on to see if the auto cutter lock up 
problem is resolved. 

If the problem is not automatically resolved by above procedures, 

please power off the printer and open the cutter cover again. Check in the 
alignment window while turning the gear downward as above or with a small 
Phillips screwdriver at the right side of the cutter mechanism. When the cutter 
blade returns to its standard position, a hole in the white plastic gear will show 
up in the window as illustrated in detailed picture above. Close the cutter cover 

Auto Cutter Track 

Thermal Elements 

Open Cutter Cover 
when hood locked 

Lift transparent 
protective foil 

Alignment window 

Adjustment area detailed below 

Use screwdriver 

Turn the adjustment wheel 
downward for few strokes 

Summary of Contents for PP-8000

Page 1: ...ther errors or omissions contained herein nor for direct indirect incidental consequential or otherwise damages including without limitation loss of data or profits resulting from the furnishing performance or use of this material This information is provided as is and Posiflex Technologies Inc expressly disclaims any warranties expressed implied or statutory including without limitation implied w...

Page 2: ...ace and Centronics for parallel interface The Aura PP 8000L series connects to a LAN port of Posiflex POS systems The Aura PP 8000U series connects to an USB port of Posiflex POS systems and simulates a RS232 device through driver and performs thermal printing particularly designed for POS applications The Aura PP 8000 series is already WEPOS Windows Embedded for Point Of Service compliant Aura pr...

Page 3: ...l c No interface cable for PP 8000L d USB cable for Aura PP 8000U Length of the interface cable depends on whether the order includes the power adaptor When power adaptor is included the interface cable is 6 ft long for stand alone application When the power adaptor is not included in the order the interface cable is a shorter one for integrated application in Posiflex POS system 5 One of the powe...

Page 4: ...ront View Bottom View Bottom Cover Power Switch Power LED Error LED Paper Out LED FEED Switch Top Hood Top Cover Hood Release Cutter Cover Paper Exit Rubber Foot Window Plate Screw Setup Window Plate Wall Mount Hanging Hole Rubber Foot ...

Page 5: ...red brief lit indicates printer busy Paper Out LED red Paper Exit Serial Port Peripheral Port Parallel Port Frame Ground Screw Power Connector USB Port LAN Port Reset Pin Hole for LAN I O Area for PP 8000U I O Area for PP 8000L USB Adaptor Fixation Screw I O Area for PP 8000 ...

Page 6: ...gnal or a red line appears on the thermal paper it is the proper timing for replacing the paper Do not wait till the print engine is dragging the paper roll at the very end Remove the leftover and replace a new paper roll as illustrated above to prevent excessive paper dust in the printer and consequently possibility for paper jam CONNECTING CABLES Serial Connection All the external connectors are...

Page 7: ...nter Please also note that to keep LAN interface operative please adjust in setup window the switch position 1 to OFF and position 2 to ON leaving the rest unchanged as factory default setting DO NOT CONNECT THE PERIPHERAL DEVICE TO THIS PORT The LAN port is 10 100BaseT compliant USB Connection The USB connector on PP 8000U is a type B USB connector at lower right position below the serial port Us...

Page 8: ... plug Such damage is considered as an artificial destruction and is not covered by the warranty Power On When all the above cable connections are made correctly you may connect your power adaptor to the wall outlet Make sure that the type of power cord and the voltage requirement of the power adaptor meet the local power conditions Now the printer is ready for power on Self Test Press and hold dow...

Page 9: ...cing plate and an internal DIP switch setting Please refer to the last chapter of this manual for the DIP switch setting Please refer to the middle picture above for the 58 mm paper spacing plate with its flange at top edge showing out Insert the noted corners of the spacing plate into the 3 dents inside the paper roll compartment as arrowed in the left picture above with point A goes in first The...

Page 10: ...l pen tip or straightened end of paper clip to push and hold for at least 5 seconds into this hole will reset the LAN setup of the printer back to the default values at delivery so the user may re do all setup The LAN setup can be viewed in second paragraph of self test printout for the PP 8000L LAN POS Printer Manager This utility can be used to manage multiple PP 8000L s connected in same networ...

Page 11: ...e exit as in the picture below You can clean the thermal elements of the print head and paper sensor gently using a cotton swab moistened with isopropyl alcohol solvent NOTE Never do this when print head is still hot Do not touch the print head thermal elements Do not scratch the print head Before putting back the paper roll for printing alcohol solvent must be dried completely TROUBLE SHOOTING Th...

Page 12: ... check for paper jam described in next item If there is no paper jam and the print head is not overheated turn off the printer and wait for half a minute then turn it back on If the problem still remains contact a qualified service person Nothing can be printed with ERROR LED OFF Try to run self test according to previous chapter to check if the printer itself works properly If the self test passe...

Page 13: ...er over the adjustment wheel with the printer powered off Turn this wheel downward for 4 or 5 strokes Close the cutter cover back and turn the printer power on to see if the auto cutter lock up problem is resolved If the problem is not automatically resolved by above procedures please power off the printer and open the cutter cover again Check in the alignment window while turning the gear downwar...

Page 14: ...com tw for details of the technical information such as driver installation DIP switch settings and command sets etc if required Place the printer on a sturdy level surface Choose a place that is well ventilated and free of excessive dust smoke or fume Do not put the printer under direct sunlight or near a heater Ideal room temperature is from 5ºC to 40ºC Ideal humidity is from 20 to 85 RH no cond...

Page 15: ...uing thermal paper If thermal paper touches anything containing phthalic acid ester plasticizer for a long time the image formation ability may be reduced or the printed image may fade Use of volatile organic solvents such as alcohol ester and ketone or some adhesive tapes on thermal paper can cause discoloration Thermal paper must not be stored with the printed surfaces against each other as the ...

Page 16: ...x 0 125 mm Input power type DC Input voltage 24 V 5 Dimension mm 148 W x 205 D x 143 H Weight 1 2 Kg net PAPER PAPER TYPE THERMAL ROLL PAPER Paper roll formation External side is heat sensitive side Paper width 80 or 58 0 1 mm Paper roll outer diameter 83 mm max Paper roll inner diameter 12 1 0 mm Paper thickness 60 80 um POWER ADAPTOR ITEM REQUIREMENT Input voltage 100 V AC 240 V AC Input frequen...

Page 17: ...Cut without paper feed Cut with auto paper feed 7 CR code 0Dh effective CR code 0Dh invalid 8 Factory internal setting Application standard mode Effect of positions 1 2 on baud rate is defined as in table below with parity check set according to position 3 number of data bits always set to 8 and stop bit set to 1 When the interface used is anything other than RS232 please still set these 2 switche...

Page 18: ...0Dh with also a line feed LF code or 0Ah action Then if the text editor always express the change to a new line with both the CR and LF codes there will be an extra line advance than expected However it works for some old editors that express the change to a new line with only either one of the LF code or the CR code For switch position 8 when it is set to ON in the field the printer maybe subject...

Page 19: ...ch time the top hood is closed e g after paper roll loading with the printer in operating condition However when there is no spill protect cover it is recommended to set to OFF and the manual cutter can be engaged whenever necessary MULTIPLE INTERFACE ISSUE For model PP 8000 there are 2 connectors for host connection through RS232 or parallel For PP 8000U there are 3 connector for host connection ...

Page 20: ...e paper roll shaft should go through the paper roll and seat in hold on paper roll compartment wall as indicated by arrows in middle picture above and the paper roll should be in the orientation as in the right picture above The paper near end sensor must be readjusted for wall mount application as it approaches the paper roll from different direction for desktop application For wall mount applica...

Reviews: