POSIFLEX LM-7115 User Manual Download Page 8

Part 8

IX. OSD

(ON SCREEN DISPLAY) SCREEN ADJUST FUNCTION

A. OSD 

buttons 

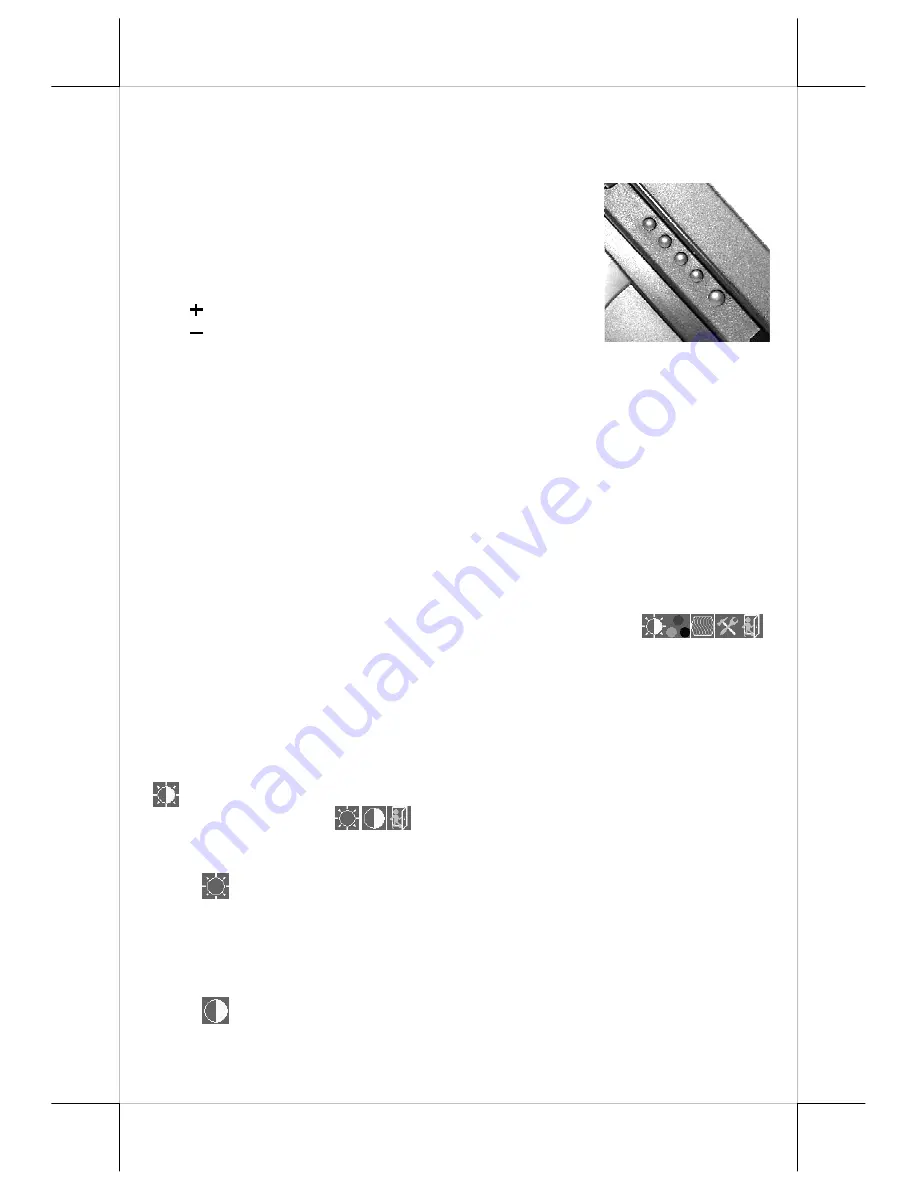
The 4 OSD control buttons are above the power 

switch button on left side of the LCD panel. 

“OSD” button

: To enter OSD setup menu, or to 

perform function selected in OSD operation. 

“NXT” button

: To go to next option function. 

” 


” button

: To increase setting value. 


” button

: To decrease setting value. 

B. 

OSD functions

Press “OSD” button with a normal display on the screen to activate the OSD 
functions (On Screen Display adjustment). The OSD window will pop up on 
the screen. On top part of this window is a Posiflex logo with the OSD 
firmware version indicated to its lower right. Below this area is a row of icons 
for main OSD menu. Below the main menu is a group of icons for submenu 
that corresponds to one icon selected in the main menu. An analysis of the 
video signal on resolution and refresh rate will be displayed at the bottom. 
Applicable icons in the main menu and its subsequent menus are explained 
below. 

MAIN MENU

”: There are in total 5 icons in this menu: One of the 5 icons 

will  be  displayed  in  inverted  color  to  indicate  its                                      
relationship with the submenu below. Pressing “NXT” button will shift the 
selected icon one by one from left to right and then wrap around to the most 
left. Press “OSD” button to enter the selected sub menu. If there is no button 
for OSD setting is pressed within a period of time (about 5 seconds to 1 minute 
as programmed) the OSD window will disappear with all the adjusted 
parameters saved. Explanations on items in sub menu are as below. 

“BRIGHTNESS / CONTRAST ADJUST SUBMENU”:

 There are 3 

icons in this submenu: 

Press “OSD” button to select item or return 

to main menu. Press “NXT” button to select among brightness, contrast and 
exit. 

“BRIGHTNESS ADJUST”:

 When this item is selected, there 

will be only the brightness icon with an adjustment indication bar under 
it between the main menu area and the video signal mode. Press “+” 
button to increase brightness. Press “-” to decrease. Press “OSD” button 
to save the current setting and return to “Brightness/Contrast submenu”. 

“CONTRAST ADJUST”: 

When this item is selected, there will 

be only the contrast icon with an adjustment indication bar under it 
between the main menu area and the video signal mode. Press “+” 

Summary of Contents for LM-7115

Page 1: ...o cause interference in which case the user at his own expense will be required to take whatever measures to correct the interference WARRANTY LIMITS Warranty will terminate automatically when the mac...

Page 2: ...M 7 Option RS232 cable 8 Option Audio cable III PARTS IDENTIFICATION A FRONT VIEW B SIDE VIEWS Display Screen Touch Panel Main Unit Adjustable Base Assembly Option FA 200 Logo Power Indicator Lock rel...

Page 3: ...ry No matter the kit it contains MSR only finger print sensor only or both options the connection to the LM TM 7115 7115N monitor is through an internal cable in right side cover of the LCD touch unit...

Page 4: ...unit back onto base stand assembly by matching the matching pegs to round part of matching holes and slide them down to slot part till the rear lock release button clicks Connect the VGA cable USB cab...

Page 5: ...ion of the CD ROM For Linux environment please find the setup program for the suitable kernel in the same directory and install the required driver and calibration program as the setup program proceed...

Page 6: ...touch accuracy Time delay to Touch_to_Calibrate This selection box defines the touch time required for a shortcut to Touch Calibrator by up down arrows beside the box when the Enable Touch_to_Calibrat...

Page 7: ...creen in multiple monitor application In using the MSR of the side mounted upgrade option for reading a magnetic stripe card be sure to insert the card to the bottom with magnetic stripe facing the ma...

Page 8: ...is menu One of the 5 icons will be displayed in inverted color to indicate its relationship with the submenu below Pressing NXT button will shift the selected icon one by one from left to right and th...

Page 9: ...h the selection Press OSD button to make the choice ACCEPT Accept the reset result REJECT Decline the reset and return to previous setting COLOR BALANCE ADJUST When this item is selected there will be...

Page 10: ...ndication bar under it between the main menu area and the video signal mode Press button to increase horizontal size Press to decrease Press OSD button to save the current setting and return to Geomet...

Page 11: ...ea and the video signal mode Press button to shift OSD window right Press to shift left Press OSD button to save the current setting and return to OSD submenu OSD VERTICAL POSITION When this item is s...

Page 12: ...bits or 16 2 M colors Supported display modes are as in the table Display Resolution Refresh Rate Hz Horizontal Frequency KHz 640 400 70 31 5 60 31 5 72 37 9 640 480 75 37 5 720 400 70 31 5 56 35 1 60...

Reviews: