background image

56808

Visit our website at: http://www.harborfreight.com

Email our technical support at: [email protected]

Owner’s Manual & Safety Instructions

Save This Manual


Keep this manual for the safety warnings and precautions, assembly, 

operating, inspection, maintenance and cleaning procedures.  Write the product’s serial number in the 
back of the manual near the assembly diagram (or month and year of purchase if product has no number). 
Keep this manual and the receipt in a safe and dry place for future reference. 

20k

When unpacking, make sure that the product is intact 

and undamaged.  If any parts are missing or broken, 

please call 1-888-866-5797 as soon as possible.

Copyright

©

 2020 by Harbor Freight Tools

®

.  All rights reserved.  

No portion of this manual or any artwork contained herein may be reproduced in 

any shape or form without the express written consent of Harbor Freight Tools.  

Diagrams within this manual may not be drawn proportionally.  Due to continuing 

improvements, actual product may differ slightly from the product described herein.  

Tools required for assembly and service may not be included.

Read this material before using this product. 
Failure to do so can result in serious injury. 
SAVE THIS MANUAL.

Summary of Contents for 56808

Page 1: ...eference 20k When unpacking make sure that the product is intact and undamaged If any parts are missing or broken please call 1 888 866 5797 as soon as possible Copyright 2020 by Harbor Freight Tools All rights reserved No portion of this manual or any artwork contained herein may be reproduced in any shape or form without the express written consent of Harbor Freight Tools Diagrams within this ma...

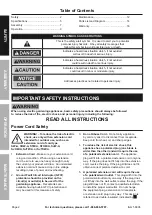
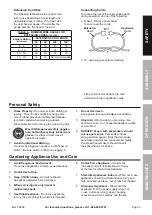
Page 2: ...n cord is in good condition When using an extension cord be sure to use one heavy enough to carry the current your product will draw An undersized extension cord will cause a drop in line voltage resulting in loss of power and overheating 2 Ground Fault circuit interrupter GFci protection should be provided on the circuit s or outlet s to be used for the gardening appliance Receptacles are availab...

Page 3: ...se face or dust mask if operation is dusty 3 avoid Unintentional Starting Do not carry plugged in appliance with finger on switch Be sure switch is off when plugging in 4 Do not Overreach Keep proper footing and balance at all times 5 Stay alert Watch what you are doing Use common sense Do not operate appliance when you are tired 6 DanGEr people with pacemakers should not use pole saws Pole saws p...

Page 4: ...ing use Nicotine reduces the blood supply to the hands and fingers increasing the risk of vibration related injury 3 Wear suitable gloves to reduce the vibration effects on the user 4 Use appliances with the lowest vibration when there is a choice between different processes 5 include vibration free periods each day of work 6 Grip appliance as lightly as possible while still keeping safe control o...

Page 5: ... kickback forces Kickback forces can be controlled by the operator if proper precautions are taken Do not let go of the garden power tool b Do not overreach This helps prevent unintended tip contact and enables better control of the garden power tool in unexpected situations c Only use replacement bars and chains specified by the manufacturer Incorrect replacement bars and chains may cause chain b...

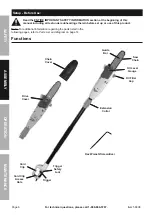
Page 6: ...is manual including all text under subheadings therein before set up or use of this product note For additional information regarding the parts listed in the following pages refer to Parts List and Diagram on page 14 Functions Hex Wrench Screwdriver Oil Filler cap Extension collar trigger cord clip cord clip access Hole trigger Safety lock Saw chain Guide bar Oil level Gauge Drive cover chain cove...

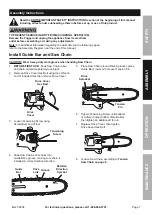
Page 7: ...ar heavy duty work gloves when handling Saw chain 1 bEFOrE FirSt USE Soak Saw Chain in bar and chain oil sold separately overnight 2 Remove Drive Cover Hex Bolt using Hex Wrench end of included tool then remove Drive Cover Drive cover Drive cover Hex bolt 3 Loosen Tensioning Screw using Screwdriver end of tool tensioning Screw 4 Slide Saw Chain s drive links into Guide Bar s groove making sure cha...

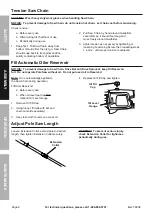
Page 8: ...y by tightening or loosening Tensioning Screw then repeating steps 1 and 2 until proper tension is achieved Fill automatic Oiler reservoir nOticE to prevent damage to Saw chain Drive bar and Drive Sprocket keep Oil reservoir full Do not operate pole Saw without oil Do not put used oil in reservoir note Oil is automatically applied to the Saw Chain during operation Fill Oiler Reservoir a Before eve...

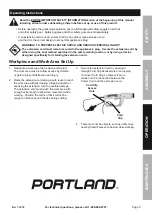
Page 9: ...e knot method explained in the safety warning section or by using a device designed specifically for retaining the extension cord Workpiece and Work area Set Up 1 Designate a work area that is clean and well lit The work area must not allow access by children or pets to prevent distraction and injury 2 Route the extension cord along a safe route to reach the work area without creating a tripping h...

Page 10: ...8 d Make sure Saw Chain is sharp DUrinG EVEry USE a Check tension often during the first half hour of use and periodically during use Adjust tension as necessary see tension Saw chain on page 8 b Check oil level every 10 minutes of use Fill oil reservoir when oil level reaches MIN mark on Oil Level Gauge see Fill automatic Oiler reservoir on page 8 1 Connect extension cord to 120VAC outlet 2 To st...

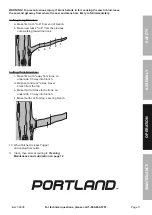
Page 11: ... first cut 4 to 6 from end of branch b Make next cuts 4 to 6 from the previous cuts working toward the trunk 1 2 3 4 5 cutting thick branches c Make first cut 6 away from trunk on underside 1 3 way into branch d Make second cut 2 away Sever branch from the top e Make third cut close to the trunk on underside 1 3 way into branch f Make fourth cut from top severing branch 10 When finished release Tr...

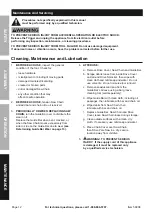
Page 12: ...ervoir 3 pEriODically Or WHEn rEplacinG SaW cHain turn the Guide Bar over to distribute the wear on it Replace the Guide Bar when bent cracked or when the Saw Chain moves excessively from side to side on the Guide Bar due to wear see Determining Guide bar Wear on page 13 4 aFtEr USE a Remove Drive Cover Saw Chain and Guide Bar b Scrape debris loose from inside Drive Cover and around Drive Sprocket...

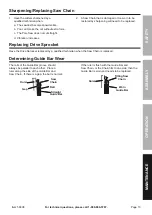
Page 13: ...be restored by sharpening will need to be replaced replacing Drive Sprocket Have the Drive Sprocket replaced by a qualified technician when the Saw Chain is replaced Determining Guide bar Wear The rails of the Guide Bar groove should always be parallel to each other Place a ruler along the side of the Guide Bar and Saw Chain If there is a gap the bar is normal Straight Guide bar ruler rail Saw cha...

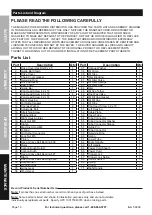
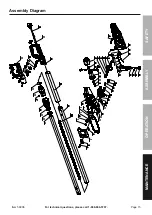
Page 14: ...be Connector 1 55 Tube Connector Washer 1 56 Tube Connector Sleeve 1 57 Guide Pin 1 58 Tube Connector 1 59 Retaining Ring 1 60 Spring 1 61 Lower Tube 1 62 Foam Handle 1 63 Left Handle 1 64 Power Cord Sheath 1 65 Power Cord 1 66 Trigger Lock 1 67 Trigger Lock Spring 1 68 Control Switch 1 69 Spring 1 70 Trigger 1 71 Right Handle 1 record product s Serial number Here note If product has no serial num...

Page 15: ...Page 15 For technical questions please call 1 888 866 5797 Item 56808 SaFEty OpEratiOn MaintEnancE aSSEMbly assembly Diagram ...

Page 16: ...lusion or limitation of incidental or consequential damages so the above limitation of exclusion may not apply to you THIS WARRANTY IS EXPRESSLY IN LIEU OF ALL OTHER WARRANTIES EXPRESS OR IMPLIED INCLUDING THE WARRANTIES OF MERCHANTABILITY AND FITNESS To take advantage of this warranty the product or part must be returned to us with transportation charges prepaid Proof of purchase date and an expl...

Reviews: