background image

19

Warranty Exclusions

Commercial Use

All SprayMaxx machines are covered for a period of 

1 year

 (unless stated 

otherwise) from the date of purchase by the Owner, when used for the 
designed purpose of that product by Domestic Users or if stated otherwise. 
When used for commercial or hire purposes the warranty is only valid for 

3 months

 from date of purchase. Claims under warranty will be accepted 

up to 15 months from date of invoice to the distributor, after which proof 
of date of purchase is required. Charges for dealer repairs to SprayMaxx 
products under warranty, will only be accepted if 

agreed in advance

.

Abuse

Failure as a result of neglect, such as improper operation. Lack of service/
maintenance or continued operation after discovery of a defect that leads 
to further damage.

Alterations

Any unauthorised alteration, modification, attachments or unauthorised 
repair to equipment.

Clean-Up Time

Portek does not pay for cleaning of products, parts or accessories or work 
area before or after the warranty repair.

Damage

Damages or machine/component failure caused by carelessness/
recklessness or accidental damage, improper operation, excessive speed, 
inappropriate storage or transportation.

Environmental 
Conditions and 
Application

Deteriorated or failed components such as o-rings, diaphragms, hoses, 
seals and connections damaged by corrosive chemicals, dirt and sand, 
excessive heat, moisture or other environmental impacts. Warranty 
determination on these type of failures will be made by Portek, only after 
inspection of the failed component.

Inability/
Unsuitability

In no event shall Portek be liable to any person for indirect or 
consequential damages or for injury or commercial loss resulting from any 
use or inability to use any SprayMaxx product.

Incorrect 
Maintenance

Component failure due to failure to perform maintenance services such 
as, oil and grease changes/top-ups, failure to clean tanks, pumps filters, 
nozzles and spray lines. Failure to tighten or replace loose or missing bolts, 
nuts, fittings, shields and covers.

Use of Non-
Genuine Parts

Use of parts other than Portek parts for repair of warranted items will 
automatically negate any warranty. Warranted components must be 
replaced with genuine parts.

Summary of Contents for SPRAYMAXX

Page 1: ...1 Read and fully understand the instructions before operating the Portek SprayMaxx Operator s Handbook portek co uk ATV UTV Mounted Sprayer 60 litre 90 litre models ...

Page 2: ...t 3 Safety Information 4 Introduction 5 Assembly 6 Set Up 7 Calibration 8 9 Filling Mixing Spraying 10 11 Cleaning Maintenance Storage 12 13 Parts Diagram Parts List 14 15 Technical Data 16 17 Warranty 18 19 Declaration of Conformity 20 ...

Page 3: ...iate instructions Respect technical data and safety precautions Do not use this product in any other way as stated for normal use Not observing general regulations in force and instructions from this manual does not make the manufacturer liable for damages Please note that our equipment has not been designed for commercial trade or industrial use If the equipment is used in commercial trade or ind...

Page 4: ...ol and increase risk of injury 2 Check for signs of wear or damage before using the SprayMaxx and after any impact and repair as necessary 3 The SprayMaxx is designed for use by adults Young people over 16 years may use the tool under supervision only 4 The manufacturer is not liable for damage which is caused through inappropriate use or incorrect operation WARNING Use Personal Protective Equipme...

Page 5: ...he product you intend using and your own safe work practices PPE must still be worn while cleaning decontaminating the SprayMaxx Care should be taken when spraying in windy conditions as spray drift may contaminate the air and may effect the operator or damage adjacent non target vegetation Once the spraying operation has been completed decontaminate the spray tank and spray accessories Dispose of...

Page 6: ...rtially fill the tank with clean water Connect the battery clips to a 12V DC power supply red to the positive terminal black to the negative terminal ensuring sufficient current capability amps to suit the pump The pump s maximum amperage requirement can be found on its name plate In order to prime the system and enable the pump to reach full pressure depress the hand lance trigger to release any t...

Page 7: ...oom you can connect it by the boom port on the side of the pump 4 Fill the SprayMaxx tank with water 5 Before running the pump make sure the regulator is fully open to avoid premature wear or damage to the pump Squeeze the hand gun trigger to start discharge and then adjust the pressure to your desired setting while keeping the gun trigger engaged NOTE To maximize the pump s life maintain pressure...

Page 8: ... make this easier 3 Drive Measured Distance Driving the sprayer at the intended spraying speed time how long it takes to travel between the marked distance Repeat this procedure a number of times and average the measurements ie average time across the number of runs Nozzle Spacing Distance to Travel 40cm 16 78m 255 45cm 18 70m 227 50cm 20 62m 204 55cm 22 56m 185 60cm 24 52m 170 Run 1 40 Seconds Ru...

Page 9: ...han 10 the nozzle should be replaced or cleaned A toothbrush works perfectly for this task 8 Compare Recommended Rate If the 1 gallon per acre rate is not within 5 of the intended rate you will have to adjust the pressure you spray at or the speed you travel You will have to repeat steps 3 7 Calibration Nozzle 1 16 5 oz Nozzle 2 16 3 oz Nozzle 3 15 9 oz Nozzle 4 15 3 oz Total 64 0 oz 64 ounces div...

Page 10: ...asuring jugs used only for this purpose Half fill the SprayMaxx with clean water then add the measured pesticide chemical Rinse out the measuring jug and empty the container Pour all rinsings into the spray tank Agitate by stirring with a suitable round edged paddle Top up the tank with water to the required level ensure that the tank is not over filled and the outside is clean and dry before handli...

Page 11: ...asing mixing and reducing spraying pressure To begin turn on the pump and activate the trigger or boom valve Adjust the regulator to achieve the desired pressure on the gauge Turn off the hand lance boom valve and check to ensure the pump is not turning rapidly on and off or cycling If the pump is cycling you will need to reduce the spraying pressure slightly until this stops NOTE To operate the h...

Page 12: ...eaning Solution and Water Add the recommended cleaning solution to the tank of water To mix run the agitator inside the sprayer Operate for 5 10 minutes to mix the cleaning solution with the water Let Sprayer Sit For 8 Hours With the water and cleaning solution left in the sprayer tank let it sit for about eight hours This will allow the solution to remove any herbicide from the residues inside th...

Page 13: ...ith a nozzle brush and allowed to dry Never blow through the nozzles with your mouth nor use wire or pins to clear any blockages When storing your spot sprayer ensure that it is clean and dry and kept in a well ventilated place STORAGE Drain Tank Fill the tank with clean water start the pump and open all spray ends If you have a spray gun or boom make sure you spray until clean water is coming thr...

Page 14: ...ied pre assembled 16 18 9 12 17 17 3 3 6 8 18 15 14 7 1 10 2 4 5 21 22 11 10 EXPLODED DIAGRAM For both 60 90 litre capacity SprayMaxx with a 12 volt pump NOTE Tank pictured is not indicative of every model but basic equipment is the same 19 20 13 ...

Page 15: ... 088 005 15 0L min Pump 17 088 097 1m Spray Hose 13mm 4 088 006 150mm Screw Lid 18 088 068 3 8 Hose Clamp 5 088 045 Basket Filter 19 088 016 3 8 Top Hat Grommet Suction 6 088 017 2 4m 12v Electrical Leads 19 088 015 1 2 Top Hat Grommet Suction 7 088 019 Pressure Regulator 20 088 015 1 2 Top Hat Grommet Return 8 088 021 12mm Threaded Elbow 21 088 025 M5 x 25 Screws BZP 9 088 020 19mm Elbow x13mm HB...

Page 16: ...Volt Pump 6m Hose and Hand Lance 2 4m Power Wiring c w Battery Clips 2x Ratchet Straps Order No 081 603 Capacity 15 0L min Dimensions W x L x H mm 1000 x 370 x 400 Weight full 75 kg 15L min Pump 60PSI 12 Volt Pump Pressure Regulator Gauge 6m Hose Hand Lance 2 4m Power Wiring c w Battery Clips 2x Ratchet Straps Easily mounted on the back on an ATV such as a quad bike these sprayers are fitted with ...

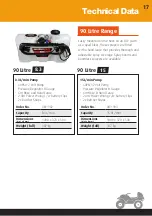
Page 17: ...unted on the back on an ATV such as a quad bike these sprayers are fitted with a hand lance that provides thorough and adjustable spray coverage Spray booms and boomless sprayers are available Order No 081 903 Capacity 15 0L min Dimensions W x L x H mm 1000 x 370 x 500 Weight full 107 kg 15L min Pump 60PSI 12 Volt Pump Pressure Regulator Gauge 6m Hose Hand Lance 2 4m Power Wiring c w Battery Clips...

Page 18: ... to hold Portek not liable for claims by their customers in excess of the obligations of Portek expressly set forth herein All products sold by Portek Limited are guaranteed to be free from defect in materials workmanship or manufacture for a period of 12 months from the initial date of purchase excepting the following exclusions Any parts products found by Portek to be defective either in materia...

Page 19: ...y repair Damage Damages or machine component failure caused by carelessness recklessness or accidental damage improper operation excessive speed inappropriate storage or transportation Environmental Conditions and Application Deteriorated or failed components such as o rings diaphragms hoses seals and connections damaged by corrosive chemicals dirt and sand excessive heat moisture or other environ...

Page 20: ...13 0LF declare that the machinery named below conforms to the requirements of EC Council Machinery Directive Annex II Designation of Machinery Portek SprayMaxx ATV Mounted Sprayer Relevant EC Council Directives 2014 30 EU 2006 42 EC 2011 65 EU The unit complies with all applicable Essential Requirements of the Directives Signature of Manufacturer s Representative Declaration made by Hugh David Man...

Reviews: