Portable USA PU-8C User Manual Download Page 17

                                                                         17                                                                                                                                   

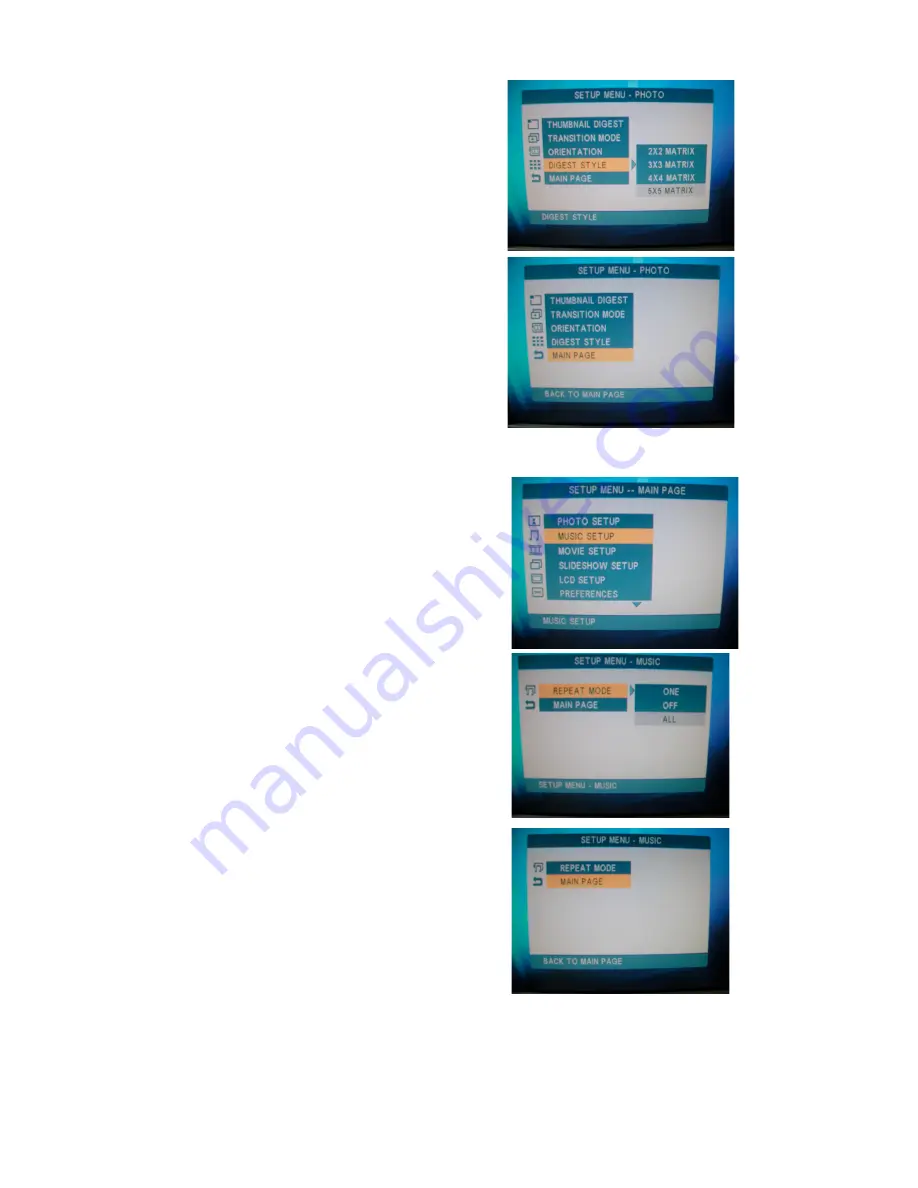
2.4.1.4 DIGEST STYLE 
You can set the DIGEST STYLE in “2X2 
MATRIS”, “3X3 MATRIX”, “4X4 MATRIX”    
& “5X5 MATRIX” mode. 
Press  

 button and then use

/

  buttons to 

select  Matrix size desired.


Press “ENTER” button to enter.


To exit the PHOTO SETUP menu, choose 
“MAIN PAGE” mode & press “ENTER” button. 


2.4.2 MUSIC SETUP 
In MUSIC SETUP menu, use  

/

 buttons to 

select “MUSIC SETUP”. 
Use “ENTER” button to enter “MUSIC 
SETUP” submenu. 


2.4.2.1 REPEAT MODE 
 You can set the REPEAT mode in “ONE”, 
“OFF” or “ALL” . 
Press  

  button and then use 

/

  buttons to 

select “ONE”, “OFF” or “ALL” setting mode.


Press “ENTER” button to enter. 


To exit the REPEAT mode, choose “MAIN 
PAGE” mode & press “ENTER” button. 


Summary of Contents for PU-8C

Page 1: ...1 Digital Photo Frame PU 8C User Manual Version 1 0J...

Page 2: ...t of your new Digital Photo Frame You should read through this manual before using the Digital Photo Frame to familiarize yourself with the various features and functions While we strive for complete...

Page 3: ...14 2 2 Video 14 2 3 Audio 15 2 4 Setting 16 2 4 1 Photo Set Up 16 2 4 1 1 Thumbnail Digest 16 2 4 1 2 Transition Mode 16 2 4 1 3 Orientation 16 2 4 1 4 Digest Style 17 2 4 2 Music Setup 17 2 4 2 1 Rep...

Page 4: ...2 4 6 5 OSD Message 22 2 4 6 6 Set Up Values 22 2 4 7 Mode Not Supported 23 2 5 File Explorer 23 2 5 1 Copy 23 2 5 2 Delete 24 2 5 3 Rename 24 2 5 4 New Folder 24 2 5 5 Properties 25 3 Troubleshootin...

Page 5: ...5 Safety Instructions...

Page 6: ...6 Package Contents Remote Control Adaptor Player AV cable User Manual Printed...

Page 7: ...o flash memory cards Support for MPEG4 for playing back film clips Playing an MP3 as background to a Slideshow A single stand or wall mount enabling you to place the Digital Photo Frame on a desk or m...

Page 8: ...16 17 18 19 20 21 22 23 24 25 26 27 1 Turn the power on and off 2 Video mode 3 Photo mode 4 Rotate the image in photo mode 5 Zoom the image 6 Used to navigate backwards 7 Show the file detail in photo...

Page 9: ...other flat surface by removing the screw on the stand of the Digital Photo Frame Remove the screw 1 2 Mounting the Frame on the Wall Digital Photo Frame can also be mounted on the wall on landscape or...

Page 10: ...ing to a TV Connect the Digital Photo Frame to view pictures and video 1 Insert the AV cable yellow video plug into the TV video socket 2 Insert the AV cable white and red audio plugs into the TV s co...

Page 11: ...tal Photo Frame s AV OUT socket 1 6 Connecting to an Amplifier Connecting the Digital Photo Frame to an Amplifier 1 Insert the AV cable white and red audio plugs into the amplifier corresponding AV IN...

Page 12: ...pes of Cards SD MMC XD MS MS 1 Position the SD MMC XD MS MS cards so that the pin hole connections are facing the bottom flash memory card slot Place the card label side up 2 Slide the card gently int...

Page 13: ...ing Remote Control Battery Step 1 Remove the battery compartment by pulling the cover in the direction of the arrow Step 2 Remove the battery Step 3 Insert the replacement battery must follow the corr...

Page 14: ...You can view photos as thumbnails in matrix images which can be set in Digest Style mode Use buttons to select a photo Press ENTER button to view a photo selected Press ENTER button to view a photo se...

Page 15: ...2 3 Audio On the main menu use the buttons to choose Audio and press ENTER button to enter Audio mode Press File Detail button on remote control to enter Music Library Press EQ Set button on remote co...

Page 16: ...ther way of browsing for a particular photo Press button and then use buttons to select ON or OFF setting mode Press ENTER button to enter 2 4 1 2 TRNASITION MODE You can set the transition mode in FA...

Page 17: ...PHOTO SETUP menu choose MAIN PAGE mode press ENTER button 2 4 2 MUSIC SETUP In MUSIC SETUP menu use buttons to select MUSIC SETUP Use ENTER button to enter MUSIC SETUP submenu 2 4 2 1 REPEAT MODE You...

Page 18: ...ONE OFF or ALL setting mode Press ENTER button to enter 2 4 3 2 DIGEST STYLE You can set the DIGEST STYLE mode in 2X2 3X3 4X4 or 5X5 MATRIX Press button and then use buttons to select the matrix sett...

Page 19: ...nter 2 4 4 3 INTERVAL TIME You can set the INTERVAL TIME in 1 sec 3 sec 5 sec or 10 sec mode Press button and then use buttons to select the interval time desired Press ENTER button to enter 2 4 4 4 T...

Page 20: ...ght 2 4 5 1 BRIGHT You can set the BRIGHT mode in level 1 to level 6 Press button and then use buttons to select the level desired Press ENTER button to enter 2 4 5 2 CONTRAST You can set the CONTRAST...

Page 21: ...e buttons to select PREFERENCES Use ENTER button to enter PREFERENCES submenu 2 4 6 1 TV TYPE You can set the TV TYPE in MULTI SYSTEM NTSC or PAL modes Press button and then use buttons to select the...

Page 22: ...UAGE in ENGLISH or CHINESE modes Press button and then use buttons to select the modes desired Press ENTER button to enter 2 4 6 5 OSD MESSAGE You can set the OSD MESSAGE in ON or OFF modes Press butt...

Page 23: ...use the button to choose File Exp and press ENTER button to enter File Library File Library menu will be displayed 2 5 1 COPY In File Library menu use button to enter submenu Use buttons to select th...

Page 24: ...want to delete or not Use buttons to select Yes to delete or No to cancel and then press OK button 2 5 3 RENAME In File Library menu use button to enter submenu Use buttons to select the RENAME mode...

Page 25: ...e Press OK button to confirm the new file name 2 5 5 PROPERTIES In File Library menu use button to enter submenu Use buttons to select the Properties mode In Properties mode the information of file si...

Page 26: ...onnect to video input yellow input of TV LCD on off switch is on When AV out cable is connected to TV then LCD should be switched off if no video then press LCD on off switch once Faulty A V cable The...

Page 27: ...Interfaces Input DC In USB 2 0 Host Output AV Out Brightness Control OSD Software control AC Adapter Input AC 100 240V 50 60Hz Output DC 12V 2A Packing Detail Unit Dimension WxDxH 262 x 198 x 39 mm We...

Reviews: