background image

25

EN

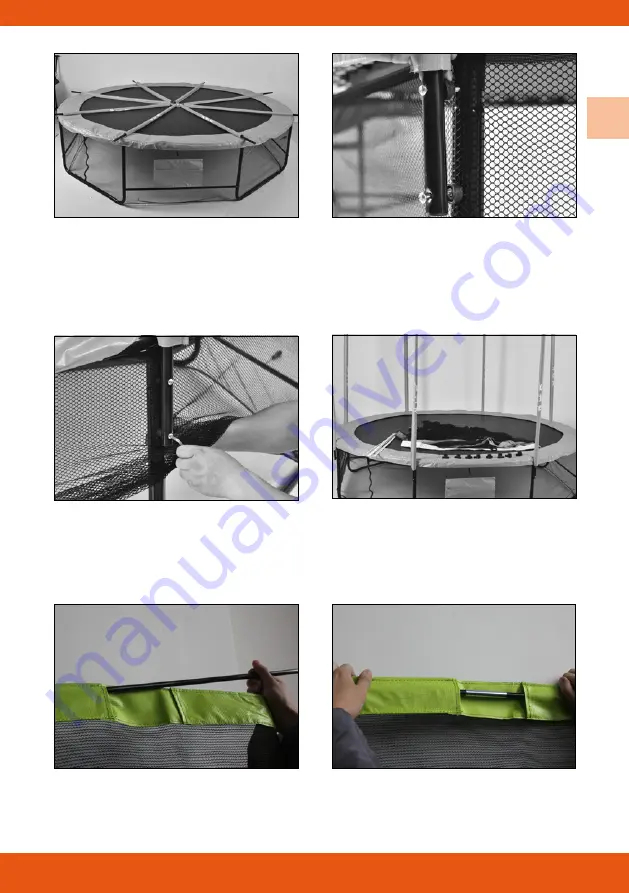
16. Arranging the poles on the trampo-

line as follows.

18. Finally with flange nuts (R) and the 

keys (F and G), screw the amount on 

the fleg with two fasteners.

Repeat for the other poles.

20. Inserting the sleeves (S) in the safe-

ty net (T) as follows. Be sure to let the 

end overtake the gap.

17. Assemble the long screws (R) on 

lower poles 2 through pre-drilled holes 

(N) inserting the brace on the other 

side (Q). Then place at the leg of the 

trampoline.

19. Lay the Sleeves (R), the safety net 

(T) and caps (U) on the trampoline.

21. Insert the end of the sleeves (S) into 

the next one.

Summary of Contents for X-TRAMP PREMIUM

Page 1: ...Veuillez lire attentivement ce manuel avant d utiliser votre trampoline Please read this manual before using your trampoline Guide d installation et d utilisation Installation and user s manual...

Page 2: ......

Page 3: ...l ments de votre trampoline avant toute utilisation Une mauvaise ou abusive utilisation du trampoline peut tre dangereuse et causer des blessures graves Le rebondissement sur un trampoline peut vous...

Page 4: ...mpoline soit constamment d gag sans aucun objet proximit Le trampoline non utilis doit tre rang hors de port e d enfants ou d animaux Autres consignes Assemblez le trampoline sur un terrain plat et ho...

Page 5: ...ructure Ne pas sauter avec des lunettes bijoux ou autres objets pointus L utilisation de chaussures de ville est proscrire viter les v tements amples Ne pas fumer sur ou proximit du trampoline Ne perm...

Page 6: ...tim 90 minutes Assurez vous qu aucune pi ce ne manque avant de commencer l assemblage D nomination Aper u Mod le 8 ft 14 ft A Structure incurv 6 8 B Barre d extension pied 6 8 C Pied 3 4 D Barre de re...

Page 7: ...bre de verre 6 8 T Filet de s curit 1 1 U Marches de l chelle 2 2 V Vis courte crou hexago nal chelle 4 4 W Tubes de l chelle 2 2 X Sardine 3 4 Y Sangle fixation au sol 3 4 D nomination Aper u Mod le...

Page 8: ...e NOTE Les photos peuvent l g rement varier suivant les diff rents mod les de trampolines 1 talez toutes les pi ces et v rifier l int gralit avec la liste des pages pr c dentes 3 Raccordez les structu...

Page 9: ...otre premier ressort I Attachez ensuite 2 nouveaux ressorts J mi distance des 2 premiers pour s assurer que la tension est gale et bien uniforme 9 R p tez le processus pour les ressorts I restant En v...

Page 10: ...O 10 Votre trampoline se pr sentera comme sur la photo ci dessus 12 Attachez le filet avec le porte chaus sure K aux boucles du tapis de saut H 11 Placez le filet avec le porte chaus sure K autour du...

Page 11: ...les tiges en fibre de verre S dans le filet de s curit T de la ma ni re suivante Veillez laisser les bouts d passer aux interstices 17 Montez les vis longues R sur le montant inf rieur travers les 2 t...

Page 12: ...curit de la mani re ci dessus La prochaine tape besoin d tre ex cut e par au moins 2 personnes afin de monter le filet en m me temps aux endroits oppos s 27 Montage de l chelle Posez sur le sol toute...

Page 13: ...ef Allen F fournis et r p ter l op ration pour chaque fixations 29 Ins rez un crou hexagonal V dans son emplacement 31 L chelle doit tre conforme la photo ci dessus 32 Fermez l entr e avec la fermetur...

Page 14: ...ir et les crochets sont en place 5 V rifier que les attaches sont toutes fix es aux anneaux sous le trampoline Saut assis R ception en position assise mains sur le matelas Retour la position de base e...

Page 15: ...on conforme des produits Les dommages dus l intervention d un r parateur non agr e par Poolstar Les dommages r sultant d une cause externe l quipement accident choc foudre vente fort Les dommages li s...

Page 16: ...16...

Page 17: ...with these instructions Always inspect the assembly of your trampoline before each use Incorrect use of this trampoline can be dangerous and cause serious injury Rebound on a trampoline you may reach...

Page 18: ...r the trampoline is cleared without any object Other instructions Assembly the trampoline on a level and horizontal surface preferably on a lawn Installing the trampoline on a cement or hard surface c...

Page 19: ...nd incorrect judgment of bouncing The trampoline must be carefully inspected before each use particulary the assembly and the structure Never jump with glasses jewelry or parts pointing Formal footwea...

Page 20: ...ure that you have all of the following parts before beginning assembly D nomination Aper u Mod le 8 ft 14 ft A Curved structure 6 8 B Leg extender bar 6 8 C Leg 3 4 D Reinforcing bar 3 4 E medium scre...

Page 21: ...crew flange nut Lower pole 12 16 S Sleeve 6 8 T Safety net 1 1 U Step for ladder 2 2 V Short screw hexagonal nut ladder 4 4 W Tube for ladder 2 2 X Stakes 3 4 Y Strap floor fixing 3 4 D nomination Ape...

Page 22: ...cause injury NOTE Pictures can vary according to the trampoline models 1 Lay out all of the part and check the integrity with the list of previous pages 3 Link the curved structure A to form a circle...

Page 23: ...side where you have attached your first spring I Then attach two new springs J midway of the first 2 to ensure that the stretch is uniform and well 9 Repeat the process for all springs I Use the sprin...

Page 24: ...plastic cap O on top 10 The trampoline must be like the picture above 12 Attach the net with shoe holder K triangular loops of the jumping mat H 11 Place the net with the shoe holder K around the bott...

Page 25: ...poles 20 Inserting the sleeves S in the safe ty net T as follows Be sure to let the end overtake the gap 17 Assemble the long screws R on lower poles 2 through pre drilled holes N inserting the brace...

Page 26: ...safety net as follows The next step needs to be performed by at least 2 people to mount the net simul taneously with the opposite locations 27 Put on the floor all the pieces of ladder U V et W 25 Mak...

Page 27: ...olding the nut and aims at using the Allen key F and repeat for each bindings 29 Put a hexagonal nut V in his place 31 The ladder must be like this picture 32 Close entry with zip and tighten input ho...

Page 28: ...heck that the fasteners are attached to the structure or the v rings underneath the trampoline Seat jump Land in a seated position with your hands on the mat Return to the basic position by pushing wi...

Page 29: ...of products Damage from work performed by a technician not approved by Poolstar Damage resulting from a cause external to the equipment accident im pact lightning strong wind Damage linked to transpor...

Page 30: ......

Page 31: ......

Page 32: ...Distribution POOLSTAR FRANCE www poolstar fr Photos non contractuelles Photos may differ from actual product...

Reviews: