


13
CONVENIENCE
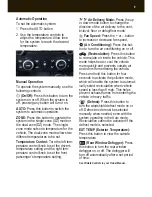
Remote Vehicle Start
This feature allows you to start the
engine from outside the vehicle by
using the Remote Keyless Entry (RKE)
transmitter. The remote start capability
must be turned on using the Driver
Information Center.
During a remote start, the manual cli-
mate control system will not operate
until the key is turned on. The automatic
climate control system (if equipped) will
default to a set temperature of 73°F
(23°C), regardless of the system setting
prior to turning off the vehicle.
Once the key is turned on, both systems
will operate at the last setting before the
vehicle was turned off.
Starting the Vehicle
To remote-start the vehicle:
1. Aim the RKE transmitter at the
vehicle. (Transmitter range is within
approximately 164 feet of the
vehicle.)
2. Press and release the
(Lock)
button on the transmitter.
3. Immediately press and hold the
(Remote Start) button for about four
seconds. When the vehicle starts, the
parking lamps will light and remain on
while the engine is running. The
engine will continue running for 10
minutes.
4. Repeat these steps for a 10-minute
time extension. Only two consecutive
remote starts are allowed.
When you enter the vehicle after a
remote start, the ignition must be turned
to the On position before driving.
Canceling a Remote Start
If you wish to turn off the engine instead
of driving after a remote start:
• Press and hold the
(Remote Start)
button until the parking lamps turn off.
• Press and release the Hazard
Warning Flashers button. Press it
again to turn off the flashers.
• Turn the key in the ignition switch to
the On position and then off.
See Keys, Doors and Windows in your Owner Manual.
Note:
The Remote Vehicle Start feature
will not operate if the key is in the igni-
tion, the hood is open, or the Check
Engine light is illuminated on the instru-
ment panel cluster.
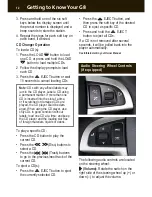
(Mute):
Press the switch on the
right side of the steering wheel to mute
the vehicle speakers.
SRCE (Source):
Press this button to
switch between FM1, FM2, AM, CD or
an AUX device (if equipped).
(Next/Previous):
Rotate the
switch on the left side of the steering
wheel to go to the next/previous preset
radio station or, when playing a CD, to
the next/previous track.
Press the switch to go to the next
CD in the multiple-disc CD player
(if equipped).
See Infotainment in your Owner Manual.


