4
17
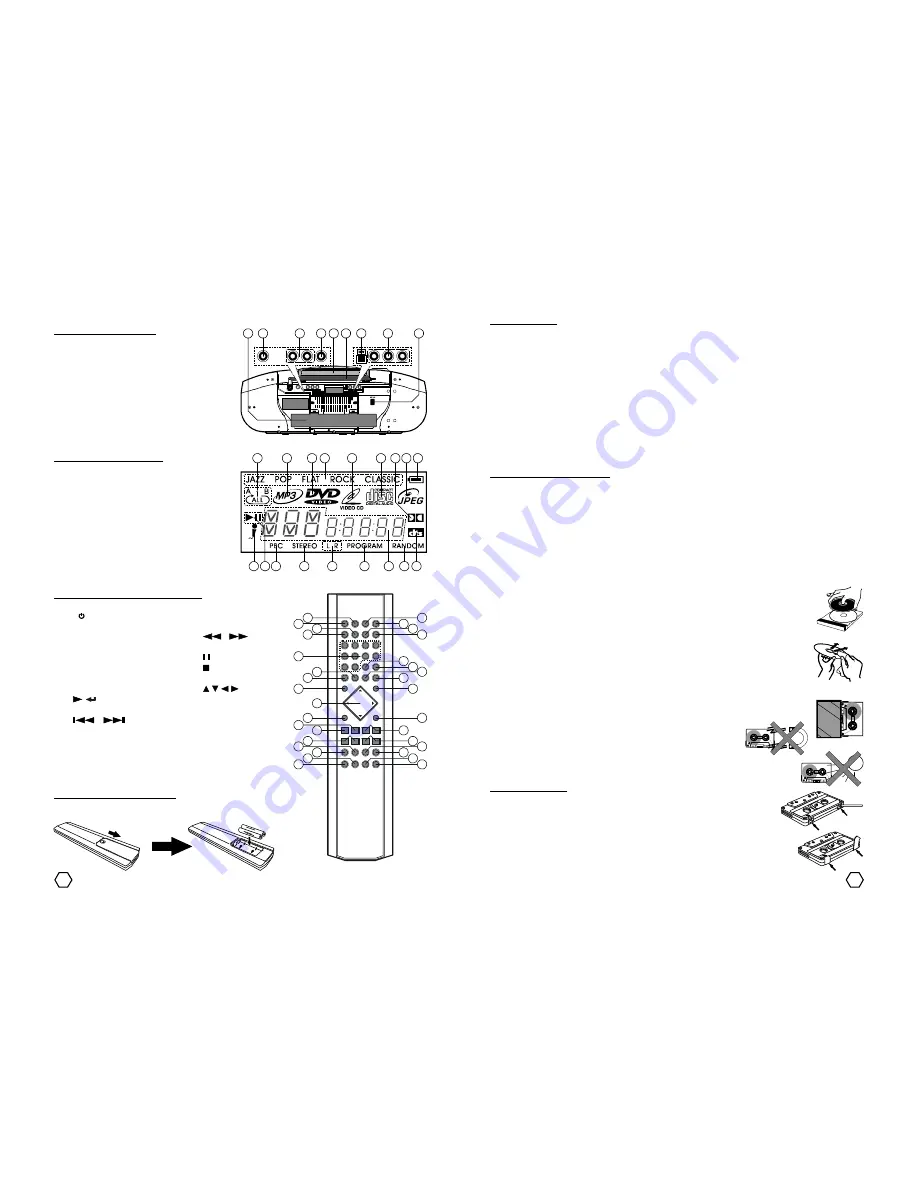
Rear Part
Description of the Rear Part :
1. Battery compartment
2. VIDEO OUT (composite) terminal
3. AUDIO OUT (stereo LR) terminal
4. COAXIAL Digital OUT terminal
5. Handle
6. FM Telescopic antenna
7. AM Loop antenna terminal
8. DVD OUT (component) terminal
9. AC IN terminal
LCD screen (liquid crystal display)
Description of the LCD screen :
1. REPEAT
10. DTS
2. MP3
11. RANDOM
3. DVD
12. Unit status/function
4. EQUALIZER
13. PROGRAM
5. VCD
14. LR
6. CDDA
15. STEREO
7. DOLBY DIGITAL 16. PBC
8. JPEG
17. PLAY/PAUSE
9. Battery
18. MIC
Remote Control battery installation : Open the battery cover and insert two
batteries size “AAA/UM4/R-03” or equivalent with the right polarity, as shown
on the battery place.
Remote Control
Button Description of the Remote Control :
1. “MUTE”
18. “PROG/MEM” (program/memory)
2. “I/ ” (unsupported)
19. “REPEAT”
3. “ANGLE”
20. “A-B”
4. “AUDIO”
21. “
”/“
”
5. “KARAOKE”
(fast reverse/fast forward)
6. “EQ” (equalizer)
22. “ / STEP” (pause/step)
7. “SURR” (surround)
23. “ ” (stop)
8. “BAZZ” (bazzoke)
24. “RETURN”
9. “SETUP”
25. “ / / / ” (navigasi)
10. “ / ” (play/enter)
26. “PBC/MENU”
11. “- VOL +” (volume)
27. “GO TO”
12. “
”/“
” (previous/next) 28. “ZOOM/FLASHRIP”
13. “OSD” (on screen display)
29. “0”-“9” numeric
14. “ECHO”
30. “TITLE”
15. “CLEAR/FM MODE”
31. “SUB-T” (subtitle)
16. “SLOW/AM/FM”
32. “FUNCT” (function)
17. “SLEEP” (unsupported)
33. “MULTIMEDIA”
9
10
2
3
4
5
6
7
8
1
11
12
13
14
15
16
24
23
20
18
19
17
22
21
26
25
27
28
29
30
31
32
33
5
6
7 8
4
3
2
1
9
14
13
12
11
15
16
17
18
10
5
6
7
8
4
3
2
1
9
Channel Selection : While playing SVCD/VCD/CD/MP3 disc, press “KARAOKE” button to select audio output
without vocal (only music).
- When Microphone connected to the unit and you press “KARAOKE” button, available channel selection :
MPX LEFT, MPX RIGHT and AVC RIGHT.
- When Microphone does not connected to the unit and you press “KARAOKE” button, available channel
selection : MONO LEFT, MONO RIGHT, MIX-MONO and STEREO.
Note : For VCD karaoke disc with vocal format on the right channel, AVC (Automatic Vocal Changer) function
would works. For DVD karaoke disc, you can select audio output without vocal (only music) by pressing
“AUDIO” button.
Echo
While singing a song (karaoke), you can add echo effect by pressing “ECHO” button on the remote control.
MAINTENANCE INSTRUCTION
Cleaning the unit
Use a soft and dry cloth. If the surfaces are extremely dirty, use a soft cloth lightly moistened with mild
detergent solution. Do not use strong solvents, such as alcohol, benzine or thinner.
Cleaning the Head
Every ± 24 hours usage, clean the head and tape path using a head cleaning cassette or cotton moistened
with cleaning fluid. Parts that need for clean up are : playback/record head, erasure head, capstan and pinch
rollers. After cleaning the parts, wait until the cleaned parts are completely dry.
Disc Maintenance
- Do not place the unit in oblique position when there is CD in the unit. Do not place and play
the player with two disc in a CD tray.
- After playing a disc, store the disc in its case. Do not leave the disc in the unit because it
can make disc become expand and humid.
- After playing a disc, store the disc in clean case and do not leave the disc in places that are
hot or humid.
- When a disc become dirty, wipe the disc from center out with a cleaning cloth.
- Do not wipe the CD by turning around, it can cause damage your CD. And do not clean the
CD with chemical liquid.
Cassette Maintenance
- After playing the cassette, keep it on its case. Do not leave the cassette inside the unit, this
will cause cassette tape is expanding or kinked hot consequence or cassette tape become
humid.
- Do not place the cassette near the magnetic source, can degrade the
quality of the cassette.
- Do not place the cassette to any direct sunlight source.
Recording safety tab :
- To protect your important recorded cassette from possibility erasure because
involuntary. Break off the taps on the cassette ribbon after recording with a
screwdriver or other pointed tool.
- If the cassette will be used to record again, cover the tape with adhesive ribbon.
We
lcome
t
o The Vide
os


