05
4 Turning the Thermostat Off
In order to turn off the thermostat use the navigational arrow
(
)
to move the cursor over the
(Off)
symbol. The display
will show the current default frost protection setting and then
switch off.
Note: Whilst in the
(Off)
mode; if the room drops to the pre-set
frost temperature value the thermostat will automatically switch
on and maintain the temperature at the value as entered (default
setting 10.0 degC).
To adjust the frost protection default setting please see the
section headed
User Menu.
5 Remote Sensor Connection
The connection of the Remote sensor allows adjacent wet rooms
to be controlled from a thermostat positioned outside the room.
However the sensor can also be used to control floor surface
temperatures where sensitive floor coverings are installed.
In the installer settings menu the sensor options are referred
to as follows.
Air
= Measures room temperature
SEN
= Remote Sensor (used to measure air temperature)
FLr
= Room temperature with floor regulation (both room
thermostat and remote sensor used)
NOTE
: This function
is only displayed when a Floor Low (menu 26) and a Floor
High (menu 27) value is entered.
To access this menu set to the unit to the
Off
mode then
hold down the Escape key
( )
for 10 seconds.
You will then access the hidden installer menu.
The unit will display menu 23
rEGU Ai
r.
Press
(OK)
to toggle between the options with the
(-)
and
(+)
Keys and verify with OK.
If you want to choose the
Flr
setting use the navigation keys
to reach menu 26
(FL:L)
and set the floor low value. Then scroll
to menu 27
(FL:H)
and set the floor high value.
To exit the installer menu scroll to menu 35
(End)
and press
(OK)
.
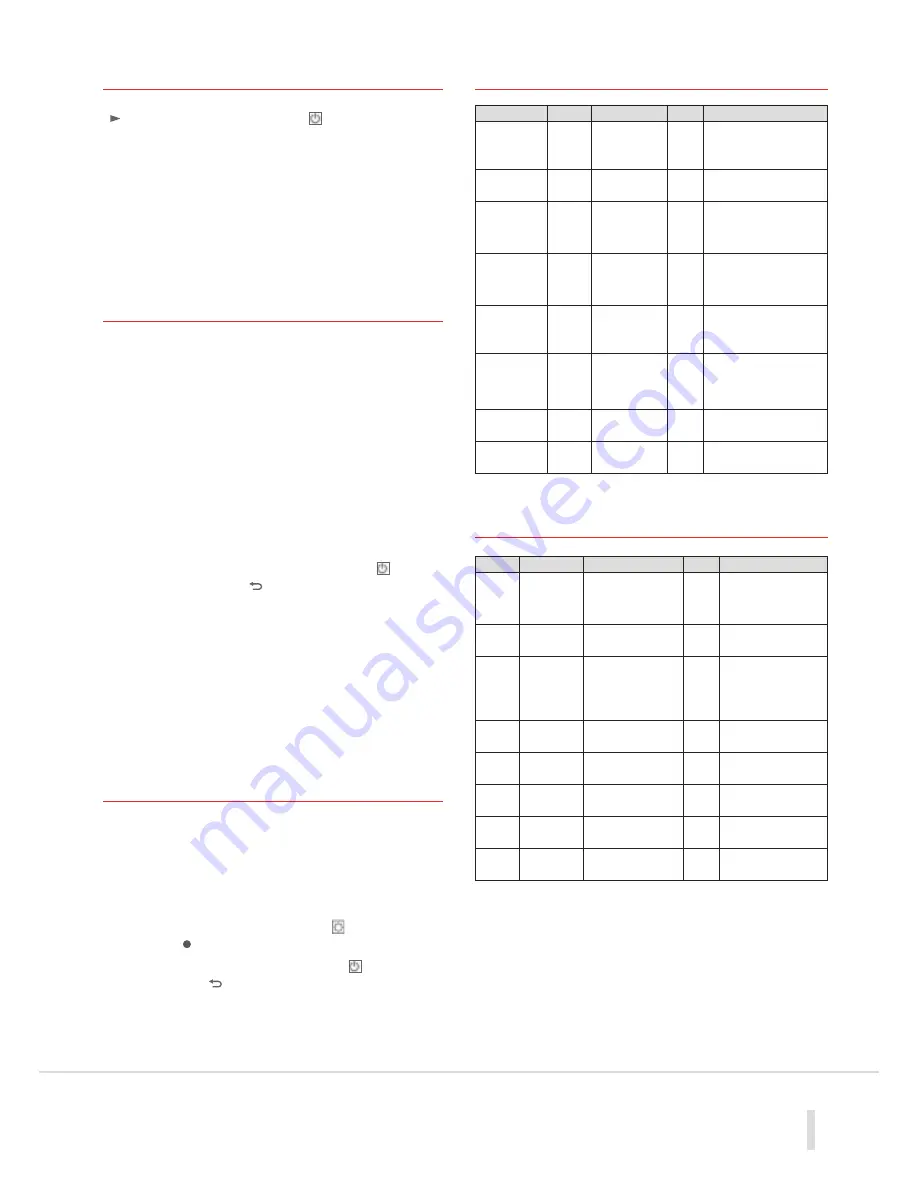
6 Hidden Menus
There are 2 hidden menus which can be accessed by pressing and
holding a combination of buttons.
The user menu can be used to set a number of user preferences
such as a 12 hour or 24 hour clock display, temperature readings
in either degC or degF, etc and the installer menu can be used
to adjust various operational settings of the unit.
To access the User menu set the unit to the setting and press
and hold the
(
)
button for 10 seconds.
To access the installer menu set the unit to the mode and
press and hold the
( )
button for 10 seconds.
PBDIG & PBDIG RF User Menu
Menu No
Display
Description
Default
Option
00 (Available
on RF
Versions only)
INI
Initiates RF
Connection
Refer to RF Installer
Leaflet
01
dEG
Temperature
Display
Deg C
Deg F
04
no
Calibration of
temp reading
no
Adjustment with + or –
button (This function is
not possible for first 24
hours of operation)
05
(only with
sensor fitted)
SEnC
Calibration of
sensor temp
reading
no
Adjustment with + or –
button (This function is
not possible for first 24
hours of operation
06
HG
Holiday mode
frost setting 10.0C
0.05C to 10.0C
08
CLr
Restore
factory
Default
settings
Press OK
09
UErS
202
Software
Version
None
10
End
Return to
main Screen
Press OK
PBDIG & PRPDIG RF
Installer Menu
Menu No
Display
Description
Default
Option
23
rEGU Air
See
section 4
Measures Room
Temp
Air
Sen Or Flr
24
Air t
Air Temp Reading
None
25
SEN t
Remote Sensor
Temp Reading (only
operative Is remote
sensor is used)
None (Note: If Err
display shows check
sensor
connection)
26
FL:Lo
Low floor temp
limit
no
Enter required low
temp setting
27
FL:Hi
High floor temp
limit
no
Enter required high
temp setting
28
type
Operating Mode
HYS
reG (proportional
banding)
34
CLr EEP
Restore factory
Default settings
Press OK
35
End
Return to main
screen
Press OK


