background image


4


The 

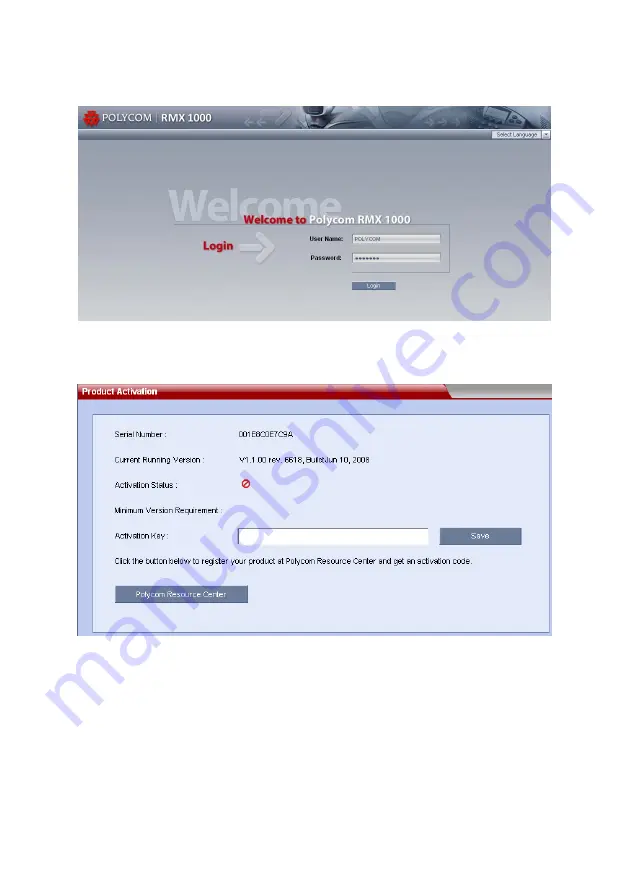
Product Activation 

dialog box is displayed. Fill in the activation 

key obtained in 

Obtaining Product Activation Key 

in the 

Activation 

Key 

box, and then click the 

Save

 button. Click the 

Close

 button. 


If you do not have an 

Activation Key

, click the “Polycom Resource 

Center” button to access the 

Service 

Support 

page of the Polycom 

website. For more information, see 

Obtaining Product Activation 

Key.


  7 

Summary of Contents for RMX 1000

Page 1: ...extended to the floor with the full weight of the rack resting on them Always make sure the rack is stable before extending a com ponent from the rack In a single rack installation attach stabilizers...

Page 2: ...refully take the RMX 1000 device out of the package You can install the device in the rack or position it on an even surface Mount the RMX 1000 in the rack Install the brackets supplied by the rack ma...

Page 3: ...activate the device Follow the procedure below to obtain the product activation key When you power on and log in to the RMX 1000 for the first time the system displays the Product Activation dialog bo...

Page 4: ...Serial Number of the product in the Single License Number pane and then click the Generate button You can find the license num ber and serial number of the product from the document provided with the...

Page 5: ...ich is in the same network segment as the IP address of the RMX 1000 The default IP address of the RMX 1000 before delivery is IP address of the LAN1 port 192 168 1 254 Subnet mask 255 255 255 0 Defau...

Page 6: ...tional Select a language for the Web interface from the drop down menu If the browser or OS of your PC does not sup port the selected language the content is displayed in English 3 On the Welcome inte...

Page 7: ...Product Activation Key in the Activation Key box and then click the Save button Click the Close button If you do not have an Activation Key click the Polycom Resource Center button to access the Servi...

Page 8: ...based on the settings of your local network 1 Click the IP Setting configuration item in the RMX Management pane 2 In the IP Setting configuration pane right click and select LAN1 Properties 3 In the...

Page 9: ...In this case a default route is dis played in the list of the Advanced Setting Router page NAT The Network Address Translation NAT func tion enables you to translate a private network IP address into...

Page 10: ...e that the switch configuration is matched with the MCU port Advanced Setting Optional If necessary you can configure other network parameters according to the following procedure 1 Click the Advanced...

Page 11: ...ress for the sending router of packet transmission Remote IP Address Set the target network address for packet transmis sion Subnet Mask Set the subnet mask for the target network 4 Click the Gatekeep...

Page 12: ...mary or alternate gatekeeper Gatekeeper IP ad dress Set the IP address for the primary or alternate gatekeeper Gatekeeper Port The port number for the primary or alternate gatekeeper System Prefix E16...

Page 13: ...64 content If an end point supporting H 264 is sending the content all the other endpoints in the calls that support H 264 content will receive the content correctly Endpoints that do not support H 26...

Page 14: ...ot possible to access an AES conference from the lobby and default profile is used when creating an Ad Hoc conference via the lobby Integration with RMX 2000 H 239 cascade is supported with the RMX 20...

Page 15: ...RMX 1000 MCS 444 Integration with LifeSize RMX does not recognize DTMF tones from the LifeSize room system MCS 439 Integration with VSX8000 RMX does not support 2SIF with the VSX8000 MCS 411 Integrat...

Reviews: