


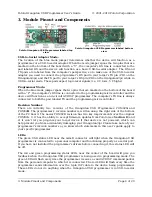


AVR Studio’s Program ISP tab
You should see both the red and the green programming status LEDs flicker on your
Orangutan USB programmer as it programs and you should see the following text
appear in the text box at the bottom of the Program window:
Reading FLASH input file.. OK
Setting mode and device parameters.. OK!
Entering programming mode.. OK!
Erasing device.. OK!
Programming FLASH .. OK!
Reading FLASH .. OK!
FLASH contents is equal to file.. OK
Leaving programming mode.. OK!
If there were no problems, the red LED on your Orangutan, Baby Orangutan, or 3pi
should now be flashing! Note that if you are trying this on a 3pi robot and you haven’t
yet soldered in the optional through-hole LEDs, you will need to turn your 3pi robot over
to see the flashing LED as the surface-mounted LEDs are located on the underside of
the 3pi’s PCB. If there was a problem, please go to Troubleshooting (
) for help
identifying and fixing it.
5.b. AVR Studio in More Detail
This section provides a brief overview of the other tabs in the AVRISP dialog. It is rare that
you will want to use anything other than the
Program
tab, but it is useful to know what the
other tabs let you do for the rare occasions when you will need them.
•
Main: setting your ISP frequency
Pololu Orangutan USB Programmer User's Guide
© 2001–2010 Pololu Corporation
5. Getting Started Using Windows
Page 12 of 29


