background image

EN-3

SAFETY INSTRUCTIONS

Please read all 

Warnings

 and 

Cautions

 before using this product.

Warnings

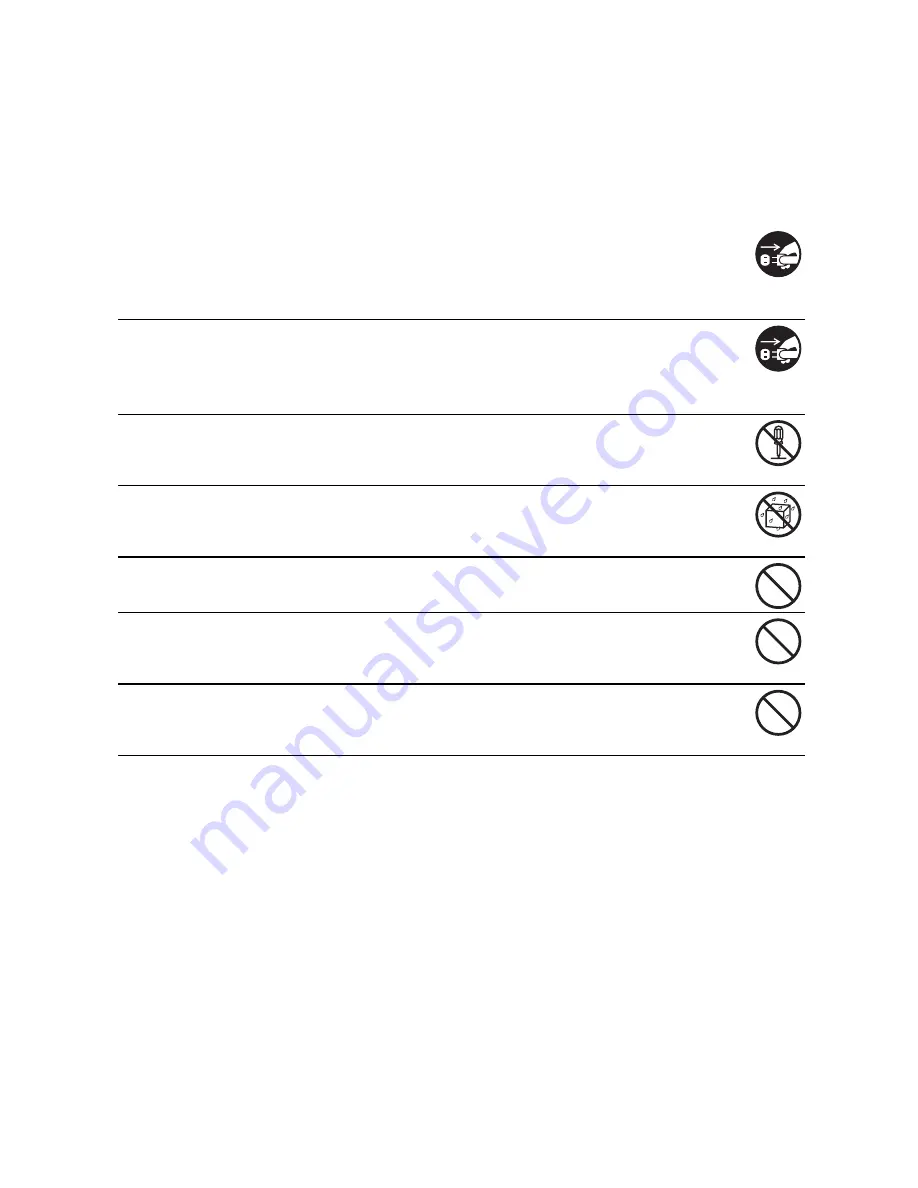
If foreign objects or water enter the camera, turn the power off and
remove the battery.

Continued use may cause personal injury.  Please consult our friendly
customer service.

If the camera has been dropped or its case has been damaged, turn the
power off and remove the battery.

Continued use may cause personal injury.  Please consult our friendly
customer service.

Do not disassemble, change or repair the camera.

Service should only be performed by a qualified technician.  Please  contact
our friendly customer service should you have any questions.

Do not use the camera in areas near water.

Continued use may cause personal injury. Please consult our friendly
customer service.

Do not place the camera on unstable surfaces.

This might cause the camera to fall and cause damage.

Keep the battery out of the reach of children.

Adult supervision is recommended when the product is being operated by 
young children.

Do not use the camera while you are walking, driving or riding a
motorcycle.

This may result in you having an accident.

Summary of Contents for t831 - Digital Camera - Compact

Page 1: ......

Page 2: ...rease the separation between the equipment and receiver Connect the equipment into an outlet on a circuit different from that to which the receiver is connected Consult the dealer or an experienced ra...

Page 3: ...our camera may be different from those described in this manual This is due to the fact that different retailers often specify slightly different product inclusions and accessories to suit their marke...

Page 4: ...Do not disassemble change or repair the camera Service should only be performed by a qualified technician Please contact our friendly customer service should you have any questions Do not use the cam...

Page 5: ...when handling the camera This may cause damage to the camera Do not use the camera in humid steamy smoky or dusty places This may cause fire or electric shock Do not remove the battery immediately aft...

Page 6: ...mize its performance and lifetime we recommend that you fully charge the battery and discharge it for at least one complete cycle before use The camera may feel warm after a long period of continuous...

Page 7: ...tection Feature 20 Recording Voice Memos 21 VIDEO MODE 21 Recording Video Clips 21 Playing Back Video Clips 22 PLAYBACK MODE 22 Playing Back Still Images 23 Thumbnail Display 23 Removing Red eye 24 At...

Page 8: ...ion of up to 3264 x 2448 pixels Package Contents Carefully unpack your camera and ensure that you have the following items Common Product Components Digital Camera User s manual Software CD ROM USB ca...

Page 9: ...EN 8 GETTING TO KNOW YOUR CAMERA Front View 1 Shutter button 2 Flash 3 Power button 4 Status LED 5 Microphone 6 Lens 7 Self timer LED 8 Zoom lever...

Page 10: ...on S button Focus button X button Flash button T button Self timer button Delete button W button Backlight Exposure compensation button 5 Strap holder 6 USB or AV OUT terminal 7 Set button Display but...

Page 11: ...SO 800 ISO 1600 12 Self timer icon 2 sec 10 sec 10 2 sec 13 Date and time 14 Exposure compensation Backlight correction Adjust exposure value with the e f buttons 15 Capture mode icon Blank Single Con...

Page 12: ...13 Shutter speed value 14 Protect icon 15 Mode icon Playback mode Video playback 1 Video status bar 2 Elapsed time 3 File number 4 Folder number 5 Sound off icon When the c button is pressed during vi...

Page 13: ...sure to format the memory card with this camera before its initial usage 5 Close the battery memory card cover and make sure it is locked securely To prevent valuable data from being accidentally era...

Page 14: ...has started and is green when charging is completed The LED is green if no battery is inserted into the charger Charging time varies according to the ambient temperature and the life of the battery Re...

Page 15: ...these steps to set the correct date and time 1 Toggle the button to or 2 Press the button 3 Select Setup with the f button 4 Select Date Time with the c d buttons and press the button 5 Select the dat...

Page 16: ...s the button The setting will be stored Formatting the Memory Card or Internal Memory This utility formats the internal memory or memory card and erases all stored images and data 1 Press the button 2...

Page 17: ...ds 2 Toggle the button to 3 Compose your image in the LCD monitor Slide the zoom lever to side to zoom in on the subject and enlarges the subject on the LCD monitor Slide the zoom lever to side to zoo...

Page 18: ...the flash mode setting is set to If the flash mode setting is changed to the camera will only capture an image after it detects a smile When capturing group shots if the number of people is more than...

Page 19: ...rity face main focus frame and gray ones around the other faces 3 Press the shutter button halfway down to lock the focus The main focus frame simultaneously turns green If the top priority face is ou...

Page 20: ...elect On with the c d buttons and press the button 5 Press the button to exit the menu mode and the camera returns to preview display 6 Press the shutter button to capture the image 7 The camera start...

Page 21: ...ith the c d buttons and press the button 5 Press the button to exit from the menu An icon is displayed on the screen 6 Compose the image press the shutter button down halfway then press it down fully...

Page 22: ...than the current one Playing Back Video Clips You can play back recorded video clips on the camera You can also play back sound if recorded with the video 1 Press the button The last image appears on...

Page 23: ...s To view the previous image press the e button To view the next image press the f button Pressing the c button during image playback will result in a 90 degree clockwise rotation display Slide the zo...

Page 24: ...displayed at its regular size An icon may be displayed in a thumbnail Removing Red eye You can use this function to remove the red eye phenomenon after an image is taken 1 Press the button 2 Select th...

Page 25: ...and press the button 6 Press the button to exit from the menu 7 Press the shutter button VOICE RECORDING is displayed on the screen and recording starts 8 To stop recording a voice memo as it is bein...

Page 26: ...he protect icon is displayed with protected images When All has been selected is displayed with all the images Canceling the Protection To cancel protection for only one image display the image on whi...

Page 27: ...all of the images except for the protected images 5 Select Execute with the c d buttons and press the button To not erase select Cancel and press the button Deleting an image will not affect sequenti...

Page 28: ...s in accordance with the shooting conditions Program AE Smile Shot Anti Shake Panorama Portrait Man Portrait Lady Landscape Sports Night Portrait Night Scene Candlelight Fireworks Text Sunset Sunrise...

Page 29: ...aper in the scene and set the white balance manually Cancel Execute ISO This sets the sensitivity for capturing images When the sensitivity is raised and the ISO figure is increased photography will b...

Page 30: ...ter with the c button and darker with the d button The adjustment range is from 5 to 5 Digital Zoom This sets whether or not to use digital zoom at the time of photography On Off Date Print The date o...

Page 31: ...ess the button Size This sets the size of the video clip that will be captured 640 x 480 320 x 240 Quality This sets the quality compression at which the video clip is captured Fine Standard Color Thi...

Page 32: ...5 sec 10 sec Protect Refer to section in this manual titled Protecting Images for further details Voice Memo Refer to section in this manual titled Attaching Voice Memos for further details LCD Bright...

Page 33: ...med for a specific period of time the power to the camera is automatically turned off This feature is useful for reducing battery usage 1 Min 2 Min 3 Min Off Date Time Refer to section in this manual...

Page 34: ...signed drive letter e or higher 7 Double click on the removable disk and locate the DCIM folder 8 Double click on the DCIM folder to open it to find more folders Your recorded images and video clips w...

Page 35: ...You can personalize the designs with your own digital pictures and text based on professionally designed templates and layouts Projects can be printed at home or saved as image files for sharing with...

Page 36: ...at JPEG DCF 1 1 EXIF 2 2 AVI Lens 3x optical zoom lens Aperture range f2 9 W f5 2 T Focal length 5 7mm 17 1mm equivalent to 34mm 102mm on a 35mm camera Focus Range Standard 0 4m 15 7 to infinity Macro...

Page 37: ...8 1177 2357 2816 x 2112 Fine 14 62 126 253 508 1018 2038 Standard 18 82 166 334 669 1340 2684 Economy 20 90 181 364 730 1461 2925 2272 x 1704 Fine 25 108 219 440 881 1765 3533 Standard 27 121 243 489...

Page 38: ...otected Remove the write protection Images do not appear on the LCD monitor LCD monitor is dark Adjust the brightness of the LCD monitor in the menu Although it is set to auto focus it does not focus...

Page 39: ...onitor 1 Select the item you want to configure with the c d buttons and press the button Images Select whether you want to print specific image or all images You may also select printing number for sp...

Page 40: ...rts and the figure shown on the right hand side appears COMPLETE will be displayed temporarily reminding you that the printing procedure is finished If an error is detected during the connection i e t...

Reviews: