background image

77

Polaroid t1235 Digital Camera User Guide
www.polaroid.com

7 Using the Setup Menu

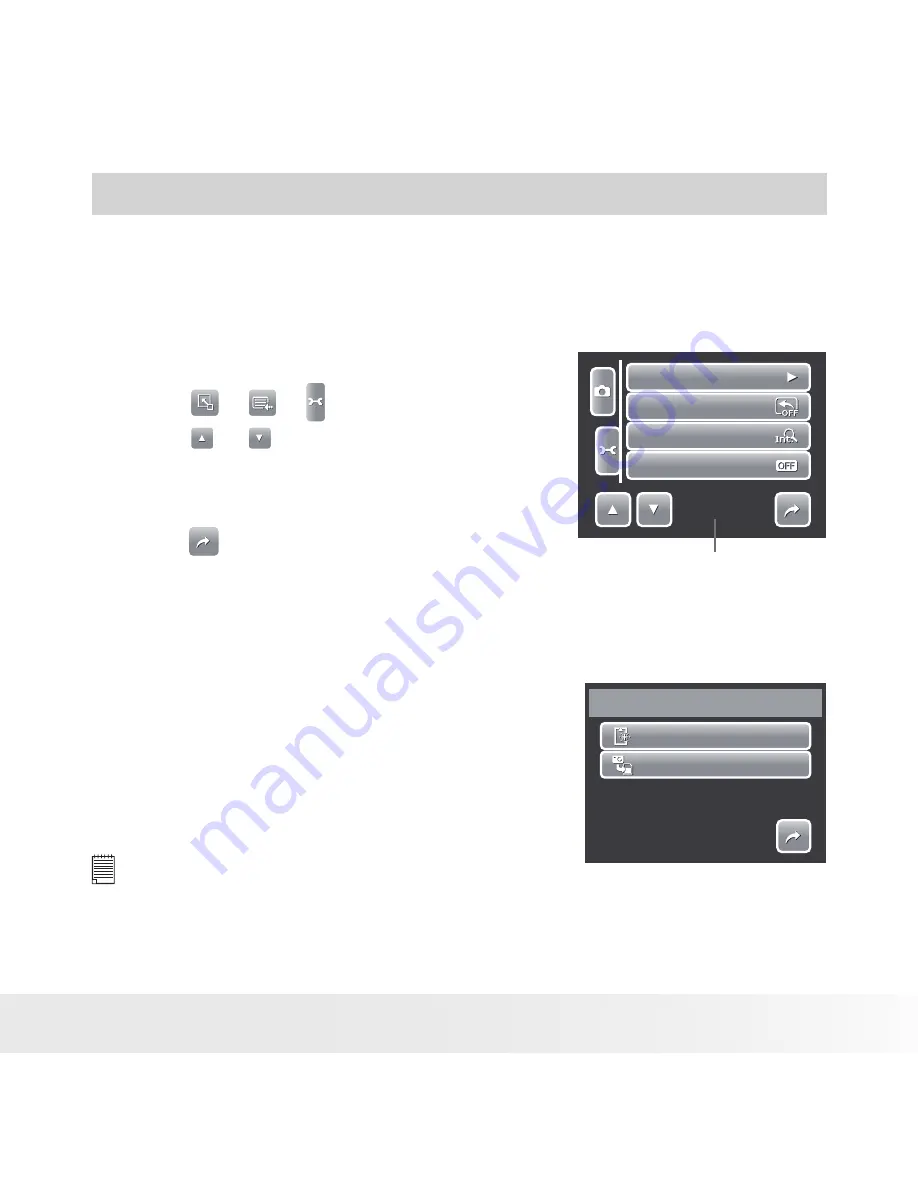
You  can  access  the  Setting  menu  whether  you  are  in  Record  or  Playback 

mode. The Setting menu allows you to configure general camera settings. 

Submenu options may vary depending on the current mode. Unavailable are 

disabled.

Memory Kit
Auto Review
Digital Zoom
System Sound

1/4

Indicates current page # for 

total # of pages.

To go to Setting Menu:

1.  Touch 

 > 

 >  . 

2.  Touch   or   to move to the next/previous 

page of menu selection. 

3.  Touch a submenu option to change submenu 

settings. 

4.  Touch 

 to exit submenu. 

• 

Setting Memory Kit

Use  this  function  to  manage  contents  of  the  internal  memory  or  memory 

card.

Format
Copy to Card

Memory Kit

1/1

Available settings are:

• 

Format.

  Select  to  format  currently  used 

memory.

• 

Copy to Card.

 Select to copy all files stored 

in the internal memory to the memory card.

  NOTE:

•  If there is a memory card inserted,the Copy to Card function is not available 

Summary of Contents for t1035

Page 1: ...Guide Questions Need Some Help This manual should help you understand your new product or visit www polaroid com support If you still have questions call our help line found on the insert with this i...

Page 2: ...ormation 8 Battery Information 9 2 Introduction 10 Camera Features 10 Package Contents 11 Camera Views 12 Camera Buttons 13 Notifications 13 LED Indicators 13 Operation Sound 15 Camera Memory 15 Inter...

Page 3: ...ick Set Bar 30 Snapshot Mode 31 Camcorder Mode 32 Voice Recorder Mode 33 Playback Mode 34 5 Recording Photos Videos and Voices 35 Taking Photos 35 Using the Image Stabilizer 36 Setting the Zoom Contro...

Page 4: ...58 Setting White Balance 58 Setting Quality 58 Setting Focus Mode 58 Setting Effect 59 Recording Voices 59 6 Playback 60 Viewing in Single Navigation 60 Viewing Slideshow 60 Viewing in Drag Play Mode...

Page 5: ...e a file 72 To delete a voice memo 72 To delete multiple files 72 To delete all files 73 Setting Playback Menu 73 To go to Playback Menu 73 Resize 73 Voice Memo 74 Red Eye Correction 75 Effect 76 7 Us...

Page 6: ...nections 87 Connecting the Camera to a TV 87 To connect your camera to a TV 87 To view photos 87 Connecting the Camera to a PC 87 Connecting the Camera to a Printer 88 Setting PictBridge Menu 89 10 Ap...

Page 7: ...imits are designed to provide reasonable protection against harmful interference in a residential installation This equipment generates uses and can radiate radio frequency energy and if not installed...

Page 8: ...at may cause undersired operation Trademark Recognition Windows 98 2000 ME XP are registered trademarks of Microsoft Corporation in the United States and or other countries Windows is an abbreviated t...

Page 9: ...rting the battery upside down can cause damage to the product and possibly cause an explosion When the camera is used for an extended period of time it is normal for the camera body to feel warm Downl...

Page 10: ...image sensor 3 inch color touch screen LCD monitor 32MB internal flash memory with optional external SD SDHC card Supports up to 4GB of SD card and up to 16GB of SDHC card Sleek metallic finish Easy...

Page 11: ...ackage Contents Please check the contents of your camera package It should contain o x Z 3 o d m i o L r e a l n o s P Digital Camera Li ion battery Battery charger Wrist strap USB cable Power cord Qu...

Page 12: ...i o L r e a l n o s P Shutter button Flash Image Stabilizer button Power button Self timer LED AF Assist Lamp Zoom lens Microphone Operation LED Zoom buttons Wrist strap retainer Play button Display...

Page 13: ...tart stop recording a video or audio clip Playback If the camera is turned off press and hold for 0 3 seconds to turn on camera in Playback mode If the camera is turned on press to toggle camera to Pl...

Page 14: ...is in progress Amber steady Power saving sleep mode Amber very fast blinking In Record mode flash is charging or AF error In Playback mode self timer countdown error Amber fast blinking Battery low or...

Page 15: ...s Beep goes off when self timer is complete Shutter sound The shutter is pressed to record an image Camera Memory Internal memory Your camera is equipped with 32MB of internal memory Users can store i...

Page 16: ...trap 1 2 Inserting the Battery Follow these instructions to insert the Li ion battery into the battery compartment Please read Battery Information on page 9 before inserting removing the battery 1 Sli...

Page 17: ...ery indent facing next to the battery SD card door 3 Flip the door back into place as shown in the illustration and slide the locking tab in the direction of the arrow Inserting an SD SDHC Memory Card...

Page 18: ...emory card 2 Slide the locking tab on the battery SD card door in the direction of the arrow and flip the door open 3 Insert the SD SDHC card into the memory card slot label side up 4 Push the SD SDHC...

Page 19: ...at comes along with your camera is not charged You need to charge the battery before using the camera 1 Insert the battery into the battery charger as shown 2 Connect the power cord to the battery cha...

Page 20: ...old the Playback button The camera is turned on in Playback mode The zoom lens is not extended Playback button To turn off the camera press the Power button See Modes on page 22 to know more about Rec...

Page 21: ...photos and videos NOTE Holding down or changes the values continuously If the battery is removed for more than 48 hours the Date Time will have to be reset Need help with your digital camera Call our...

Page 22: ...mcorder mode Use this mode to record video Voice Recorder mode Use this mode to record voice clips See Selecting the Record mode options on page 23 Playback mode Set your camera to Playback mode to vi...

Page 23: ...g to scene conditions 1 Set the camera to Record mode 2 Touch to launch Quick Set Bar 3 Touch to launch Scene Mode submenu 4 Touch to select scene 5 Touch to close menu 12M ISO AUTO AF A 1 12M ISO AUT...

Page 24: ...r video The display on the LCD screen is called the On Screen Display or OSD LCD Screen Layout The following illustrations shows the LCD screen layout and icon descriptions Record Mode Screen Layout N...

Page 25: ...s resolution settings 9 Quality Displays quality settings 10 Focus frame Use to frame subject to capture 11 Exposure Displays exposure settings 12 Quick Set Bar Touch to activate Quick Set Bar 13 ISO...

Page 26: ...al no Indicates the file number over the total number of files in the memory 3 Recording information Displays recording information of the file 4 Quick Set Bar Touch to activate Quick Set Bar 5 Next T...

Page 27: ...card 3 Movie clip Indicates the file is a movie 4 Quick Set Bar Touch to activate Quick Set Bar 5 Next Touch to display next file 6 Slideshow Touch to activate slideshow 7 Previous Touch to display pr...

Page 28: ...es the file is an audio file 4 Quick Set Bar Touch to activate Quick Set Bar 5 Next Touch to display next file 6 Slideshow Disabled slideshow icon Available only in image video playback mode 7 Previou...

Page 29: ...s the Display button repeatedly to change the LCD display from one type to another In Record Mode the LCD display can be changed into any of the following NOTE The OSD information may vary depending o...

Page 30: ...nnot be changed for the following situations Recording movie or audio clips Playing movie or audio clips Playing slideshow Using Quick Set Bar The Quick Set Bar acts as a shortcut menu to adjust basic...

Page 31: ...ailable functions or functions with preset settings appear as grayed out icons No Menu Item Description 1 Scene Mode Touch to select scene mode 2 Flash Touch to change flash settings 3 Focus Mode Touc...

Page 32: ...touch the desired setting icon Touch to exit submenu 10M ISO AUTO AF A 1 10M ISO AUTO AF A 1 Camcorder Mode N N AWB AWB 640 640 AF AF 9 8 7 6 3 2 1 5 4 The Quick Set Bar in Camcorder mode contains 9...

Page 33: ...go to Camcorder and Settings Menu 6 Quality Touch to change quality settings 7 Drive Mode Touch to change drive mode settings 8 Effect Touch to add effects 9 Close Touch to close Quick Set Bar Voice...

Page 34: ...o Menu Item Description 1 Effect Touch to add effects to image 2 Rotate Touch to rotate image 3 D Lighting Touch to adjust D lighting settings 4 Protect Touch to lock image 5 Main Menu Touch to go to...

Page 35: ...sure When the camera is ready to take the photo the focus frame turns green the shutter speed and aperture value are displayed When the focus frame is in red and the operation LED blinks the subject i...

Page 36: ...stabilizer Setting the Zoom Control Your camera features up to 3x optical zoom and up to 5x of digital zoom Optical zoom is achieved by mechanically adjusting the lens while digital zoom is activated...

Page 37: ...size picture Optical zoom Digital zoom 0 0EV 0 0EV 3200 3200 307 307 0 0EV 0 0EV 3200 3200 307 307 Setting Scene Mode Setting the Scene mode allows you to capture your images with preset settings acc...

Page 38: ...ne mode Portrait The camera blurs the background to focus on the subject Landscape This feature is used to emphasize wide scenic views Sunset This feature enhances the red hue for capturing sunset ima...

Page 39: ...makes the captured image more enticing Building This feature enhances the edges of captured images Text This feature enhances the black and white contrast normally used when capturing text images Auct...

Page 40: ...ct from the Scene Mode submenu 2 Focus the camera on the subject to capture 3 The camera detects the shooting conditions and switches to an appropriate scene mod 4 Half press the shutter button to foc...

Page 41: ...set when There is no face detected The focus distance is more than 1 5 meters The EV setting is lower than 5 or 4 5 Using Smile Detection Mode The Smile Detection mode uses smile tracking to automatic...

Page 42: ...an image with several faces face tracking function may take up more time tracking faces for the first time Using Blink Detection Mode The Blink Detection mode tracks faces and determines captured ima...

Page 43: ...the screen on the right is displayed 4 Select Yes to save or No to discard image Selecting the Photo Stitch Mode This feature is used for shooting scenery Use Photo Stitch to make your panoramic pict...

Page 44: ...sh mode 12M 307 307 Your camera is equipped with six flash modes Icon Flash Mode Description Auto flash The flash fires automatically whenever extra lighting is needed Off The flash is turned off Alwa...

Page 45: ...the icon 4 To change the submenu settings touch the icon of the desired setting 5 Touch to exit submenu Resolution The Resolution function is used to set the resolution before you capture the image C...

Page 46: ...ne Normal Quality 1 1 Available settings for still images are as follows Super fine Fine and Normal ISO The ISO function lets you adjust the ISO sensitivity in recording still images depending on the...

Page 47: ...ultiple points in the subject area Center The camera measures the average light from the entire frame but gives more importance to the values near the center Spot The camera selects the exposure value...

Page 48: ...r photos with fluorescent lighting conditions Custom Used to measure the white balance manually WB White Balance Used when light source cannot be specified When user touches this icon WB icon appears...

Page 49: ...more vivid G Vivid Green Captured image becomes greenish Ideally used to record images like mountains and lawns to make them more vivid B Vivid Blue Captured image becomes bluish Ideally used to reco...

Page 50: ...a yellow focus frame appears on the LCD screen 1 Tap and hold the yellow focus frame to display the instruction frame 2 Drag the yellow focus frame within the instruction frame to manually choose 3 Ca...

Page 51: ...ndifficultlightingcondition theautoexposure function of your camera may be misled into giving the wrong readings Exposure Value EV function allows you to adjust the exposure value and correctly expose...

Page 52: ...Press the shutter button to capture image with selected frame Sharpness This function allows you to enhance or soften finer details of your photos The table below shows the available Sharpness settin...

Page 53: ...e contrast Date Stamp The Date Stamp function allows you to add the recorded date and time they were taken on your photos The recorded date and time are based on your camera s clock settings Once date...

Page 54: ...elf timer and Burst which can be set in the Drive mode function The Self timer allows you to take photos after a pre defined delay While burst lets you take consecutive shots This function is only ava...

Page 55: ...sing the shutter button allowing the camera to focus easily Available settings are Auto and Off Auto Off AF Lamp 1 1 Recording Movies You can record movies with the camera the available recording time...

Page 56: ...to the following menu items Movie Size Quality Frame Rate Drive Mode White Balance Effect and Main Menu Touch an icon to open the submenu Use the Camcorder Menu to change other settings like Effect Sh...

Page 57: ...e size is up to 1 GB Most uploaded movie length ranges within 5 minutes although you can upload a maximum movie length of 10 minutes Therefore when you record using the YouTube mode the following stan...

Page 58: ...15fps and 30 30fps Setting White Balance To set white balance tap to activate Quick Set Bar Tap AWB AWB to display the white balance screen Setting Quality The quality determines the amount of compres...

Page 59: ...on every object INF Infinity Camera focuses on distant objects Setting Effect To set an effect tap to activate Quick Set Bar Tap N to display the effect screen Recording Voices 1 To select Voice Recor...

Page 60: ...n image To understand the icons and other information on the screen please see Playback Mode Screen Layout on page 25 Still Image Movie Audio Clip 27 27 27 27 27 27 27 27 27 27 27 27 3 Touch or to vie...

Page 61: ...ce recording to view play it normally Viewing Thumbnails 1 From single navigation mode press the W button twice to view 12 image thumbnails 2 Touch or to view next previous page 3 Touch a thumbnail to...

Page 62: ...tes an error file Zooming Images The zoom view function works with still images only In normal view press the T button to activate zoom function see picture below 2 0x Shows zoom location You can view...

Page 63: ...and apply changes to the current file NOTE Once an image is over written you cannot go back to the original image Playing Movies 1 Select video to play A video file has a video icon displayed on scree...

Page 64: ...ume playback 6 Touch to stop playback The LCD screen displays the movie frame image in Single navigation mode Playing Voice Memo Voice memo is recorded and attached separately to a captured image See...

Page 65: ...ilable for images captured with VGA and 16 9 HD resolution 1 View image to add drawings to 2 Touch The My Drawing toolbar is displayed on the LCD screen 3 Touch on an icon to use the function For exam...

Page 66: ...t pen stroke Touch to save changes Touch to select stamp stroke Touch to exit My Drawing function Adding a Memo Dialog to an Image The Add Memo function lets you add a memo dialog to a still image Thi...

Page 67: ...mage to rotate 2 Touch 3 Touch or to rotate image 90 counterclockwise clockwise Touch the icons repeatedly until desired orientation is achieved The preview on the LCD screen changes at the same time...

Page 68: ...quate lighting conditions This function is only applicable for still images The edited image can be saved as a new file SET SET 0 0 0 0 D Lighting 1 View the file to adjust lighting 2 Touch 3 Touch or...

Page 69: ...r To set DPOF on a single file 1 View image video voice recording you want to set DPOF on the LCD screen 2 Touch 3 To set DPOF on currently viewed file touch Yes Set DPOF Yes No Select All 4 Set the n...

Page 70: ...ed for printing can be set off following the same procedures above NOTE If the camera is in thumbnail mode touching displays protect multiple files interface You can specify up to 30 copies for DPOF I...

Page 71: ...e LCD screen displays files in thumbnail view 3 Touch a thumbnail to mark file for protection The protect icon appears on the thumbnail 4 Touch Protect to protect marked files 5 Select Yes to confirm...

Page 72: ...ile you want to delete on the LCD screen 2 Touch See picture on the right 3 To delete currently viewed file touch Yes Delete this file Yes Voice only Select All Voice only icon is enabled only when vi...

Page 73: ...ve to the next previous page of menu selection 3 To select an item touch the icon 4 To change the submenu settings touch the icon of desired settings 5 Touch to exit submenu Resize The Resize function...

Page 74: ...on allows you to record and attach a voice memo to a saved image You can record a maximum of 20 seconds of Voice memo per image This function is only available for still images To record voice memo 1...

Page 75: ...ollow the procedure in recording a voice memo mentioned above Red Eye Correction The Red Eye Correction function is used to reduce red eye in captured images This function is only available for still...

Page 76: ...h whether to Yes Save the image to a new file No Disregard changes Overwrite Apply and save changes to the existing file The succeeding table shows the available settings Icon Type Description N Norma...

Page 77: ...urrent page for total of pages To go to Setting Menu 1 Touch 2 Touch or to move to the next previous page of menu selection 3 Touch a submenu option to change submenu settings 4 Touch to exit submenu...

Page 78: ...ture controls the digital zoom mode of your camera Your camera enlarges an image using the optical zoom first When the zoom scale exceeds 3x the camera uses digital zoom To set Digital Zoom 1 From the...

Page 79: ...gs are Volume 0 Off Volume 1 Volume 2 Volume 3 Volume 4 Volume 5 1 From the Setting menu select Volume 2 Touch to apply desired settings Volume 0 Volume 1 Volume 2 Volume 1 1 2 2 1 2 Setting LCD Brigh...

Page 80: ...s function is useful in attaching date stamps on captured images Your camera uses a 24 hour time format YY MM DD Date Time SET SET 2008 07 14 16 10 1 Touch or to adjust date and time value 2 Touch SET...

Page 81: ...1 1 P P 2 Touch an icon on the Quick Set Bar to replace A pop up selection appears 3 Touch desired submenu 4 To replace other icons repeat steps 2 3 5 Touch SET to save and apply changes Hot Key SET S...

Page 82: ...nd to reset file numbering when saving images videos voice recordings 001 001 Reset File No Reset Reset 1 1 To Reset 1 From the Setting menu select Reset 2 Touch option Reset File No Touchtoresetfilen...

Page 83: ...For better quality graphics and sound when watching your video clips on the computer it is recommended to install DirectX version 9 0 or above To download visit www microsoft com 1 Before you begin c...

Page 84: ...ouTube Or share them through simple email attachments or popular photo printing ArcSoft Print Creations A family of fun and easy print project software that brings out the creativity in you Print Crea...

Page 85: ...rcSoft software and select Video 4 Select the movie file you want to upload and click Upload to YouTube icon 5 Enter your YouTube account information If you do not have a YouTube account visit www you...

Page 86: ...1 Open Add Remove Program Properties in Control Panel and select Polaroid Digital Camera program then click Add Remove button 2 The confirmation dialogue box appears please click Yes to confirm remov...

Page 87: ...in 1 cable to the USB port on the bottom of your camera 4 Connect the other end of the cable to the TV s AV input port 5 The LCD screen turns black and all images and video clips are displayed on the...

Page 88: ...use a card reader to access the memory card contents of your camera Connecting the Camera to a Printer You can print your photos directly using a PictBridge compatible printer PictBridge allows you to...

Page 89: ...2 Quality Layout Paper Size Paper Type Indicates current page no total no of menu page To access PictBridge menu touch Setup in the confirmation selection before printing photos The table below shows...

Page 90: ...nd audio files are stored in this folder except for files recorded using the Auction or YouTube mode _AUCT Captured images using the Auction mode are saved in this folder _UTUBE Captured videos using...

Page 91: ...arning message Folder cannot be created When this happens try one of the following ways Reset the file number See Reset File Number on page 82 Plug in a new memory card NOTE Do not change the folder a...

Page 92: ...ace the memory card with a new one or delete unnecessary images LCD screen displays File locked This file is locked Unlock the file See Protecting Unprotecting Files on page 70 LCD screen displays Car...

Page 93: ...61 702001 E mail eurosupport arcsoft com For China ArcSoft China Support Center Hangzhou Tel 86 571 88210575 E mail support arcsoft com cn Web http www arcsoft com cn new support For Japan ArcSoft Ja...

Page 94: ...000 sec Fireworks 8 sec File Format Still Image EXIF 2 2 compatible format JPEG compression Video AVI MJPEG Audio WAV ISO Auto 80 100 200 400 800 1600 3200 Exposure Compensation 2EV to 2EV 1 3EV steps...

Page 95: ...l Vivid Sepia Black White Red Green Blue Playback Normal Sepia Black White Negative Art Mosaic Red Green Blue Storage 32MB flash memory 10MB real size for mass storage SD max size 4GB SDHC card up to...

Page 96: ...t Still Image Mode Image Resolution 12M Quality Fine Metering Multi White Balance for Pictures Auto ISO Auto Effect Normal AF Area Wide Flash Intensity Normal EV Compensation 0 Photo Frame Off Sharpne...

Page 97: ...to Effect Normal Sharpness Normal Saturation Normal Contrast Normal Focus Mode AF Setup Mode Auto Review Off Digital Zoom Standard Zoom System Sound On Volume Volume 3 LCD Brightness Normal Power Save...

Page 98: ...a User Guide www polaroid com Questions Need some help This manual should help you understand your new product If you have questions call our customer service help number Look for the insert with this...

Page 99: ...99 Polaroid t1235 Digital Camera User Guide www polaroid com Part No UMT1235UCUS001...

Page 100: ......

Reviews: