background image

EN-15

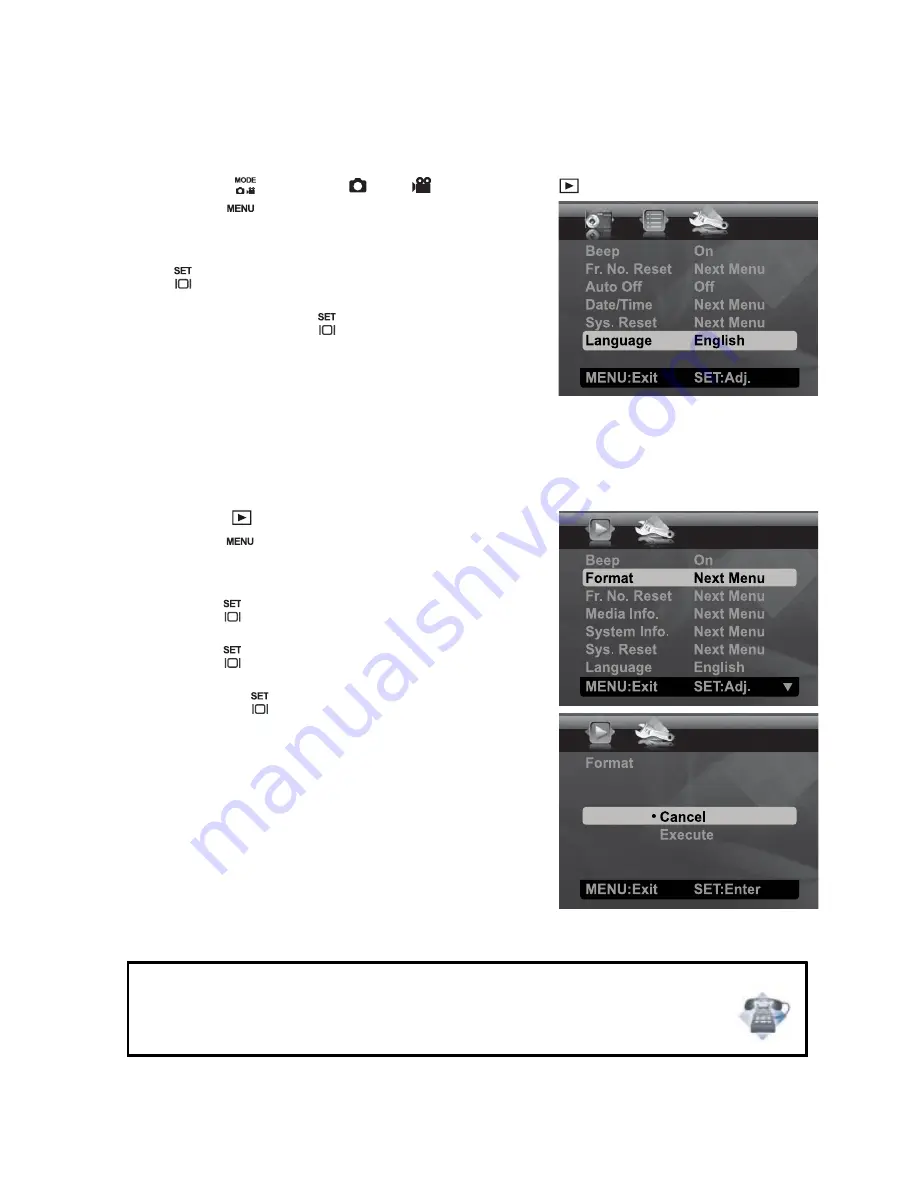
Choosing your Language

Specify what language in the menus and messages are to be displayed on the LCD display.

1. Toggle the 

 button to [

] or [

]; or press the [

] button.

2. Press the 

 button.

3. Select [Setup] menu with the 

f

 button.

4. Select [Language] with the 

c

 / 

d

 buttons and press

the

button.

5. Select the displayed language with the 

c

 / 

d

buttons and press the

button.

„

The setting will be stored.

Formatting the Memory Card or Internal Memory

This utility formats the internal memory (or memory card) and erases all stored images
and data.

1. Press the [

] button.

2. Press the 

 button.

3. Select [Setup] menu with 

f

 button.

4. Select [Format] with the 

c

 / 

d

 buttons, then

press the

button.

5. Select [Execute] with the 

c

 / 

d

 buttons, and

press the

button.

„

To cancel formatting, select [Cancel] and
press the

button.

Questions?

Call our toll-free customer service number. Look for the insert with this icon: 

Or visit www.polaroid.com.

Summary of Contents for T1032

Page 1: ......

Page 2: ...user is encouraged to try to correct the interference by one or more of the following measures Reorient or relocate the receiving antenna Increase the separation between the equipment and receiver Con...

Page 3: ...een retailers especially with accessories such as batteries chargers AC adapters memory cards cables pouches and language support Occasionally a retailer will specify a unique product color appearance...

Page 4: ...Do not disassemble change or repair the camera Service should only be performed by a qualified technician Please contact our friendly customer service should you have any questions Do not use the cam...

Page 5: ...when handling the camera This may cause damage to the camera Do not use the camera in humid steamy smoky or dusty places This may cause fire or electric shock Do not remove the battery immediately aft...

Page 6: ...mize its performance and lifetime we recommend that you fully charge the battery and discharge it for at least one complete cycle before use The camera may feel warm after a long period of continuous...

Page 7: ...emos 21 VIDEO MODE 21 Recording Video Clips 21 Playing Back Video Clips 22 PLAYBACK MODE 22 Playing Back of Still Images 23 Thumbnail Display 23 Removing Red eye 24 Dynamic Lighting Feature 24 Attachi...

Page 8: ...Carefully unpack your camera and ensure that you have the following items Common Product Components Digital Camera User s manual Software CD ROM USB cable AV cable Camera strap Camera pouch Rechargea...

Page 9: ...EN 8 GETTING TO KNOW YOUR CAMERA Front View 1 Shutter button 2 Flash 3 Power button 4 Status LED 5 Microphone 6 Lens 7 Self timer LED 8 Zoom lever...

Page 10: ...utton Macro Focus button X Right button Flash button T Down button Self timer button Delete button W Left button Backlight Exposure compensation button 5 Hand strap holder 6 USB or AV OUT terminal 7 S...

Page 11: ...0 ISO 200 ISO 400 ISO 800 ISO 1000 12 Self timer icon 2 sec 10 sec 10 2 sec 13 Date and time 14 Exposure compensation Backlight correction Adjust exposure compensation value with the e f buttons 15 Ca...

Page 12: ...utter speed value 14 Protect icon 15 Mode icon Playback mode Video playback 1 Video status bar 2 Elapsed time 3 File number 4 Folder number 5 Sound off icon When the c button is pressed during video p...

Page 13: ...ity Be sure to format the memory card with this camera before its initial usage 5 Close the battery memory card cover and make sure it is locked securely To prevent valuable data from being accidental...

Page 14: ...is red when charging and is green when charging has been completed The LED is green if no battery is inserted into the charger Charging time varies according to the ambient temperature and the life of...

Page 15: ...steps to set the correct date and time 1 Toggle the button to or 2 Press the button 3 Select Setup with the f button 4 Select Date Time with the c d buttons and press the button 5 Select the date form...

Page 16: ...s the button The setting will be stored Formatting the Memory Card or Internal Memory This utility formats the internal memory or memory card and erases all stored images and data 1 Press the button 2...

Page 17: ...30 seconds 2 Toggle the button to 3 Compose your image in the LCD display Slide the zoom lever to side to zoom in on the subject and enlarges the subject on the LCD display Slide the zoom lever to sid...

Page 18: ...etects a smile it will automatically capture 3 images by default the flash mode setting is set to If the flash mode setting is changed to the camera will only capture one image after it detects a smil...

Page 19: ...ty face main focus frame and gray ones around the other faces 3 Press the shutter button halfway down to lock the focus The main focus frame simultaneously turns green If the top priority face is out...

Page 20: ...link Detect with the c d buttons and press the button 4 Select On with the c d buttons and press the button 5 Press the button to exit the menu mode and the camera returns to preview display 6 Press t...

Page 21: ...he focus and exposure then press it down fully to capture your image VOICE RECORDING is displayed on the screen immediately and the voice memo recording starts 7 Press the shutter button one more time...

Page 22: ...uality lower than the current one Playing Back Video Clips You can play back recorded video clips on the camera You can also play back sound if recorded with the video 1 Press the button The last imag...

Page 23: ...ons To view the previous image press the e button To view the next image press the f button Pressing the c button during image playback will result in a 90 degree clockwise rotation display Slide the...

Page 24: ...Removing Red eye You can use this function to remove the red eye phenomenon after an image is taken 1 Press the button 2 Select the image that you want to edit with the e f buttons 3 Press the button...

Page 25: ...or captured still images The voice memo can be recorded only once 1 Press the button The last image appears on the screen 2 Select the image to which you want to attach the voice memo with the e f but...

Page 26: ...protect icon is displayed with protected images When All has been selected is displayed on all the images Canceling the Protection To cancel protection for only one image display the image on the LCD...

Page 27: ...xcept for the protected images 5 Select Execute with the c d buttons and press the button To not erase select Cancel and press the button Deleting an image will not affect sequential image numbering F...

Page 28: ...ce with the shooting conditions Program AE Smile Shot Anti Shake Panorama Portrait Man Portrait Lady Landscape Sports Night Portrait Night Scene Candlelight Fireworks Text Sunset Sunrise Splash Water...

Page 29: ...o turned on Zoom in on the paper so it almost fills the frame Then select Execute from the Manual WB menu This establishes for the camera exactly what white should look like under the current lighting...

Page 30: ...ge is from 5 to 5 Digital Zoom This sets whether or not to use digital zoom Using a combination of 3x optical zoom and 4x digital zoom permits zoom photography at up to 12x magnification While the dig...

Page 31: ...button Size This sets the size of the video clip that will be captured 640 x 480 320 x 240 Quality This sets the quality compression at which the video clip is captured Fine Standard Color This sets...

Page 32: ...Refer to the section in this manual titled Protecting Images for further details Voice Memo Refer to the section in this manual titled Attaching Voice Memos for further details LCD Bright Refer to the...

Page 33: ...era inactivity the power to the camera is automatically turned off This feature is useful for conserving battery power 1 Min 2 Min 3 Min Off Date Time Refer to the section in this manual titled Settin...

Page 34: ...ill be assigned drive letter e or higher 7 Double click on the removable disk and locate the DCIM folder 8 Double click on the DCIM folder to open it to find more folders Your recorded images and vide...

Page 35: ...3 Connect the other end of the USB cable to an available USB port on your computer 4 Turn on your camera 5 Select PC Camera with the c d buttons and press the button 6 Position the camera steadily on...

Page 36: ...You can personalize the designs with your own digital pictures and text based on professionally designed templates and layouts Projects can be printed at home or saved as image files for sharing with...

Page 37: ...format JPEG DCF 1 1 EXIF 2 2 AVI Lens 3x optical zoom lens Aperture range f2 9 W f5 2 T Focal length 5 7mm 17 1mm equivalent to 31mm 94mm on a 35mm camera Focus Range Standard 0 4m 15 7 to infinity M...

Page 38: ...onomy 14 32 65 132 266 534 1069 2141 2816 x 2112 Fine 13 29 59 120 241 484 970 1942 Standard 18 39 79 161 323 648 1298 2599 Economy 20 43 87 177 355 712 1426 2854 2272 x 1704 Fine 24 52 106 215 432 86...

Page 39: ...otected Remove the write protection Images do not appear on the LCD display LCD display is dark Adjust the brightness of the LCD display in the menu Although it is set to auto focus it does not focus...

Page 40: ...play 1 Select the item you want to configure with the c d buttons and press the button Images Select whether you want to print specific image or all images You may also select printing number for spec...

Page 41: ...g starts and the figure shown on the right hand side appears COMPLETE will be displayed temporarily reminding you that the printing procedure is finished If an error is detected during the connection...

Reviews: