background image

Remote Control                                     


Use Of Remote Control 

 
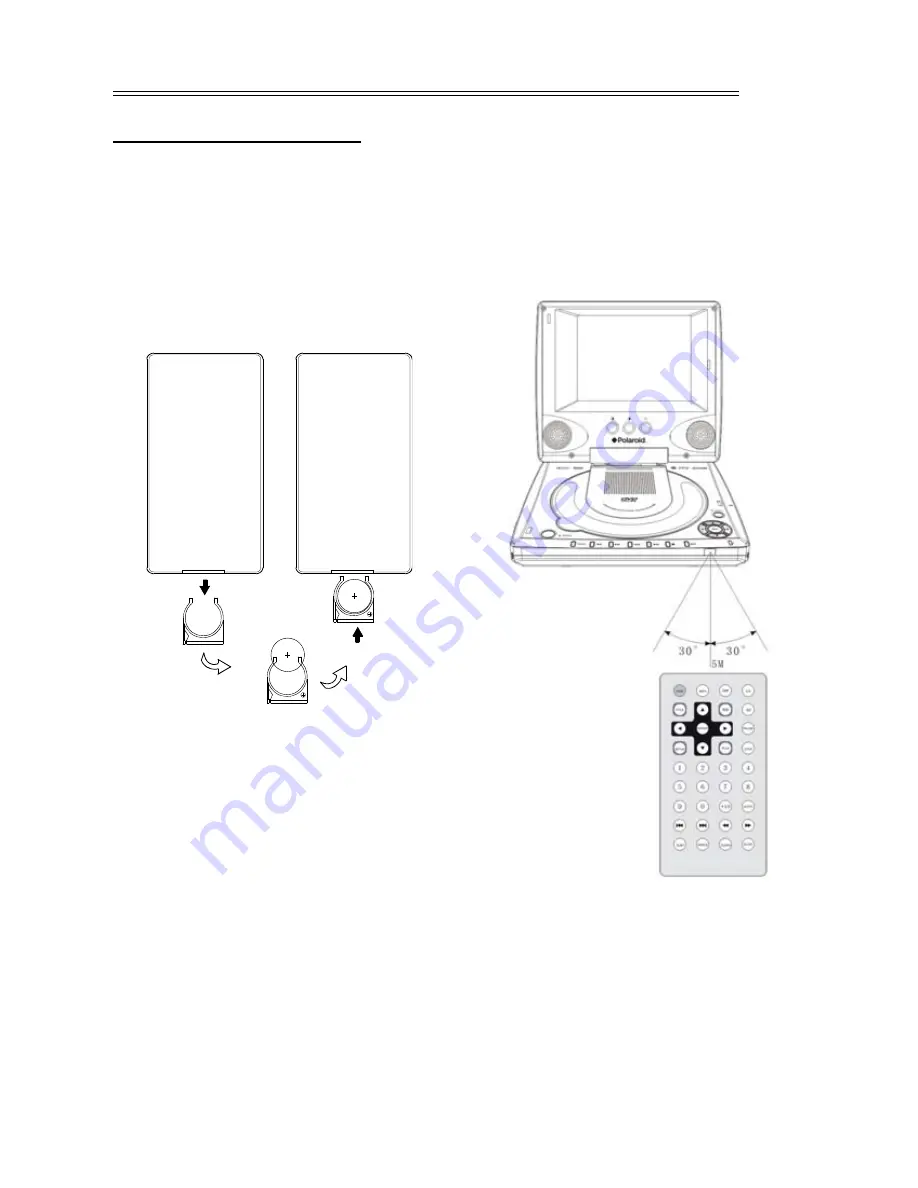
Preparation of remote control 

Remove the battery compartment in the 
direction of the arrow. Place the lithium 
battery in the battery compartment. 
Make sure the polarity matches the 
marks inside the compartment. Insert 
the compartment into the remote.   


Under normal use the battery will last for 
about one year. If the remote control unit 
fails to work even when it is operated 
near the player, replace the battery. 
Take out the battery when the remote is 
not used for a long time.


Correct use of the Remote Control 

Point the remote control at the unit from 
no more than about 5 feet from the 
remote control sensor and within about 
60 degrees of the front of the unit. Do 
not place objects between the remote 
control unit and the remote control 
sensor. 


Summary of Contents for PDV-523M2

Page 1: ...5 Portable DVD Player Model PDV 523M2 Operations Manual 20040928 1...

Page 2: ...Power Adapter Connecting to Car Adapter Connecting to LCD Display Connecting to Headphone About Rechargeable Battery Usage of the rechargeable battery Detaching the rechargeable battery Disc Play Oper...

Page 3: ...NCE TO RAIN OR MOISTURE POWER SUPPLY Connect the supplied adapter to the side of the attached LCD display in the slot marked with DC12V In Use the supplied power cord to connect the jack marked DC12V...

Page 4: ...nt where they exit from the apparatus 11 Only use attachments accessories specified by the manufacturer 12 Use only with the cart stand tripod bracket or table specified by the manufacturer or sold wi...

Page 5: ...pports multi angle extra language caption and parental lock Video Out Standard video output Audio Out Audio output terminal for connection to audio amplifiers ESP Function Built in electronic shock pr...

Page 6: ...ires proper formatting and finalization of the disc for audio playback Some computers and or software programs may not be capable of creating compatible discs Care of Discs Do not touch the playing su...

Page 7: ...rch forward 5 PREV SKIP button Press to return to the previous menu or chapter track 6 NEXT SKIP button Press to skip to the next menu or next chapter track 7 STOP button Press to stop playback 8 PLAY...

Page 8: ...plugged in the built in speakers will be turned off 2 POWER ON OFF switch Switch the power of the player on or off Right View 1 Headphone speaker volume knob Use to adjust the volume of the headphone...

Page 9: ...r normal use the battery will last for about one year If the remote control unit fails to work even when it is operated near the player replace the battery Take out the battery when the remote is not...

Page 10: ...ormation on the disc playing Press repeatedly to remove information from screen 3 TITLE button Press to display title menu if present on the disc 4 Direction buttons Use to select menu items 5 ENTER b...

Page 11: ...content 15 MENU button Press to turn of off the menu 16 PAUSE button Press to pause playback Press the PLAY button to resume normal playback 17 STOP button Press once to stop playback and then press...

Page 12: ...io and video connections have been made Switch AV IN OUT to AV OUT mode for playing discs Connect the audio video output jacks to the corresponding jacks on the TV amplifier or speaker Connecting to T...

Page 13: ...into the video output socket of external AV signal source Connecting to Power Adapter The player is supplied with a switching power adapter There are two ways to connect to the power adapter When usin...

Page 14: ...pter install the unit away from the power adapter Don t put them close to each other Connecting To Car Adapter You can use Car Adapter in a vehicle 1 This player can be powered with a car adapter The...

Page 15: ...hone Plug the headphone connector into the headphone jack on the right side of the DVD player See the below figure Excessive loud usage of headphones could damage your hearing Turn down the volume bef...

Page 16: ...pack on to the player then slide the Battery Pack toward the front of the player until you hear it click and lock into place 3 Plug the Power Adapter into the player s DC IN 12 V Jack located on Right...

Page 17: ...on t plan on using the battery for an extended period of time and keep it in a dry and cool place Battery should only be used and charged when temperatures are between 32 95F Maintain well ventilation...

Page 18: ...earch the disc automatically if there is a disc loaded the player will start to play it automatically Press OPEN button on front panel to open the disc cover Load the disc into the disc tray with the...

Page 19: ...player is designed and manufactured to respond to the region management information that is recorded on a DVD disc If the region code described on the DVD disc does not correspond to the region code...

Page 20: ...The player will play all tracks for CD discs continuously in default status You can press the and PREV NEXT SKIP buttons or number buttons to select a certain track MP3 Playback Open the cover and lo...

Page 21: ...ress the ENTER button to begin the playback Many discs have other items besides pictures Picture Rotation Pictures can be flipped and rotated while they are displayed Once another picture is selected...

Page 22: ...Folder Shuffle and Random During DVD playback repeatedly pressing the REPEAT button will display a menu as follows Chapter Title and All Some discs do not support this function A B Repeat Use the A B...

Page 23: ...enlarge x3 and enlarge x4 or reduction x1 2 reduction x1 3 and reduction 1 4 repeat press the ZOOM button on the remote control to resume normal playback When the picture is enlarged use the direction...

Page 24: ...t General Setup Page TV Display Wide Normal PS Angle Mark On Normal LB OSD Lang ENG Wide Captions Off Screen saver On Set TV Display Mode General Setup Page TV Display Wide Angle Mark On OSD Lang ENG...

Page 25: ...eturn to the last level General Setup Page TV Display Wide Angle Mark On On OSD Lang ENG Off Captions Off Screen Saver On Set Angle Mark Captions In the General Setup Page use the direction buttons to...

Page 26: ...lay Wide Angle Mark On OSD Lang ENG Captions Off Screen Saver On On Off When Speaker Setup has been done press the W to return to category Use the X to choose Dolby Digital Setup Press the ENTER or th...

Page 27: ...direction button to highlight the Brightness Contrast and press the X to bring up the menu below Use the W X buttons to set the brightness and contrast of the picture Press the ENTER button to confirm...

Page 28: ...on to confirm it and return to the last level This function is only available for discs that several audio bit streams have been recorded onto Preference Page Audio ENG English Subtitle ENG French Dis...

Page 29: ...ngs done so far will be deleted Version In Preference menu use the direction button to highlight the Default and bring up the right menu Press the X button to access it This item is to display softwar...

Page 30: ...tdoors Two speakers produce high quality sound and the 5 Color TFT LCD screen presents a high resolution picture Its video system is NTSC Front View 1 Color button Press to adjust the color of the LCD...

Page 31: ...2 POWER OUT jack Connection for power output 3 VIDEO IN jack Connection for video input 4 AUDIO IN jack Connection for audio input 5 Headphone jack Connection for the headphone When the headphone is...

Page 32: ...ctions should be made as follows Connecting to Audio Video Sources Use the audio cable to connect the AUDIO IN socket of the LCD display with the audio output jack of the external AV signal source Put...

Page 33: ...ong end of the power cord to an AC100 240V outlet See the below figure When you use the Power Adapter install the unit away from the power adapter Don t put them close together Connecting To Car Adapt...

Page 34: ...ht side of the LCD display See the below figure Excessive loud usage of headphones could damage your hearing Turn down the volume before you connect the headphones and then raise the volume to suit yo...

Page 35: ...layer and accessories 2 The DVD Player Case is intended for viewing only from the rear seats Do not install or use this product in the front seat of a vehicle 3 To reduce the chance of injury in case...

Page 36: ...he main compartment that holds the player locate the set of rings tucked inside the top edge of the case A 2 Locate the 2 straps with hooks on each end 3 Hook one end of each strap to the rings at the...

Page 37: ...of the case A 2 Locate the 2 straps with hooks on each end 3 Hook one end of each strap to the rings at the top of the case A 4 Wrap each strap around the headrest or seat hook the straps to a second...

Page 38: ...Your Portable DVD Player includes a sturdy carrying bag headrest mount for the ultimate in portable convenience The bag mount is easy to attach and fits on nearly any car or truck headrest see photo a...

Page 39: ...to minimum Make sure the headphone is not connected Make sure the player is not in pause status Disc skips and will not continue to play Make sure the player is not in A B repeat status Is the disc d...

Page 40: ...Video Out Out Level 1VP P 0 2 Load 75 Unbalanced Negative Power AC100 240V 50 60Hz Dimension 170mm 155mm 39mm Weight About 2 3 kg TFT screen size 5 inches 4 3 Compliance with FCC FDA cUL listed E20915...

Page 41: ...oidelectronics com or in the US call 1 866 289 5168 in Canada call 1 866 301 7922 and in Mexico call 01 800 400 2443 Polaroid is a registered trademark of Polaroid Corporation of Waltham MA USA and li...

Reviews: