background image

- 15 - 


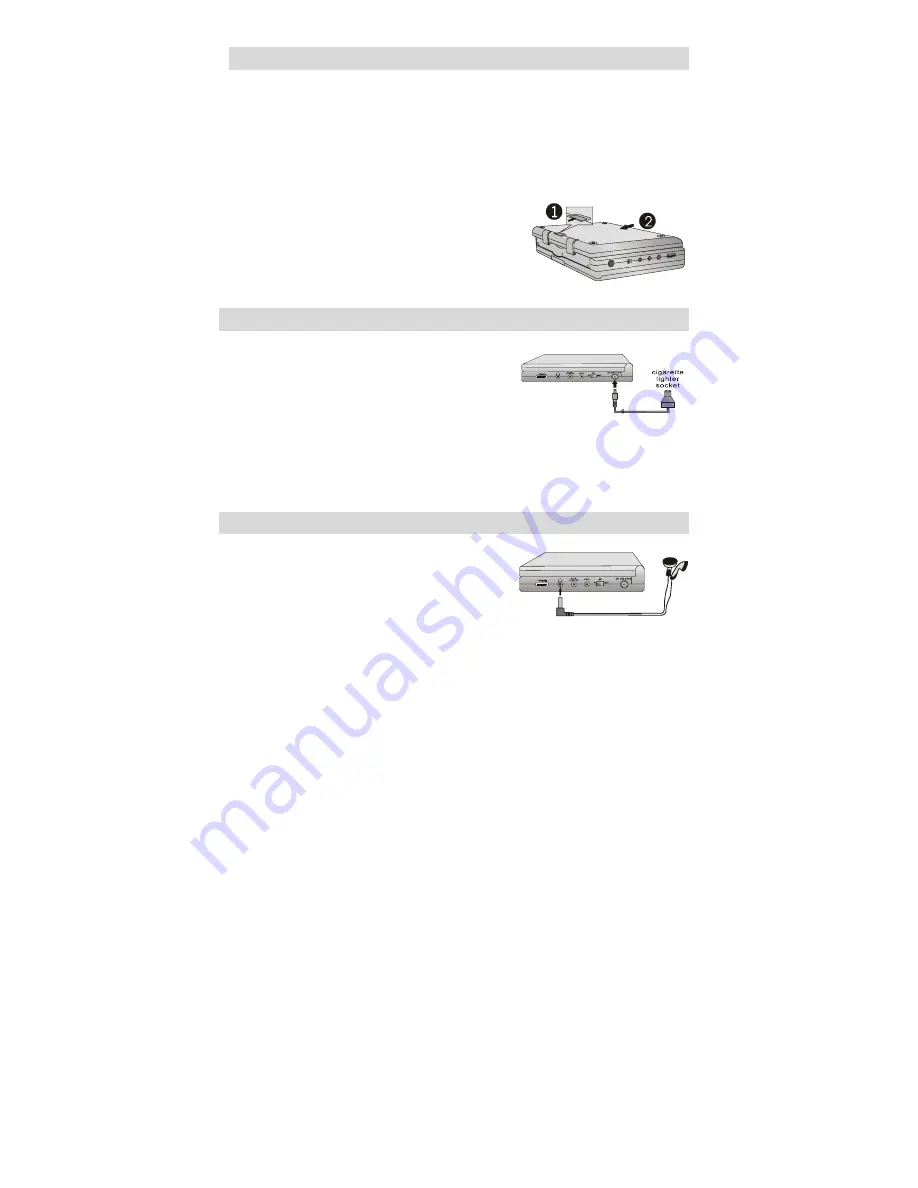
Detaching Battery Pack                           

Detaching Battery Pack from the unit: 

If the player is not going to be used for a long period of time, we recommend that 

you detach the Battery Pack. Even if the unit is powered down, the unit is still consuming 

some power in STANDBY mode. This could lead to over discharging the battery. Make 

sure the power is turned off before detaching the Battery Pack. After detaching the battery 

pack, take care when handling the unit. 

1.


Slide and hold in position. 

Press the tab towards the front of the unit. Hold 

the tab in the up position. 

2.


Taking off the Battery Pack 

Gently slide the Battery Pack toward the back of the 

Unit. Carefully lift the Battery Pack from your player.


Using a Car Adapter                              

You can use Car Adapter while in a vehicle: 

Connecting the Car Adapter Power Plug into the unit’s 

Power Jack and the other end to the Vehicle Cigarette 

Lighter Socket:


Quick Tips 


Do not operate the unit or view video software while driving a vehicle.


Place the unit in a secure position for viewing. 


Do not leave battery attached when using car adaptor as power supply.   


Do not play a DVD while using the car adaptor to charge the battery. 

Using  Headphones                                

Using Headphones while you are in a quiet area: 

Connecting Headphone Connector into right side of the 

unit’s Headphone Jack:


Quick Tips 


Excessive loud usage of headphones could damage your hearing. 


Turn down the Volume before you connect the headphones, then raise the volume 

to suit your level.


Sound from the unit’s external speaker will cease when headphones are connected.


Summary of Contents for PDV-0800

Page 1: ...8 Portable DVD Player PDV 0800 Operation Manual...

Page 2: ...upported by this player Usage of Switching Power Adapter Power Supply Using and Charging the Battery Pack Detaching Battery Pack Using a Car Adapter Using Headphones Basic Operations System Setup Play...

Page 3: ...otect the power cord from being walked on or pinched particularly at plugs convenience receptacles and the point where they exit from the apparatus 11 Only use attachments accessories specified by the...

Page 4: ...operating or the DVD is placed near an air conditioner In the hot summer season the DVD player is moved from an air conditioned room to a hot damp place to be used The DVD player is being operated in...

Page 5: ...OUTPUT Convenient forlisteningtomoviesormusic in private 11 REVOLVING TFT LCD screen Adjust the screen for custom viewing by revolving it horizontally about its axis or lay it flat with the screen fa...

Page 6: ...button 11 Play button 12 Menu button 13 Title button 14 Bright up down 15 Speaker For enjoying high quality stereo music 16 Rotate button The picture can be rotated in inversion and enantiomorphism f...

Page 7: ...hen connecting this jack speaker volume is turned off 3 Audio output input and optical digital output jack 4 Video output input jack 5 Switch position between AV IN and AV OUT Switch to IN then the pl...

Page 8: ...s if present on the disc Press to select random play when playing a CD 4 Direction buttons Press to select menu items 5 ENTER button Press to confirm the items or setting 6 SETUP button Press to acces...

Page 9: ...utton Press to pause playback Press PLAY button to resume normal playback 17 STOP button Press once to stop playback and then press PLAY button to resume normal playback Press the button twice to stop...

Page 10: ...upply 2 The easiest way to connect the DVD player to a television is via the supplied Audio Video connections Connect the audio video cable from the DVD player to the TV s audio video inputs Connectin...

Page 11: ...ilm was applied to the battery Remove this film 3 Insert the battery into the receptacle and insert the receptacle into the remote 4 For best results aim the remote directly at the player s receiving...

Page 12: ...most recordable CD R or erasable CD RW CDs but playback of CD R or CD RW discs created on a computer requires proper formatting and finalization of the disc for audio playback Some computers and or s...

Page 13: ...g end of the power cord to a grounded electrical socket Note Please turn player s power off first and then unplug the power to prevent malfunction Pre operation 1 Connect to power 2 Lift the main cove...

Page 14: ...yer to prevent it from moving push the battery pack on to the player then slide the Battery Pack toward the front of the Player until you hear it click and lock into place 3 Charging the Battery Pack...

Page 15: ...Pack from your player Using a Car Adapter You can use Car Adapter while in a vehicle Connecting the Car Adapter Power Plug into the unit s Power Jack and the other end to the Vehicle Cigarette Lighte...

Page 16: ...to prevent damage to the player or disc 5 Close the disc cover The player will automatically search for the disc and when it finds it play will begin Start to Playback 1 Press the PLAY button on the...

Page 17: ...Press direction button or the number buttons to select the title or disc option you wish to play 3 Press the PLAY button to start playback NOTE Title and Menu are only available for DVD discs Previou...

Page 18: ...items placed in the middle or highlighted will be the current set up 2 Press right direction button on the remote control to select the correct category 3 Press the direction button to select your pre...

Page 19: ...5 Captions You can choose captions on or off on screen during playback 6 Screen Saver When activated the screen saver automatically works if there has been no operation for a period of time Dolby Dig...

Page 20: ...re password protected Choose a password you will remember easily or write it down The original password is 1369 4 Default Reset Use this function to reset all the settings 5 Version Displays software...

Page 21: ...g outside of Region 1 and playing DVDs purchased outside of Region 1 follow the steps listed below 1 Remove DVD disc from unit 2 Turn on the DVD player 3 Using the remote control press the Set up butt...

Page 22: ...d or rewind Slow Forward Rewind Press the SLOW button to slow forward or rewind Subtitle A DVD disc can be recorded with up to 32 subtitles Press the SUBTITLE button on the remote control the mode of...

Page 23: ...PLAY button is pressed the play will begin from the beginning of disc Playing an MP3 MP3 is the third audio compression format of international standard MPEG which compresses the audio signal at the...

Page 24: ...ation It can be operated when the picture is normally displayed Once another picture is selected rotating function will not be effective There are four kinds of rotational modes you can use direction...

Page 25: ...ise Gently wipe from the inside to the outer edge Cleaning Care Use a soft dry cloth for cleaning For stubborn dirt soak the cloth in a detergent solution ring well first and wipe Use a dry cloth to w...

Page 26: ...rwise damage may occur 6 A fully charged battery is able to play a DVD with the TFT on for about 3 hours Note Playing time varies from disc to disc 7 Working conditions and precautions New batteries s...

Page 27: ...ped Clean or replace disc Cannot continue to play and play a section repeatedly Make sure the player is not in A B repeat status Press A B button to cancel it A B repeat status Is your disc dirty or w...

Page 28: ...ut Digital Audio Out Out Level 0 5VP P Load 75 Video Out Video Out Out Level 1VP P 0 2 Load 75 Unbalanced Negative Power AC100 240V 50 60Hz Power Consumption 25W Dimension w o battery 215 mm x 160 mm...

Page 29: ...on panel Pos B 2 Revolving the screen horizontally about its axis in the clockwise only The maximum revolving degree is 180 position C at which you will hear a click and the screen faces backward If y...

Reviews: