background image

Polaroid a540 Digital Camera User Guide                                      


www.polaroid.com

EN-15

Choosing your Language 

Specify which language the menus and messages are to be displayed on the LCD display.
1. Press the MENU button.
2. Select [Setup] menu with the     button. 
3. Select [Language] with the ▼ buttons, and press the OK 

button.
■ The Language setting screen will be displayed.

4. Select the display language with the ▲ / ▼buttons, and press 

    the OK button.

■ The setting will be stored.

■  

To exit from any menu selection, press the     button.

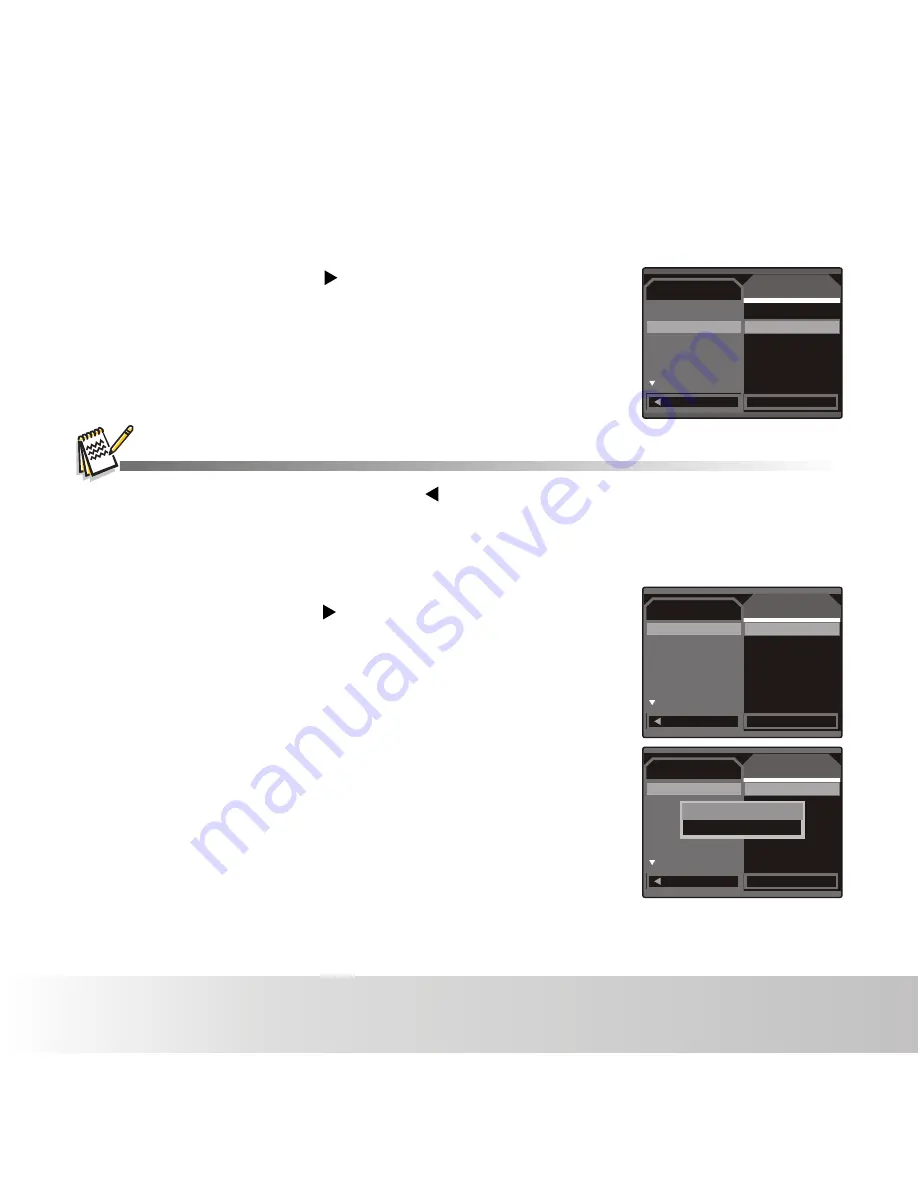
Formatting the Memory Card or Internal Memory 

This utility formats the internal memory (or memory card) and erases all stored images and data.

1. Press the MENU button.
2. Select [Setup] menu with the     button. 
3. Select [Format] , and press the 


OK button.

4. Select [ Execute] with the ▼ button,
    and press the OK button to confirm.
    ■ To cancel formatting, select [Cancel] and
    press the OK button.

Capture

Setup

Next Menu
English
Off
Next Menu
60Hz

Exit

OK

    Set

Format
Language
Auto Off
Sys. Reset
Light Freq.

Capture

Setup

Next Menu
English
Off
Next Menu
60Hz

Exit

OK

    Set

Format
Language
Auto Off
Sys. Reset
Light Freq.

Capture

Setup

Next Menu
English
Off
Next Menu
60Hz

Exit

OK

    Set

Format
Language
Auto Off
Sys. Reset
Light Freq.

Cancel
Execute

Summary of Contents for iZone A540

Page 1: ......

Page 2: ...se the separation between the equipment and receiver Connect the equipment into an outlet on a circuit different from that to which the receiver is connected Consult the dealer or an experienced radio...

Page 3: ...al adverse effects on the environment and human health Presence of this label on the product means it should not be disposed of as unsorted waste and must be collected separately As a consumer you are...

Page 4: ...ct and accessories that come with your camera may be different from those described in this manual This is due to the fact that different retailers often specify slightly different product inclusions...

Page 5: ...ce for assistance There is no user serviceable parts DO NOT DISSASSEMBLE For repair please call our friendly customer service for assistance Do not use the camera in areas near water Take special care...

Page 6: ...ater and seek medical attention immediately A camera is a precision instrument Do not drop strike or use excessive force when handling the camera This may cause damage to the camera Do not use the cam...

Page 7: ...by limiting the following activities Reviewing the pictures on the LCD Screen Using the optical viewfinder if your camera has one to frame the subject when taking pictures Excessive use of the flash R...

Page 8: ...PPENDIX 37 Possible Number of Shots 38 Troubleshooting 39 Connecting to a PictBridge Compliant Printer INTRODUCTION 8 Overview 8 Package Contents 9 GETTING TO KNOW YOUR CAMERA 9 Front View 10 Rear Vie...

Page 9: ...ped with a 5 0 megapixel sensor this camera is capable of capturing images with a resolution of up to 2560 x 1920 pixels Package Contents Common Optional Accessories Carefully unpack your camera and e...

Page 10: ...User Guide www polaroid com EN 9 GETTING TO KNOW YOUR CAMERA Front View 1 Shutter button 2 Power button 3 Self timer indicator 4 Flash 5 Taking lens 6 Focus switch Normal mode Macro mode 7 USB interf...

Page 11: ...tor 11 Hand strap retainer 12 Tripod socket 13 SD card slot 14 Battery door 15 Menu button 16 Mode button 17 Up zoom in button 18 Left Display button 19 Down zoom out button 20 Delete 21 OK button 22...

Page 12: ...ty Fine Standard Economy 16 Photo Video counter 1 Battery Power Level Full power Medium power Low power No power 2 Brightness Alert 3 Date stamp 4 Mode indicator Auto Sport Night Screen Portrait Lands...

Page 13: ...image playback 1 Battery level 2 Playback indicator 3 Counting indicator 4 SIZE 5 EV 6 Storage media 7 Photo Video counter Playback mode Video playback 1 Battery level 2 Total recorded time 3 Playbac...

Page 14: ...capacity We recommend the use of a Polaroid SD not included Be sure to format the memory card with this camera before its initial usage To prevent valuable data from being accidentally erased from an...

Page 15: ...linking red Questions Call our toll free customer service number Look for the insert with this icon Or visit www polaroid com Pressing the POWER button once turns the camera on To turn the power off p...

Page 16: ...e Memory Card or Internal Memory This utility formats the internal memory or memory card and erases all stored images and data 1 Press the MENU button 2 Select Setup menu with the button 3 Select Form...

Page 17: ...ress the Power button to turn the power on 2 Frame your image on the LCD display so that the main subject is within the focus frame Pressing the button zooms in on the subject and enlarges the subject...

Page 18: ...iner the image may become To capture a zoomed image perform the following steps 1 Press the Power button to turn the power on 2 To activate the digital zoom press the button The status of digital magn...

Page 19: ...ocus range of macro mode is 4 3 to 7 0 11cm to 18cm normal mode is 20 to Infinity 0 5m to Infinity 1 Press the Power button to turn the camera on 2 Slide the focus switch to your desired focus mode 3...

Page 20: ...is mode when you want to photograph fast moving subjects Night Select this mode when you want to capture dark scenes such as night views Portrait Select this mode when you want to capture an image tha...

Page 21: ...er with white text on black paper Weak reflecting bodies such as trees or dark leaves When the background is bright and the subject is dark When subjects people have a light source such as the sun to...

Page 22: ...Pressing the shutter button one more time will end the recording of the video clip The recording time depends on the storage size and the subject of the image to be recorded When recording a video cli...

Page 23: ...ip To pause video playback press the OK button This pauses video playback To cancel pause press the OK button again Questions Call our toll free customer service number Look for the insert with this i...

Page 24: ...the button to adjust the zoom ratio The magnification factor is displayed on the LCD display 4 To view different portion of the images Press OK once and press the button to adjust the display area 5...

Page 25: ...ess the MENU button The playback menu is displayed 3 Select Slide Show with the buttons then press the OK button 4 Select the desired interval time with the buttons and press the OK button The slidesh...

Page 26: ...e button 2 Press the MENUbutton 3 Select Protect with the button and press the OK button 4 Select Single All Select with the buttons and press the OK button Single Protects the selected image All Prot...

Page 27: ...an image number is retired when an image is deleted and will not be reused or reassigned to another subsequently captured image 1 Press the button The last image will be displayed on the screen 2 Sel...

Page 28: ...ing still images 1 Press the MODE button to set the camera mode to STILL CAMERA 2 Press the MENU button 3 Select the desired option item with the buttons and press the OK button to enter its respectiv...

Page 29: ...setting in cloudy overcast conditions Tungsten Use this settings when incandescent tungsten lights are in your scene Fluorescent Use this settings when flourescent lights are in your scene ISO This s...

Page 30: ...2 Press the MENU button 3 Select the desired option item with the buttons and press the OK button to enter its 4 Select the desired setting with the buttons and press the OK button 5 To exit from the...

Page 31: ...ttons and press the OK button 5 To exit from the menu press the button Delete Refer to section in this manual titled Copy to Card Allows you to copy your files from the camera s internal memory to an...

Page 32: ...ss the OK button 5 To exit from the menu press the button Format Refer to section in this manual titled Formatting the Memory Card or Internal Memory for further details Language Refer to section in t...

Page 33: ...allows to change the light frequency of environment to 60Hz or 50Hz 60Hz The light frequency of environment is 60Hz like the US 50Hz The light frequency of environment is 50Hz like the UK TV Output NT...

Page 34: ...ore folders Your recorded images and video clips will be inside these folders 8 Copy Paste or Drag N Drop image and video files to a folder on your computer Pentium III 800 or equivalent Windows 2000...

Page 35: ...featuring your photo video and music files Edit enhance and add creative effects to your photos Create your own movies or photo slide shows complete with soundtrack Upload your files easily to YouTube...

Page 36: ...Quality Fine Scene Auto Exposure 0 0 White Balance Auto ISO Auto Color Standard Saturation High Sharpness Normal Questions Call our toll free customer service number Look for the insert with this icon...

Page 37: ...memory Supports SD SDHC memory card up to 2GB for SD and up to 8GB for SDHC optional Image format JPEG video format AVI F no f 3 0 Focus Length 6 47 mm equivalent to 39mm on a 35mm camera 1 1 1000 sec...

Page 38: ...5902 6356 8698 10016 2296 4594 5907 3230 5874 7180 6362 9731 11816 12726 17414 20053 Polaroid a540 Digital Camera User Guide www polaroid com EN 37 APPENDIX Possible Number of Shots Fine Super Fine Fi...

Page 39: ...e a picture The shutter button is not pressed all the way down Press the shutter button all the way down The internal memory or memory card does not have any free capacity The flash is charging The me...

Page 40: ...USB port on the printer 3 Select Printer with the buttons and press the OK button Printing images When the camera is properly connected to a Pict Bridge compliant printer and set to Printer the Pict B...

Page 41: ...number press the OK button to confirm To exit from the menu press the button 4 Select Print with the buttons and press the OK button to start printing 5 The printing starts The PRINTING will be displa...

Page 42: ...Polaroid a540 Digital Camera User Guide www polaroid com EN 41...

Page 43: ......

Reviews: