background image


42 

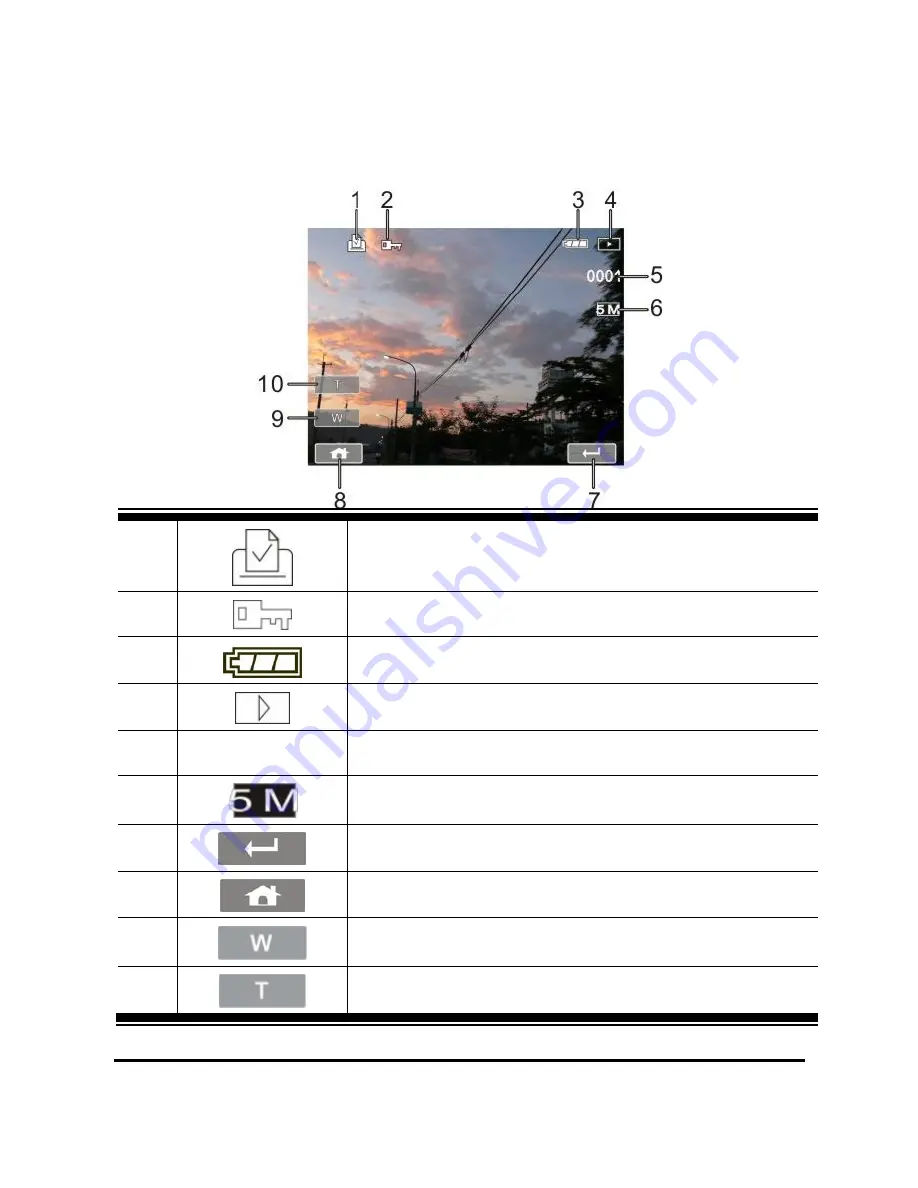
5.3  DSC Playback Mode   

Please  refer  to  the  following  illustration  to  familiarize  yourself  with 
icons and symbols of DSC Playback Mode. 


DPOF (Digital Print Order Format) icon


File Protect icon


Battery status icon


Image Playback Mode icon


0001


Number of pictures left icon


Resolution icon


Return Button 


Menu Button 


Zoom- Out Button 

10 


Zoom- In Button 

Summary of Contents for iD879

Page 1: ...g Started 16 2 1 Inserting SD Card s 16 2 2 Loading the Battery 17 2 3 Charging the Battery 19 2 4 The gestures of using the touch screen 20 2 4 1 Single touch 20 2 4 2 Slide 21 2 4 3 Rotate 21 2 5 Bu...

Page 2: ...layback Mode 39 5 2 Voice Recording Playback Mode 41 5 3 DSC Playback Mode 42 6 Menu Mode 43 6 1 Menu options of DV Mode 43 6 1 1 Movie clip Resolution 43 6 1 2 White Balance 44 6 1 3 Effect 45 6 1 4...

Page 3: ...4 1 Delete 63 6 4 2 Protect 65 6 4 3 Autoplay 66 6 4 4 Rotate 67 6 4 5 DPOF 68 6 5 Setting Menu 70 6 5 1 Information 70 6 5 2 Date Time 70 6 5 3 Beep 71 6 5 4 Default 72 6 5 5 TV standard 73 6 5 6 Aut...

Page 4: ...d TV Connection 86 7 1 Connecting to the Computer 86 7 2 Connecting to a Standard TV 86 7 3 Connecting to a HD TV 87 8 Installing the Software 88 9 Editing Software 89 10 Appendix 90 Specifications 90...

Page 5: ...correct and up to date However we do not guarantee the accuracy of the contents of this manual In case there is any discrepancy between this manual and the Digital Video Camera please use this camera...

Page 6: ...deo camera Ensure that you read this manual carefully and keep it in a safe place for future reference About This Manual This manual is designed to assist you in using your new camcorder All informati...

Page 7: ...battery by handling it over to the applicable take back scheme for the recycling of electrical and electronic equipment and or battery For more information about recycling of this equipment and or bat...

Page 8: ...atteries according to the instructions 4 Keep the camcorder and its accessories out of the reach of babies toddlers and children In particular small parts such as memory card and battery could be easi...

Page 9: ...s well as incorrect usage of electricity or use of non original accessories 2 It is the sole responsibility of the user if problems such as data loss and system failure occurred due to non factory ins...

Page 10: ...fingers 12 If a foreign substance or water gets in your camcorder please turn the power off immediately and disconnect the batteries Next remove the foreign substance or water and send it to the main...

Page 11: ...camcorder in or near water 4 The camcorder operating temperature is between 0 C 40 C 32 F 104 F It is normal for the operating time to be shortened when the temperature is low 5 The capacity of your c...

Page 12: ...ac OS 10 3 10 4 A CPU of at least the equivalent of Intel Pentium 4 2 8GHz At least 2GB of RAM Standard USB 1 1 connection port or higher At least 64MB of display card Note USB 1 1 allows you to trans...

Page 13: ...13 1 3 Accessories This package should contain the following items In case there is any missing or damaged item please contact your dealer immediately...

Page 14: ...D Torch 11 Power 3 Self timer Indicator 12 Light Button 4 Status Display 13 Mode Button 5 Recording Button 14 Tripod socket 6 USB HD TV Output 15 Battery Memory Card Compartment 7 Zoom Button 16 Micro...

Page 15: ...15 1 5 Adjusting LCD Display Before taking picture or recording movie clips please rotate according to the illustrations below...

Page 16: ...e battery cover 2 Insert the SD card gently into the slot Make sure the copper contact faces upwards SD card 1 SD card SD card 2 Micro SD card Note Do not remove or insert SD cards when the power of t...

Page 17: ...rding to this description Error in inserting the battery could result in damage to this Digital Video Camera and result in fire 1 Open the battery cover Battery Status Indicator Battery full Battery h...

Page 18: ...18 2 Insert the battery according to the illustration 3 Close the battery cover...

Page 19: ...ptor attached to charge the lithium battery whether the system is on or off Insert the lithium battery into the Digital Video Camera and connect the camera to the cable of the adaptor You can also cha...

Page 20: ...the touch screen 2 4 1 Single touch The single touch function acts as a hotkey menu to adjust basic settings directly on the display 1 Mode change DV DSC and Voice Recording 2 Resolution change Full H...

Page 21: ...21 2 4 2 Slide Slide right or left to view the previous file or the next file in Playback Mode 2 4 3 Rotate Under Playback Mode you can rotate the image by 90 step as shown below...

Page 22: ...rch MENU and PLAY BACK 2 buttons can be used for selection of the relevant functions LIGHT is for left and MODE is for right Zoom Button This Digital Video Camera is equipped with 5X optical zoom and...

Page 23: ...and playback the last file 2 6 About LED Indicators Below table describes the meaning of the camera LED indicators Indicator Color Definition Power Rear LED Green Turning power on Recording Front LED...

Page 24: ...irst time Set the date and time by press Zoom Button or touching the screen to select 2 Press Mode Button to highlight each column Use Zoom Button to adjust the value Press Recording Button to store y...

Page 25: ...V Mode The following illustration shows the LCD display layout and icon description in the DV Mode 1 DV Movie Clip Mode icon 2 Motion Detection icon 3 Night Mode icon 4 Exposure compensation icon 5 Co...

Page 26: ...Remaining recording time icon 10 Resolution Button 11 Backlight icon 12 Histogram icon 13 Playback Button 14 Digital Zoom Button 15 Menu Button 16 Memory Status icon SD card 1 icon Micro SD card 2 ico...

Page 27: ...out and icon description in the Voice Recording Mode 1 Voice Recording Mode icon 2 Battery status icon 3 00 00 00 Recording time left icon 4 Playback Button 5 Menu Button 6 Memory Status icon SD card...

Page 28: ...he following illustration shows the LCD display layout and icon description in the DSC Mode 1 DSC Mode icon 2 Night Mode icon 3 EV compensation icon 4 Effect icon 5 Metering Mode icon 6 White balance...

Page 29: ...on Button 10 Backlight icon 11 Histogram icon 12 Playback Button 13 Digital zoom Button 14 Menu Button 15 Memory Status icon SD card 1 icon Micro SD card 2 icon Internal memory icon displayed when the...

Page 30: ...Press the Mode Button or touch the screen to select the DV Mode icon to switch to DV mode 2 Press the Recording Button to start moving recording Press the Recording Button again to stop moving recordi...

Page 31: ...ratio will be different depending on the setting of Movie Clip resolution Please refer to the table shown below Video Resolution Preview FHD 1920 x 1080 HD 1280 x 720 WVGA 848 x 480 16 9 ratio WEB 320...

Page 32: ...Camera Press the Mode Button or touch the screen to select the Voice Recording Mode icon to switch to Voice Recording Mode 2 Press the Recording Button to start voice recording Press the Recording Bu...

Page 33: ...er or the image file is stored on other digital video camera after recording this digital video camera cannot guarantee the file can be played back normally 1 In DV Voice Recording Mode pressing the P...

Page 34: ...ouch the screen to select the file to playback 3 To pause the Playback of file press the Recording Button or touch the screen icon 4 Press Playback Button again or touch the screen to select the Retur...

Page 35: ...ayback speed is as below when the Slow Motion is OFF Playback speed is as below when the Slow Motion is ON Rewind 2X play Forward Rewind 1 2X play Forward Rewind 4X play Forward Rewind 1 4X play Forwa...

Page 36: ...re 1 Turn on the Digital Video Camera Press the Mode Button or touch the screen to select the DSC Mode icon to switch to DSC Mode 2 Press the Recording Button to capture images The Digital Video Camer...

Page 37: ...ack Button or touch the screen to select the Playback Button icon to display the images on the LCD screen 2 Press Zoom Button will select a file Pressing Recording Button or touch the screen to select...

Page 38: ...he picture Press the Mode Button or touch the screen o select the 4 way Button to move the image 4 Press Zoom Button or touch the Return Button to return to full screen for viewing images 5 Press the...

Page 39: ...e following table regarding the description of each icon and symbol 1 Slow Motion Playback Button 2 File Protect icon 3 Battery status icon 4 Playback Mode icon 5 00 00 00 Length of each Movie clip ic...

Page 40: ...nd Playback Button 11 Menu Button 12 Sound volume Button 13 100 0001 Folder and file number Notes 1 Maximum capacity of each recorded file is 4GB 2 Setting of high resolution will result in larger fil...

Page 41: ...ach icon and symbol 1 File Protect icon 2 Battery status icon 3 Playback Mode icon 4 00 00 00 Length of each voice recording icon 5 Return Button 6 Fast forward Playback Button 7 Playback Pause Button...

Page 42: ...yourself with icons and symbols of DSC Playback Mode 1 DPOF Digital Print Order Format icon 2 File Protect icon 3 Battery status icon 4 Image Playback Mode icon 5 0001 Number of pictures left icon 6...

Page 43: ...V options menu 6 1 1 Movie clip Resolution 1 Turn on the Digital Video Camera and make sure it is in the DV Mode 2 Press Menu Button and press Zoom Button to highlight the Resolution item Press the Re...

Page 44: ...the item 3 Press Zoom Button to select Auto Daylight Cloudy Fluorescent or Tungsten Press the Recording Button to confirm or touch the screen to select the item Auto The Digital Video Camera automatic...

Page 45: ...t item Press the Recording Button to display submenu or touch the screen to select the item 3 Press Zoom Button to select Normal B W or Sepia Press the Recording Button to confirm or touch the screen...

Page 46: ...item 3 Press Zoom Button to select Spot Center or Touch AE Press the Recording Button to confirm or touch the screen to select the item Spot This setting is to ensure correct exposure for the object...

Page 47: ...V Mode 2 Press Menu Button and press Zoom Button to highlight the Backlight item Press the Recording Button to display submenu or touch the screen to select the item 3 Press Zoom Button to select On o...

Page 48: ...V Mode 2 Press Menu Button and press Zoom Button to highlight the Night Mode item Press the Recording Button to display submenu or touch the screen to select the item 3 Press Zoom Button to select On...

Page 49: ...ing When the image stops moving the camera will stop recording 1 Turn on the Digital Video Camera and make sure it is in the DV Mode 2 Press Menu Button and press Zoom Button to highlight the Motion D...

Page 50: ...rn on the Digital Video Camera and make sure it is in the DV Mode 2 Press Menu Button and press Zoom Button to highlight the EV Compensation item Press the Recording Button to display submenu or touch...

Page 51: ...tal Video Camera and make sure it is in the DV Voice Playback Mode 2 Select the file to be deleted and press the Menu Button to enter Menu Press Zoom Button to highlight the Delete item or touch the s...

Page 52: ...ete the current file Delete All Delete all files stored in the Digital Video Camera Note The file cannot be recovered once it is deleted Therefore please make sure you have backed up the file before D...

Page 53: ...ton to highlight the Protect item Press the Recording Button to display submenu or touch the screen to select the item 3 Display the lock icon to indicate the file is being protected Protect Lock Note...

Page 54: ...2 Press Menu Button and press Zoom Button to highlight the Resolution item Press the Recording Button to display submenu or touch the screen to select the item 3 Press Zoom Button to select 16M 8M 5M...

Page 55: ...nu Button and press Zoom Button to highlight the White Balance item Press the Recording Button to display submenu or touch the screen to select the item 3 Press Zoom Button to select Auto Daylight Clo...

Page 56: ...gital Video Camera and make sure it is in the DSC Mode 2 Press Menu Button and press Zoom Button to highlight the Effect item Press the Recording Button to display submenu or touch the screen to selec...

Page 57: ...2 Press Menu Button and press Zoom Button to highlight the Metering item Press the Recording Button to display submenu or touch the screen to select the item 3 Press Zoom Button to select Spot Center...

Page 58: ...C Mode 2 Press Menu Button and press Zoom Button to highlight the Backlight item Press the Recording Button to display submenu or touch the screen to select the item 3 Press Zoom Button to select On o...

Page 59: ...C Mode 2 Press Menu Button and press Zoom Button to highlight the Night Mode item Press the Recording Button to display submenu or touch the screen to select the item 3 Press Zoom Button to select On...

Page 60: ...cording Button to display submenu or touch the screen to select the item 3 Press Zoom Button to select Off 2 secs or 10 secs Press the Recording Button to confirm or touch the screen to select the ite...

Page 61: ...tures 1 Turn on the Digital Video Camera and make sure it is in the DSC Mode 2 Press Menu Button and press Zoom Button to highlight the Burst item Press the Recording Button to display submenu or touc...

Page 62: ...rn on the Digital Video Camera and make sure it is in the DSC Mode 2 Press Menu Button and press Zoom Button to highlight the EV Compression item Press the Recording Button to display submenu or touch...

Page 63: ...2 Select the file to be deleted press Menu Button and press Zoom Button to highlight the Delete item Press the Recording Button to display submenu or touch the screen to select the item 3 Press Zoom B...

Page 64: ...e s or touch the screen to select the item Note The files cannot be recovered once deleted Therefore please make sure you have a backup file before delete The protect files will not be able to delete...

Page 65: ...n to display submenu or touch the screen to select the item 3 Press Zoom Button to select Lock One Lock All Unlock One or Unlock All Press the Recording Button to confirm or touch the screen to select...

Page 66: ...ake sure it is in the Playback Mode 2 Press Menu Button and press Zoom Button to highlight the Autoplay item Press the Recording Button to display submenu or touch the screen to select the item 3 Pres...

Page 67: ...Mode 2 Press Menu Button and press Zoom Button to highlight the Rotate item Press the Recording Button to display submenu or touch the screen to select the item 3 Press Zoom Button to select Left 90 o...

Page 68: ...nting information stored in the memory card 1 Turn on the the Digital Video Camera and make sure it is in the Playback Mode 2 Press Menu Button and press Zoom Button to highlight the DPOF item Press t...

Page 69: ...Recording Button to confirm or touch the screen to select the item The DPOF icon will be shown to indicate the files that are ordered for printing DPOF Note 1 A memory card is required for the DPOF f...

Page 70: ...image clips 1 Turn on the Digital Video Camera and press Menu Button and switch to SET Mode 2 Press Zoom Button to highlight Information item Press the Recording Button to display submenu or touch th...

Page 71: ...n and switch to SET Mode 2 Press Zoom Button to highlight Beep item Press the Recording Button to display submenu or touch the screen to select the item 3 Press Zoom Button to select On or Off Press t...

Page 72: ...Camera and press Menu Button and switch to SET Mode 2 Press Zoom Button to highlight Default item Press the Recording Button to display submenu or touch the screen to select the item 3 Press Zoom But...

Page 73: ...ecording Button to display submenu or touch the screen to select the item 3 Press Zoom Button to select NTSC or PAL Press the Recording Button to confirm or touch the screen to select the item TV out...

Page 74: ...Turn on the Digital Video Camera and press Menu Button and switch to SET Mode 2 Press Zoom Button to highlight Auto Power Off item Press the Recording Button to display submenu or touch the screen to...

Page 75: ...oom Button to highlight Frequency item Press the Recording Button to display submenu or touch the screen to select the item 3 Press Zoom Button to select 50HZ or 60HZ Press the Recording Button to con...

Page 76: ...ss the Recording Button to display submenu or touch the screen to select the item 3 Press Zoom Button to select the following languages English German French Italian Japanese Spanish Portuguese Tradit...

Page 77: ...to SET Mode 2 Press Zoom Button to highlight Format item Press the Recording Button to display submenu or touch the screen to select the item 3 Press Zoom Button to select O Yes or X No Press the Rec...

Page 78: ...rt from 0001 even after formatting deleting or inserting a new memory card 1 Turn on the Digital Video Camera and press Menu Button and switch to SET Mode 2 Press Zoom Button to highlight File Number...

Page 79: ...Camera and press Menu Button and switch to SET Mode 2 Press Zoom Button to highlight LCD brightness item Press the Recording Button to display submenu or touch the screen to select the item 3 Press Z...

Page 80: ...Video Camera and press Menu Button and switch to SET Mode 2 Press Zoom Button to highlight Instant Review item Press the Recording Button to display submenu or touch the screen to select the item 3 Pr...

Page 81: ...ght Memory item Press the Recording Button to display submenu or touch the screen to select the item 3 Press Zoom Button to select SD1 or SD2 Press the Recording Button to confirm or touch the screen...

Page 82: ...d press Menu Button and switch to SET Mode 2 Press Zoom Button to highlight Volume item Press the Recording Button to display submenu or touch the screen to select the item 3 Press Zoom Button to sele...

Page 83: ...he Digital Video Camera and press Menu Button and switch to SET Mode 2 Press Zoom Button to highlight Star up Logo item Press the Recording Button to display submenu or touch the screen to select the...

Page 84: ...art up Logo Press the Recording Button to confirm or touch the screen to select the item 5 Turn the camera off and on again DV will use the preset image as Start up Logo 6 If you want to cancel the St...

Page 85: ...on the Digital Video Camera and press Menu Button and switch to SET Mode 2 Press Zoom Button to highlight Face Detection item Press the Recording Button to display submenu or touch the screen to sele...

Page 86: ...As shown in the illustration use the USB cable provided to connect the Digital Video Camera to a PC for file transmission 7 2 Connecting to a Standard TV As shown in the illustration use the video ca...

Page 87: ...the illustration use the HDMI cable provided to connect the Digital Video Camera to a HD TV for high resolution picture display Note Some TV could not recognize this image format 1080p 30fps Please co...

Page 88: ...r 2 If the CD is not executed automatically please use the root menu of the computer to locate the Install_CD exe file in the CD root menu The following screen will be displayed 3 Press the Menu item...

Page 89: ...rojects featuring your photo video and music files Edit enhance and add creative effects to your photos You can Create your own movies or photo slide shows complete with soundtrack Upload your files e...

Page 90: ...3 5 3 7 f 38 190 mm 35mm equivalent Focus range Wide 10cm Infinity Tele 100cm Infinity Still image Format JPEG DPOF EXIF Resolution 3MP 5MP 8MP Interpolation 16M Interpolation Recording method fps Res...

Page 91: ...t Tungsten Exposure 2 0 EV 2 0 EV 0 5EV step Self Timer Off 2 seconds 10 seconds Interface Camera USB 2 0 high speed Mass storage high disk USB 2 0 high speed MIC input HDMI USB DC IN Shutter Electron...

Page 92: ...ory Power off before storing the images Please change to new batteries when the battery indicator turns to red color Camera shutdown when using Self timer shooting picture Batteries in camera are exha...

Page 93: ...tteries in the camera and re insert again Technical Support For technical support issues please visit our website at www polaroid com For further assistance you can also call our technical support dep...

Page 94: ...t our website at www polaroid com To receive Warranty service along with the name and address of an authorized product service center the original consumer purchaser must contact us for problem determ...

Page 95: ...S SHALL APPLY NOTWITHSTANDING THE FOREGOING CONSUMER S RECOVERY AGAINST DISTRIBUTOR SHALL NOT EXCEED THE PURCHASE PRICE OF THE PRODUCT SOLD BY DISTRIBUTOR THIS WARRANTY SHALL NOT EXTEND TO ANYONE OTHE...

Page 96: ...oduct You may also go to www polaroid com and reference Social Responsibility to learn more about the specific laws in your area and to locate a collection facility near your home If your electronic d...

Reviews: