background image

- 19 - 

TV Setup and Operation                                        


Preparations 

1. After making your connections, press the POWER button to turn on the power. (If it is turned on, 

the power indicator is blue.) 

2. Press the SOURCE button to shift to TV mode. You can go on with the following operations:   
 

Image Setting 

 
Note: This item is only available when there is signal input. 


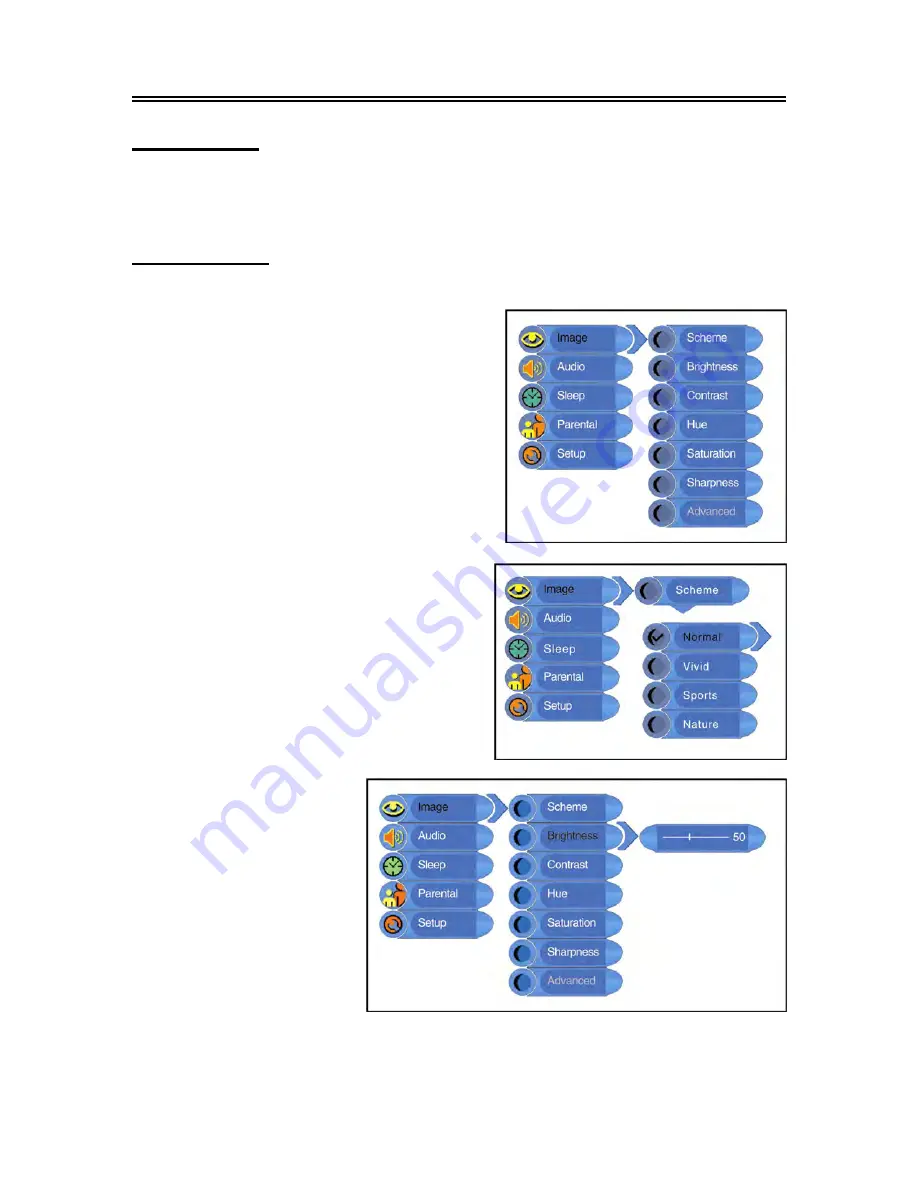
Press the MENU button once to enter the setup 

menu, as shown on the right: 

In the setup menu, press the 

▲▼

button to 

select

 Image

 and then press the ENTER button 

to enter the item. Press the 

▲▼

button to 

select. Press the MENU button to return to the 

previous menu. 


Scheme Setup 

Press the 

▲▼

 button to select 

Scheme 

and 

press the ENTER button to enter. Press the 

▲▼

button to select the desired item and press 

the ENTER button to confirm your selection. 

Press the MENU button to return to the previous 

menu. 

Brightness Setup 

Press the 

▲▼

 button to 

select 

Brightness

 and press 

the 

◄►

 button to adjust the 

value. Press the MENU 

button to return to the 

previous menu. 


Summary of Contents for FXM-1511C

Page 1: ...15 HD Ready LCD TV DVD Combo with AC DC Compatibility FXM 1511C 20060331 ...

Page 2: ...AV Device AV Out 14 Connecting to PC 15 Connecting to Earphone 16 Connecting to Power Supply 16 Connecting to Car Adapter 17 Connecting to TV Antenna 18 TV Setup and Operation 19 Preparations 19 Image Setting 19 Audio Setting 20 Sleep Setting 21 Parental Setting 22 Setup Setting 25 DVD System Setup 28 DVD Play Operation 34 USB and SD MS MMC Card Function 39 Other Functions 40 External AV Input Fun...

Page 3: ...rvicing instructions are for use by qualified service personnel only To reduce the risk of electric shock do not perform any servicing other than that contained in the operating instructions unless you are qualified to do so Refer to service manual for servicing instructions The lightning flash with arrowhead symbol within an equilateral triangle is intended to alert the user to the presence of un...

Page 4: ...moving the cart apparatus combination to avoid injury from tip over 13 Unplug this apparatus during lightning storms or when unused for long periods of time 14 Refer all servicing to qualified service personnel Servicing is required when the apparatus has been damaged in any way such as power supply cord or plug is damaged liquid has been spilled or objects have fallen into the apparatus the appar...

Page 5: ... function Multi audio and Multi video modes Support multi audio and multi video modes provide more selecting USB and CARD PORTS Designed with USB and SD MS MMC card port can be connected to USB device or SD MS MMC Card Auto TV Searching Function Can be connected to the TV antenna support Auto and manual TV programs searching function MTS Multi Channel Sound Function Supports the MTS function Accor...

Page 6: ...y the software maker Please refer to the instruction manual of the disc About Disc Terms Title Generally pictures or music compressed on a DVD are divided into several sections title Chapter The smaller section unit of picture or music in a DVD under the title usually one title is comprised of one or more chapters and each of them is numbered for easy searching But some discs may not have a record...

Page 7: ...3 MENU button Press to enter or exit setup menu 4 CH button In the TV mode press to select channels In setup menu the same function as direction buttons 5 VOL button In the TV mode press to decrease or increase the volume In setup menu the same function as direction buttons In setup menu the VOL has the same function as ENTER button 6 PLAY button Press to play the disc in DVD mode ...

Page 8: ...dby mode 10 SD MS MMC Card Port Insert the SD MS or MMC card into the port 11 Disc Tray Slot Used to load disc into the unit 12 Earphone Jack When connected to earphone the internal speakers will automatically turn off 13 USB Connecting Port Connecting to the USB device 14 Remote Sensor Remote sensor window for the remote control 15 Power Indicator In normal playback status it is blue in standby m...

Page 9: ...e S VIDEO mode connected to S VIDEO signal input In the COMPOSITE mode connected to the external video signal input The L R audio input jacks can be used in the both S VIDEO and COMPOSITE modes 5 TV Signal Input Jack RF Connected for the external NTSC TV signal input 6 DC 12V In Jack Connected to power adapter 7 VGA Input Jack Connected to the VGA output jack on a personal computer 8 PC AUDIO Inpu...

Page 10: ... remote is not in use for a long time Using the Remote control Point the remote control unit from no more than about 7m from the remote control sensor and within about 60 degrees of the front of the unit The operating distance may vary depending to the brightness around Notes Do not point bright lights directly at the remote control sensor Do not place objects between the remote control unit and t...

Page 11: ...the setup menu press the button to select the desired item and press the button to adjust or set 9 ENTER button Press to confirm your selection 10 INFO button Press to display the information about current status on the screen 11 10 button In DVD mode press to select number greater than 10 In TV mode when select the 1 99 channel press this button to confirm and enter the selected channel 12 S M bu...

Page 12: ...era angles if the DVD disc contains multiple camera angles 12 A B button Press to mark a segment to repeat between A and B during DVD disc playback 13 AUDIO button Press to select different audio languages during a multiple audio language DVD disc playback in DVD mode 14 Eject button Press to eject the disc out 15 STOP button Press to stop playback in DVD mode 16 NEXT button Press the NEXT to skip...

Page 13: ...t the AV input jacks on the rear panel of the unit to the external AV signal source Use the S VIDEO cable to connect the S VIDEO input jack on the rear panel of the unit to the external AV signal source After connection turn on the power of the unit and the external AV signal source Press the SOURCE button of the remote or the unit and select COMPOSITE or S VIDEO as the input mode Note the L R aud...

Page 14: ...audio and video cables to connect the Y Pb Pr input Jacks on the rear panel of the unit to the external AV signal source After connection turn on the power of the unit and external AV signal source and then press the SOURCE of the remote or the unit and select Component as the input mode ...

Page 15: ...g to External AV Device AV Out The unit supports AV signal output it can be connected to the external audio and video devices Use the audio and video cables to connect the AV output jacks on the rear panel of the unit to the external AV device ...

Page 16: ... VGA input jack on the rear panel of the unit 2 Connect the other end to the PC 3 Connect one end of the audio cable to the PC audio input jack on the rear panel of the unit 4 Connect the other end to the PC audio output jack 5 Please set the PC s resolution at 1024x768 60Hz After connection turn on the unit and the PC and then press the SOURCE button of the remote or the unit and select VGA as th...

Page 17: ...nit can be connected to an earphone for listening music privately See the below figure for details After connecting to the earphone the internal speakers will turn off automatically Connecting to Power Supply Plug the power supply cord to the AC100 240V wall outlet ...

Page 18: ...he DC 12V IN jack on the rear panel of the unit the other end to the vehicle s 12V accessory cigarette lighter power outlet as shown on the below Attention Do not operate the unit or view video software while driving a vehicle Place the unit in a proper position for viewing Do not connect the unit to the power outlet of the car until the car is running ...

Page 19: ...it will go to the selected channel Press the number button to select channel X then press the 10 to go to the selected channel immediately Press the number buttons to input 00X it will go to the selected channel immediately 2 For channels 10 through 99 Press the number buttons to select channel XX wait three seconds and it will go to the selected channel Press the number buttons to select channel ...

Page 20: ... shown on the right In the setup menu press the button to select Image and then press the ENTER button to enter the item Press the button to select Press the MENU button to return to the previous menu Scheme Setup Press the button to select Scheme and press the ENTER button to enter Press the button to select the desired item and press the ENTER button to confirm your selection Press the MENU butt...

Page 21: ...Advanced and press the ENTER button to enter In the menu press the button to select the desired item and then press the ENTER button to confirm Press the MENU button to return to the previous menu Note This item is only available in Component DVD and VGA modes Audio Setting Volume Setup Press the button to select Volume and press the button to adjust the level Press the MENU button to return to th...

Page 22: ...the MENU button to enter the setup menu Press the button to select Sleep and press the ENTER button to enter the menu shown on the right In the Sleep setup menu press the button to select 15Min 30Min 45Min 60Min 75Min 90Min 105Min 120Min or Off Press the MENU button to return to the previous menu Sound Mode Setup Press the button to select Sound Mode and press the ENTER button to enter Press the b...

Page 23: ...the pin The initial pin is 1111 Then press the ENTER button to continue and display the menu as shown on the right Note The Master password is 3308 This password is always effective even after you have selected your own password and changed it Change PIN Press the button to select Change PIN and press the ENTER button to enter Use the number buttons to enter the new pin you want and then press the...

Page 24: ... Rating Press the button to select TV Rating and press the ENTER button to enter Press the button to select the desired item and then press the ENTER button to confirm your selection Press the MENU button to return to the previous menu Movie Rating Press the button to select Movie Rating and press the ENTER button to enter Press the button to select the desired item and then press the ENTER button...

Page 25: ... Eng Rating Press the button to select CA Eng Rating and press the ENTER button to enter Press the button to select the desired item and then press the ENTER button to confirm your selection Press the MENU button to return to the previous menu CA Fr Rating Press the button to select CA Fr Rating and press the ENTER button to enter Press the button to select the desired item and then press the ENTE...

Page 26: ...to scan mode Press the MENU button once to enter the setup menu Press the button to select Setup and press the ENTER button to enter the menu shown on the right In the Setup menu press the button to select the desired item and press the ENTER button to enter Press the MENU button to return to the previous menu Tuner Channel Press the button to select the Tuner Channel and press the ENTER button to...

Page 27: ...e button to select the Delete Program and press the ENTER button to cancel the skip function which when using the CH button to select channels under normal playback status it will play the channels in sequence Press the MENU button to return to the previous menu Prog Organizer Press the button to select the Prog Organizer and press the ENTER button to enter the menu as shown on the right In the Pr...

Page 28: ... the Factory Reset press the ENTER button to resume default status Language Press the button to select the Language press the ENTER button to enter the setup press the button to select item Press the MENU button to return to the previous menu CC Mode Press the button to select CC Mode and press the ENTER button to enter Press the button to select the desired item and then press the ENTER button to...

Page 29: ...Setup Page Press the SETUP button to enter the General setup menu The screen will display as the following TV Display Angle Mark In the menu Use the direction buttons to select the desired item Press the ENTER button to enter the item Press the button to return 1 Press the direction buttons to select TV Display 2 Press the ENTER button to enter the setup 3 Use the direction buttons to select items...

Page 30: ... Press the ENTER button to enter the setup 3 Use the direction buttons to select On or Off 4 Press the ENTER button again to confirm selection and to return 1 Press the direction buttons to select Last Memory 2 Press the ENTER button to enter the setup 3 Use the direction buttons to select On or Off 4 Press the ENTER button again to confirm selection and return 1 Press the direction buttons to sel...

Page 31: ...ter the setup the screen will display as left 3 In the menu use the direction buttons to select items 4 Press the ENTER button to enter the setup Press the button to return 1 Press the direction buttons to select Dual Mono 2 Press the ENTER button to enter the setup 3 Use the direction buttons to select items 4 Press the ENTER button again to confirm selection and return 1 Press the direction butt...

Page 32: ...ing Video Quality Setup Select Quality press the ENTER button to enter the menu as below 1 In the menu press the ENTER button to enter the setup 2 Use the direction buttons to select items 3 Press the ENTER button again to confirm selection and return 4 Press the button to return In the menu Use the direction buttons to select the desired item Press the ENTER button to enter the item Press the but...

Page 33: ...m selection and return 1 Press the direction buttons to select Sharpness 2 Press the ENTER button to enter the setup the screen will display as left 3 Use the direction buttons to adjust the level 4 Press the ENTER button again to confirm setting and return 1 Press the direction buttons to select Contrast 2 Press the ENTER button to enter the setup the screen will display as left 3 Use the directi...

Page 34: ...le 2 Press the ENTER button to enter the setup see the left figure 3 Press the direction buttons to select Subtitle language 4 Press the ENTER button again to confirm setting and return 1 Press the direction buttons to select Disc Menu 2 Press the ENTER button to enter the setup see the left figure 3 Press the direction buttons to select Menu language 4 Press the ENTER button again to confirm sett...

Page 35: ... disc into the disc tray 4 As disc is automatically taken in the disc tray fully the player will search a disc and play it automatically in DVD mode Warning Do not play poor quality discs as this may damage the player DVD Playback Region Code DVD players and discs are coded by region These regional codes must match the played discs If the codes don t match the disc cannot be played This player s d...

Page 36: ... Use the REPEAT button repeatedly to repeat a chapter title or all Some discs do not support the repeat function A B Repeat During DVD disc playback press the A B button to select the segment that you want to play repeatedly Press the A B button first timeonce to set the beginning point A press the A B button again to set the ending point B and it will play the segment repeatedly Press the A B but...

Page 37: ...iscs do not support the search function Various Camera Angles The movies on some DVDs have been recorded from various camera positions This lets you enjoy the same scene from different perspectives In this case you ll usually find a marking on the DVD sleeve When playing a DVD containing various camera angles the camera symbol appears on the screen Press the ANGLE button repeatedly until the desir...

Page 38: ...tion Hundreds of pictures can be stored on a disc in this format In order to view JPEG photo albums you can ask your film development company to make a PICTURE CD when they develop your film Normal Playback Load a JPEG disc in For JPEG disc there will be a root menu displayed on the screen Use the ENTER button and the direction button to select a submenu and then use the direction button to select...

Page 39: ...ut the file number Picture Rotation This can be used only when the picture is normally displayed Once another picture is selected rotation will be cancelled automatically Use the buttons to rotate the picture Zoom and Move of Picture During playback press the ZOOM button to activate the zoom function press the button to cycle through the zoom proportions When zooming in the picture you can use the...

Page 40: ...shift among disc playback USB playback and the SD MS MMC playback The default state is disk playback Please see the below figure 6 Press the button to select the folder and press ENTER button to enter 7 Press the and buttons to select the desired track Then press PLAY button to start playback 8 Press STOP button to stop playback if the STOP button is pressed the playback will start from the beginn...

Page 41: ...utton to shift to the corresponding mode S VIDEO or Component Then you can go on to set up the menu in a certain mode Computer Screen Function The TFT LCD screen of the unit can be used as the computer screen Take the steps of connecting the unit to the PC and then you can set up the menu You had better set the PC s resolution at 1024 x 768 60Hz The operations of these menus in COMPOSITE S VIDEO C...

Page 42: ...ntinue to play and play a section repeatedly Make sure is not in A B or other repeat status Make sure disc is not dirty or damaged There is no picture or the picture moves up and down Check if the connections with the external AV signal source are correct Correctly set the items in the picture menu Check if the video type input signal is not corresponding to the unit Make sure the unit is turned o...

Page 43: ...ECT TO CHANGE WITHOUT NOTICE Manufactured under license from Dolby Laboratories Dolby and the double D symbol are trademarks of Dolby Laboratories Confidential unpublished works 1992 1997 Dolby Laboratories Inc All rights reserved Polaroid and Polaroid and Pixel are trademarks of Polaroid Corporation Waltham MA USA For service support and warranty information visit www polaroid com or in the US ca...

Page 44: ... 43 ...

Reviews: