background image

17 I 

k

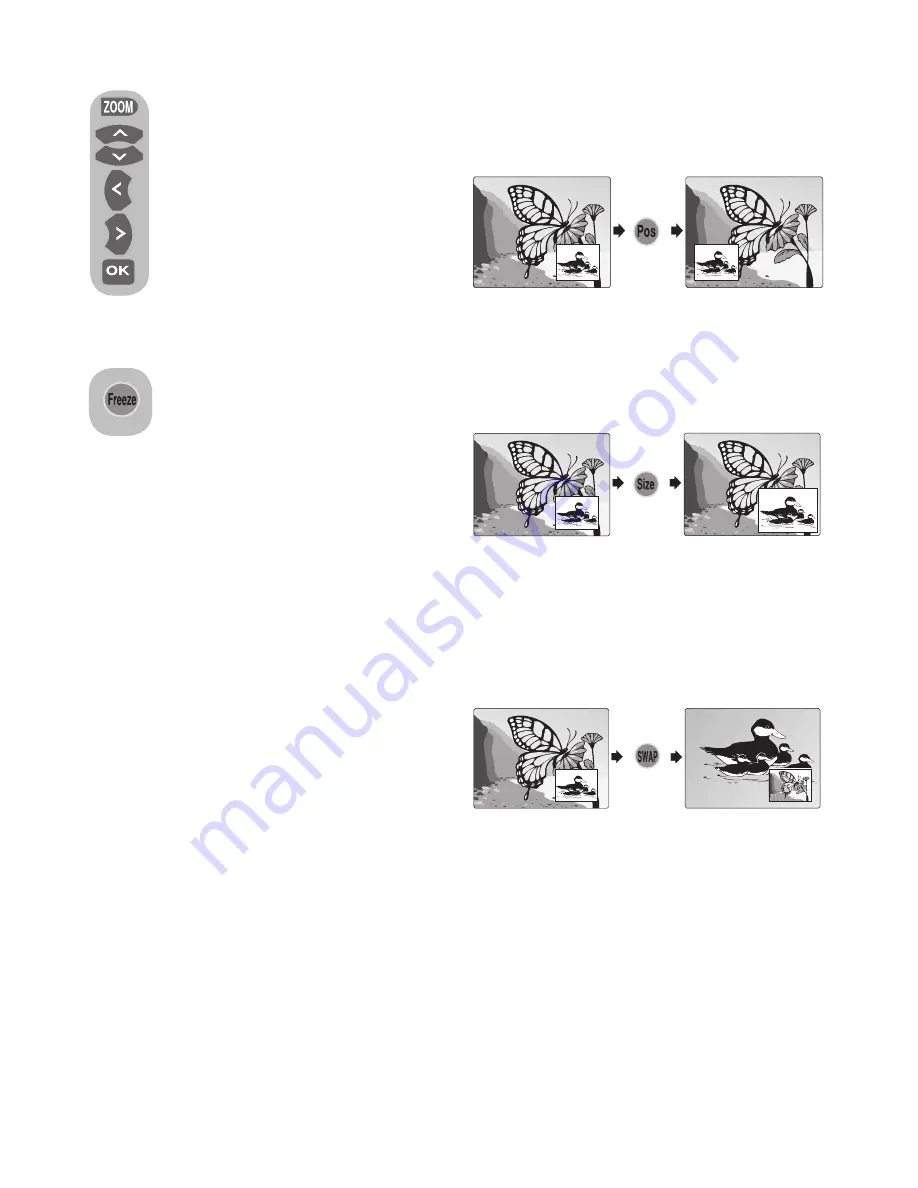
7.4.3.1-PIP Position

With this option, you can change the 

display position of the PIP screen. You 

can change the position of the PIP screen 

in clockwise by pressing the 

Pos

 button 

when there is a PIP picture on the screen.

7.4-Other picture features

7.4.1-Zoom

Press the 

ZOOM

 button on your 

remote control while watching a 

channel to activate this feature. 

During the zooming process, the 

image is zoomed in in three stages 

oriented to the centre. To move the 

picture in this mode, you can use 

up/down

 or 

right/left

 movement 

buttons of your remote control.

Note: 

Zoom mode does not 

function with KOMP/HDMI/PC 

inputs. Zoom mode is aborted when the 

channel is changed or Teletext is activated.

7.4.2-Freeze (Freeze picture)

You may freeze the program 

picture you are watching with 

this feature. For this, press the 

FREEZE

 button on your remote 

control. The program picture will freeze 

until the same button is pressed a second 

time.

7.4.3-Using PIP Feature (Picture in 

Picture) (*)

Press the 

PIP

 button on your remote 

control. PIP screen is displayed. 

Depending on the selected source, a 

window will be opened in the main picture 

and a sub screen will be displayed. You 

can switch to PAP mode by pressing the 

PIP

 button again. You can use right/left 

buttons to change the source in the PIP 

screen when you are in the PIP or PAP 

mode. You can use up/down buttons to 

change the channels.


Note 1:

 Two different channels from the 

Tuner can not be viewed in the PIP screen. 

Only the broadcast from the external 

source can be viewed in the PIP screen.

Note 2:

 Since the external sources such 

as satellite receivers focus on single 

channel and transmit it to the TV although 

they can receive many channels, other 

channels that are received by similar 

devices can not be displayed on the POP 

screen.

Note 3:

 HDMI2 can not be selected in the 

PIP screen when HDMI1 is displayed on 

the main screen.

Note 4:

 Right and left movement buttons 

do not control the volume in PIP, PAP and 

PAT modes. They can only be used to 

change the source.

7.4.3.2-PIP Size

With this option, you can increase and 

decrease the size of the PIP window. You 

can change the PIP size by pressing the 

Size

 button when there is a PIP picture 

on the screen.

7.4.3.3-Switching the locations of the 

Main screen and PIP screen

When a sub window is open in front of 

the main window, you can switch the 

locations of the main window and sub 

window by pressing the 

SWAP

 button 

on your remote control.

7.4.4-PAT Mode

With this feature, you can follow the 

teletext broadcasts simultaneously with 

the current program, provided that 

the current program contains teletext 

broadcast. For this purpose, press 

TXT


and then 16:9 buttons in a channel with 

teletext broadcasting. Thus, the screen 

will be split into two with the left pane 

showing the currently watched program 

and the right pane will show the Teletext 

at the same time. In the event that 

you wish to exit the PAT mode for any 

reason, simply press the 

16:9

 button.

Summary of Contents for 42" 16:9 HD-READY LCD TV

Page 1: ...e pictured above Questions Need some help This manual should help you understand your new product If you still have questions call our help line found on the insert with this icon Or visit www polaroi...

Page 2: ...l Connections 7 5 3 External Connections Table 8 6 Performing the initial power on settings 9 6 1 TV controls 9 6 2 Automatically tuning and storing the programs on your television 10 6 3 Manually tun...

Page 3: ...cameras personal media players and so much more And while our selection has changed you will still receive the same friendly helpful service that made Polaroid an icon Congratulations on your new Pola...

Page 4: ...es Teletext Fastext Toptext Graphic equalizer Sharpness feature in Color Transitions CTI Sharpness feature and picture resolution LTI in black white transitions A clearer Picture made possible with a...

Page 5: ...the device The screen glass may break and cause serious injuries if something hits it 7 To ensure adequate ventilation please leave a clearance area of at least 10 cm around the television This clear...

Page 6: ...disconnect it from mains Note If your device has an adaptor then use the adaptor and AC power cable supplied with your product Do not use defective sockets Make sure that the plug is firmly inserted...

Page 7: ...the risk of electric shock 19 Do not dispose of the batteries in fire Do not short circuit dismantle or overheat the batteries There is the risk of explosion if the batteries are not replaced correctl...

Page 8: ...of 8 meters from or at an angle of 30 degrees beyond the centre of the TV 4 Start Remove your television carefully from its box You can keep the packaging of your television to use in future Contents...

Page 9: ...t Y Component video input Pb Component video input Pr Component sound input L Component sound input R HDMI input 1 HDMI input 2 VGA PC connection input Please see External connections table on page 8...

Page 10: ...wn button 11 Volume up button 12 Red teletext button 13 Green teletext button 14 Teletext Mix selection button 15 Equalizer selection button Teletext page enlarge button Double 16 AV modes selection m...

Page 11: ...ute the sound of your television press the MUTE button on your remote control In that case MUTE symbol will appear on the screen When you press the same button a second time the sound will be restored...

Page 12: ...n The channels will be automatically searched and those found will be stored in memory At the same moment the Autoprogram menu will be displayed and a marker indicating the progress of the autoprogram...

Page 13: ...ansmitters do not operate according to the standards To store in the memory the settings you have made select the STORE tab and press the right or left movement button viewed on the screen is of your...

Page 14: ...ou do not wish to see certain programs while navigating through the channels using the PR PR buttons then you can use this function Select the program that will be hidden by pressing the up down or ri...

Page 15: ...will not be active if the SRS is not selected from the Sound mode tab 7 1 4 AVL Automatic Volume Limiting Television transmitters have different sound levels This can be noticed from the different vol...

Page 16: ...can select the equalizer options directly by pressing the button on your remote control 7 1 8 Dynamic Bass optional Dynamic Bass makes the bass content MENU EQUALIZER CHANGE BACK MUSIC SPORTS CINEMA S...

Page 17: ...user options by pressing the button on your remote control SOFT NATURAL and RICH are default values USER represents the values you stored in memory 7 2 7 Picture Format With this option you can view...

Page 18: ...current time with numeric buttons Select the ON TIME and OFF TIME in the same manner and specify the time Enter the program number from which you would like the TV to be turned on to or enter the ext...

Page 19: ...Note 1 Two different channels from the Tuner can not be viewed in the PIP screen Only the broadcast from the external source can be viewed in the PIP screen Note 2 Since the external sources such as...

Page 20: ...b When you would like to turn the pages one by one you can go to the next page pressing the up button and to the previous page pressing the down button Press the INFO button to return to the Index pag...

Page 21: ...the relevant topic by pressing the yellow or blue buttons on the remote control You can select the next page by pressing the red button and the previous page by pressing the green button Note Fastext...

Page 22: ...o this option and press the OK button SVIDEO To watch the picture of the broadcast device connected using the S Video input move onto this option and press the OK button PC To be able to watch the ima...

Page 23: ...be used as a PC monitor since it also allows the VGA inputs 9 2 1 PC Connection Connect the D Sub15 connector to the PC IN input on the of your television using a suitable cable not supplied with the...

Page 24: ...or 4 3 formats Note 1 In the Monitor mode you can make the Brightness Contrast Sharpness Red Green and Blue Settings from the PICTURE menu Note 2 Some artifacts may appear in the main screen when the...

Page 25: ...teries Make sure that there are no obstructions between the remote control and television If your television does not work properly even though you tried the above mentioned solutions try turning it o...

Page 26: ...received VHF Band I Channel 2 4 VHF Band III Channel 5 12 UHF Channel 21 69 Cable TV S1 S20 S21 S41 Broadcasting systems received PAL BG PAL SECAM BG PAL SECAM BG DK PAL SECAM BG LL PAL I Note 1 Your...

Reviews: