background image

88

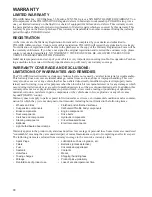
WARRANTY

LIMITED WARRANTY

POLARIS Sales Inc., 2100 Highway 55, Medina, MN 55340, gives a SIX MONTH LIMITED WARRANTY on 
all components of the POLARIS 

RANGER

 against defects in material or workmanship. POLARIS also gives a 

one year limited warranty on the final drive chain (if equipped) for failure due to defects. This warranty covers 
the parts and labor charges for repair or replacement of defective parts which are covered by this warranty. This 
warranty begins on the date of purchase. This warranty is transferable to another consumer during the warranty 
period through a POLARIS dealer. 

REGISTRATION

At the time of sale, the Warranty Registration Form must be completed by your dealer and submitted to 
POLARIS within ten days. Upon receipt of this registration, POLARIS will record the registration for warranty. 
No verification of registration will be sent to the purchaser as the copy of the Warranty Registration Form will be 
the warranty entitlement. If you have not signed the original registration and received the customer copy, please 
contact your dealer immediately. NO WARRANTY COVERAGE WILL BE ALLOWED UNLESS YOUR 
VEHICLE IS REGISTERED WITH POLARIS. 
Initial dealer preparation and set-up of your vehicle is very important in ensuring trouble-free operation. Purchas-
ing a machine in the crate or without proper dealer set-up will void your warranty coverage.

WARRANTY COVERAGE AND EXCLUSIONS:
LIMITATIONS OF WARRANTIES AND REMEDIES

The POLARIS limited warranty excludes any failures that are not caused by a defect in material or workmanship. 
This warranty does not cover accidental damage, normal wear and tear, abuse or improper handling. This war-
ranty also does not cover any vehicle that has been altered structurally, modified, neglected, improperly main-
tained, used for racing, or used for purposes other than for which it was manufactured, or for any damages which 
occur during trailer transit or as a result of unauthorized service or the use of unauthorized parts. In addition, this 
warranty does not cover physical damage to paint or finish, stress cracks, tearing or puncturing of upholstery 
material, corrosion, or defects in parts, components or the vehicle due to fire, explosions or any other cause 
beyond POLARIS' control.
Warranty does not apply to parts exposed to friction surfaces, stresses, environmental conditions and/or contami-
nation for which they were not designed or not intended, including but not limited to the following items:

Warranty applies to the product only and does not allow for coverage of personal loss. Some items are considered 
"consumable," meaning they are considered part of normal maintenance or part of completing an effective repair. 
The following items are excluded from warranty coverage in the event of a warranty claim:

Wheels and tires

Finished and unfinished surfaces

Suspension components

Carburetor/Throttle body components

Brake components

Engine components

Seat components

Drive belts

Clutches and components

Hydraulic components

Steering components

Circuit breakers/Fuses

Batteries

Electronic components

Light bulbs/Sealed beam lamps

Spark Plugs

Lubricants such as oil, grease, etc.

Filters

Batteries (unless defective)

Fuel

Cosmetic damage/repair

Sealants

Coolants

Hotel fees

Meals

Towing charges

Shipping/ handling fees

Mileage

Product pick-up/delivery

Rentals/Loss of product use

Loss of vacation/personal  time
Summary of Contents for Sportsman BIG BOSS 6X6 800 EFI

Page 1: ...Owner s Manual for Maintenance and Safety RANGER 800 RANGER 6X6 800 RANGER CREW 800 ...

Page 2: ...ons in this manual and on all product labels Failure to follow the safety precautions could result in serious injury or death WARNING The engine exhaust from this product contains chemicals known to the State of California to cause cancer birth defects or other reproductive harm ...

Page 3: ...The text is printed on 100 recycled with 40 post consumer waste PCW ...

Page 4: ...n gloves long sleeve shirt long pants and over the anke boots Wear your seat belt Vehicle rollover can cause severe injury or death Reduce speed and use extra caution when carrying passengers Avoid sharp turns or turns while applying heavy throttle Make sure passengers read and understand all safety labels Operate slowly in reverse avoid sharp turns or sudden braking READ OWNER S MANUAL FOLLOW ALL...

Page 5: ... produced For safe and enjoyable operation of your vehicle be sure to follow the instructions and rec ommendations in this owner s manual Your manual contains instructions for minor mainte nance but information about major repairs is outlined in the POLARIS Service Manual and should be performed only by a Factory Certified Master Service Dealer MSD Technician Your POLARIS dealer knows your vehicle...

Page 6: ...etween the actual vehicle and the information presented in this publication Depictions and or procedures in this publication are intended for reference use only No liabil ity can be accepted for omissions or inaccuracies Any reprinting or reuse of the depictions and or procedures contained within whether whole or in part is expressly prohibited The original instructions for this vehicle are in Eng...

Page 7: ... CONTENTS Introduction 4 Safety 6 Features and Controls 16 Operation 29 Emission Control Systems 42 Maintenance 43 Specifications 78 POLARIS Products 84 Troubleshooting 85 Warranty 88 Maintenance Log 93 Index 94 ...

Page 8: ...g in this vehicle Always wear a helmet eye protection gloves long sleeve shirt long pants and over the ankle boots Always keep hands and feet inside the vehicle at all times The RANGER is an off road vehicle Familiarize yourself with all laws and regulations con cerning the operation of this vehicle in your area The following signal words and symbols appear throughout this manual and on your vehic...

Page 9: ..._______________ Key Number _______________________________________________________________________________ European Vibration and Noise The driver perceived noise and hand arm and whole body vibration levels of this machinery is measured per prEN 15997 The operating conditions of the machinery during testing The vehicles were in like new condition The environment was controlled as indicated by the...

Page 10: ...l Clutch Cover Warning WARNING NO STEP Moving parts hazard under belt clutch guard To prevent serious injury do not operate vehicle with guard removed Do not modify engine or clutch Doing so can cause part failure possible imbalance and excessive engine RPM which can result in serious injury or death 7172563 Age 16 Warning Operating this vehicle if you are under the age of 16 increases your chance...

Page 11: ...nd hand holds On paved surfaces pavement may seriously affect handling and control With non POLARIS approved accessories they may seriously affect stability ALWAYS Wear your seat belt Vehicle rollover could cause severe injury or death Secure cab nets and keep hands and feet in vehicle at all times Wear a helmet and eye protection Reduce speed and use extra caution when carrying passengers Avoid s...

Page 12: ...ered and carried as low as possible in box For stability on rough or hilly terrain reduce speed and cargo Be careful if load extends over the side of the box 7177689 RANGER 4 x 4 6 x 6 Crew CA 4 x 4 CA 6 x 6 MAXIMUM CARGO BOX LOAD 1000 lbs 454 kg 1250 lbs 567 kg 1000 lbs 454 kg 600 lbs 272 kg 1250 lbs 567 kg TIRE PRESSURE IN PSI KPa FRONT 10 69 REAR 10 69 FRONT 10 69 CENTER 10 69 REAR 10 69 FRONT ...

Page 13: ... country which has granted approval The approval number and serial number will also be displayed on the label Eye Protection Do not depend on eyeglasses or sunglasses for eye protection Whenever riding a POLARIS vehicle always wear shatterproof goggles or use a shatterproof helmet face shield POLARIS recommends wearing approved Personal Protective Equipment PPE bearing markings such as VESC 8 V 8 ...

Page 14: ... unless the guest has read this manual and all product labels To reduce tipover risk be especially careful when encountering obstacles and slopes and when braking on hills or during turns This vehicle is for off road use only Never operate on public roads Always avoid paved surfaces Never consume alcohol or drugs before or while operating this vehicle Never operate at excessive speeds Always trave...

Page 15: ...reduced stopping ability Test your brakes after leaving water If necessary apply them lightly several times to let friction dry out the pads Always be sure there are no obstacles or people behind your vehicle when operating in reverse When it s safe to proceed in reverse move slowly Avoid turning at sharp angles in reverse Always use the proper size and type of tires specified in this manual Alway...

Page 16: ... and familiarize yourself with their function and effect on the vehicle Handling Gasoline Gasoline is highly flammable and explosive under certain conditions Always exercise extreme caution whenever handling gasoline Always stop the engine when refueling Always refuel outdoors or in a well ventilated area Remove flammable material containers from the box before filling them with fuel Do not smoke ...

Page 17: ...nk alcohol or use drugs or medications before or while operating this vehicle Seat Belts Riding in this vehicle without wearing the seat belt increases the risk of serious injury in the event of an accident or sudden stop Riders must wear seat belts at all times Seat belts reduce the severity of injury in the event of a sudden stop or accident Always make sure the seat belts are secured for both t...

Page 18: ...nt have a qualified service dealer inspect the entire machine for possible damage including but not limited to brakes throttle and steering systems Operating at Excessive Speeds Operating this vehicle at excessive speeds increases the operator s risk of losing control Always operate at a speed that s appropriate for the terrain the visibility and operating conditions your skills and your passenger...

Page 19: ... hill could cause an overturn Always maintain a steady speed when climbing a hill If all forward speed is lost Apply the brakes Place the transmission in reverse and slowly allow the vehicle to roll straight downhill while applying light brake pressure to control speed If you begin rolling downhill Never apply engine power Apply the brakes gradually until the vehicle is fully stopped Place the tra...

Page 20: ...only to allow component identification Always use the cab nets Not all models come with all features Refer to the specifications section on page 78 Headlights Front Bumper Brush Guard Radiator ROPS Cab Frame Console Hip Bar Cargo Box Fuel Tank Cap Cab Net Net Rod Mount Net Rod 6X6 Storage Box Storage Compartment Tailgate Latch Release Receiver Hitch CV Boot Rear Caliper Muffler Spark Arrester Tail...

Page 21: ...o a complete stop When the engine is idling move the lever to the desired gear NOTICE Shifting gears with the engine speed above idle or while the vehicle is moving could cause transmission damage Always shift when the vehicle is stationary and the engine is at idle Tip Maintaining shift linkage adjustment is important to assure proper transmission function See your dealer if you experience any sh...

Page 22: ...ifferential Lock Switch The AWD Differential Switch has three positions All Wheel Drive AWD Differential Lock 2WD Differential Unlock Press the top of the rocker switch to engage All Wheel Drive AWD See page 40 for operating instructions Move the rocker switch to the center position to lock the differential and operate in rear wheel drive Press the bottom of the switch to unlock the differential a...

Page 23: ...and hold the adjustment lever toward you while moving the steering wheel upward or downward Release the lever when the steering wheel is at the desired position Electronic Power Steering EPS Electronic power steering if equipped engages when the ignition key is turned to the ON position EPS remains engaged whether the vehicle is moving or idle To conserve battery power the EPS will shut down 5 min...

Page 24: ... moved Check for disconnection then see your dealer promptly if this feature fails to operate properly Inspect and adjust park brake cable tension after the first 25 hours of operation and every 100 hours thereafter to ensure proper cable tension See page 64 Always apply the service brakes before engaging or releasing the park brake 1 Apply the brakes 2 Pull the park brake lever downward as far as...

Page 25: ...ptly replace worn or damaged cab nets with new cab nets available from your authorized Polaris dealer Securing a Net 1 After entering the vehicle insert the lower net rod into the net mount on the floor Make sure the ball at the end of the rod is properly secured in the mount 2 Connect the latch at the top edge of the net to the receiver latch mounted on the front frame Opening a Net 1 To exit the...

Page 26: ...lt is not twisted For lap style belts place the belt across your lap as low on your hips as possible Make sure that the belt is not twisted 2 Push the latch plate into the buckle until it clicks 3 Release the strap it will self tighten Tip The center belt must be tightened manually by pulling on the strap 4 To release the seat belt press the square red button in the buckle s center Seat Belt Inspe...

Page 27: ...tlined in this manual to avoid vehicle rollover WARNING Vehicle rollover could cause severe injury or death Always avoid operating in a manner that could result in vehicle rollover Storage Compartments A storage compartment is located under the driver s seat and on CREW models under the left rear seat On 6X6 models a lockable storage box is located behind the ROPS Always make sure the cover is sec...

Page 28: ...emains and the system will automatically reduce engine power EPS Warning This indicator illuminates briefly when the key is turned to the ON position If the light remains on the EPS system is inoperative See your authorized POLARIS dealer for service Neutral This lamp illuminates when the transmission is in neutral and the ignition key is in the ON position High Beam This lamp illuminates when the...

Page 29: ...flash Refuel immediately Tip If the fuel icon fails to display an open or short circuit has occurred in the fuel sensor circuit See your dealer 3 Information Display Area This area displays odometer trip meter engine hour meter and programmable service hour interval 4 Under Over Voltage This warning usually indicates that the vehicle is operating at an RPM too low to keep the battery charged It ma...

Page 30: ...splay option 5 Repeat the procedure to change remaining display settings Clock Mode Tip The clock must be reset any time the battery has been disconnected or discharged 1 Turn the key to the ON position Use the MODE button to toggle to the odometer dis play 2 Press and hold the MODE button until the hour segment flashes Release the button 3 With the segment flashing tap the MODE button to advance ...

Page 31: ...the engine is started When this feature is enabled it provides a convenient reminder to perform routine maintenance The service interval is programmed at 50 hours at the factory Use the following procedure to change the service interval 1 Press the MODE button until remaining service hours display 2 Press and hold the MODE button 3 When the service hours flash press and release the MODE button to ...

Page 32: ...ates retrieve the error codes from the display 1 If the error codes are not displayed use the MODE button to toggle until Ck ENG displays on the main line of the display 2 Press and hold the MODE button to enter the diagnostics code menu 3 Record the three numbers displayed in the gear position clock and odometer displays 4 Press the MODE button to advance to the next error code 5 Press and hold t...

Page 33: ...as needed to maintain the oil level in the normal safe operating range 3 Drive slowly at first Select an open area that allows room to familiarize yourself with vehicle operation and handling 4 Vary throttle positions Do not operate at sustained idle 5 Perform regular checks on fluid levels controls and areas outlined on the daily pre ride inspection checklist See page 30 During the break in perio...

Page 34: ...ressure 65 Wheels fasteners Inspect ensure fastener tightness 65 Frame nuts bolts fasteners Inspect ensure tightness Fuel and oil Ensure proper levels 25 47 Coolant level Ensure proper level 57 Coolant hoses Inspect for leaks Throttle Ensure proper operation 62 Indicator lights switches Ensure operation 18 Air filter pre filter Inspect clean 60 Air box sediment tube Drain deposits whenever visible...

Page 35: ...y the engine RPM slightly with the throttle to aid in warm up until the engine idles smoothly NOTICE Operating the vehicle immediately after starting could cause engine damage Allow the engine to warm up for several minutes before operating the vehicle Stopping the Engine 1 Release the throttle pedal completely and brake to a complete stop 2 Turn the engine off 3 Engage the park brake WARNING A ro...

Page 36: ...er 1 Perform the pre ride inspection See page 30 2 Make sure all passengers are at least 12 years of age and tall enough to comfortably and safely sit in a passenger seat with the seat belt secured put both feet on the floor and grasp the hand hold 3 Make sure all passengers are wearing helmet eye protection gloves long sleeve shirt long pants and over the ankle boots 4 Make sure all passengers se...

Page 37: ...the trail and avoiding quick sharp turns which can cause skids 4 Engage all wheel drive before wheels begin to lose traction NOTICE Severe damage to the drive train may occur if the AWD is engaged while the wheels are spinning Always allow the wheels to stop spinning before engaging AWD 5 Correct a skid by turning the steering wheel in the direction of the skid Never apply the brakes during a skid...

Page 38: ...other side of the hill Driving on a Sidehill Sidehilling Driving on a sidehill is not recommended Improper procedure could cause loss of control or overturn Avoid crossing the side of any hill unless absolutely necessary If crossing a sidehill is unavoidable follow these precautions 1 Slow down 2 Exercise extreme caution 3 Avoid crossing the side of a steep hill 15 maximum Driving Downhill When dr...

Page 39: ...t before entering water 2 Choose a crossing where both banks have gradual inclines 3 Proceed slowly avoiding rocks and obstacles 4 Avoid operating through deep or fast flowing water WARNING The large tires on your RANGER may cause the vehicle to float in deep or fast flowing water which could result in loss of control and lead to serious injury or death Never cross deep or fast flowing water with ...

Page 40: ...e vehicle on a level sur face 2 When parking inside a garage or other structure be sure that the structure is well venti lated and that the vehicle is not close to any source of flame or sparks including any appliance with pilot lights 3 Turn the engine off 4 Engage the park brake 5 Remove the ignition switch key to prevent unauthorized use Parking on an Incline Avoid parking on an incline if poss...

Page 41: ...ling off centered loads that cannot be centered securely fasten the load and operate with extra caution Always attach the tow load to the hitch point designated for your vehicle HEAVY LOADS CAN CAUSE BRAKING AND CONTROL PROBLEMS Use extreme caution when applying brakes with a loaded vehicle Avoid terrain or situations that may require backing downhill USE EXTREME CAUTION when operating with loads ...

Page 42: ...e specifications charts beginning on page 78 4 Attach a trailer to the trailer hitch bracket only Do not attach a trailer to any other loca tion or you may lose control of the vehicle 5 Never tow a trailer on a grade steeper than 15 Belt Life To extend belt life use the lowest gear possible when hauling or towing heavy cargo Model Total Towed Load Weight Level Ground Total Towed Load Weight 15 gra...

Page 43: ...box may dump unexpectedly and cause serious injury to the operator or bystanders Never operate the dump lever without ensuring that the load is positioned evenly or at the front of the box 6 Stand clear and pull up on the cargo box release lever Lift the front of the cargo box to dump the cargo 7 Lower the cargo box and push down securely to latch WARNING Operating the vehicle while the cargo box ...

Page 44: ...ng to AWD NOTICE Switching to AWD while the rear wheels are spinning may cause severe drive shaft and clutch damage Always switch to AWD while the rear wheels have traction or are at rest Disengaging AWD Move the AWD switch to the center or bottom position to disengage AWD If the switch is turned off while the front hubs are driving they will not release until the rear wheels regain traction In so...

Page 45: ... or low traction conditions helps improve traction Move the rocker switch to the center position 2WD to lock the differential and operate in rear wheel drive On 6X6 models all four rear wheels will be drive wheels Press the bottom of the switch to unlock the differential and allow the rear drive wheels to operate independently This mode of operation is well suited to turf driving or whenever aggre...

Page 46: ...quipped with a closed crankcase system Blow by gases are forced back to the combustion chamber by the intake system All exhaust gases exit through the exhaust system Exhaust Emission Control System Exhaust emissions are controlled by engine design An electronic fuel injection EFI system controls fuel delivery The engine and EFI components are set at the factory for optimal per formance and are not...

Page 47: ...se must be inspected and serviced more frequently Severe Use Definition Frequent immersion in mud water or sand Frequent or prolonged operation in dusty environments Racing or race style high RPM use Prolonged low speed heavy load operation Extended idle Short trip cold weather operation Pay special attention to the oil level A rise in oil level during cold weather can indicate con taminants colle...

Page 48: ...f equipped Daily Inspect daily clean often Headlamp tail lamp Daily Check operation apply dielectric grease if replacing E Air filter main element Weekly Inspect replace as needed D Brake pad wear 10 H Monthly Inspect periodically Battery 20 H Monthly Check terminals clean test E Engine breather filter if equipped 25 H Monthly Inspect replace if necessary Engine oil change break in 25 H 1 M Perfor...

Page 49: ... 100 H 6 M Inspect level change yearly Rear gearcase oil if equipped 100 H 6 M Inspect level change yearly Transmission oil 100 H 6 M Inspect level change yearly D E Fuel system 100 H 12 M Check for leaks at tank cap lines fuel valve filter pump throttle body replace lines every two years Radiator if applicable 100 H 12 M Inspect clean external surfaces Cooling Hoses if applicable 100 H 12 M Inspe...

Page 50: ...vel on dipstick See page 47 Brake Fluid DOT 4 Maintain level between fill lines See page 63 Main Gearcase Oil Transmission AGL PLUS Transmission Fluid See page 51 6X6 See page 50 4X4 CREW Front Gearcase Oil Demand Drive Plus Fluid See page 52 Middle Gearcase Oil 6X6 Premium ATV Angle Drive Fluid See page 53 Rear Gearcase Oil 6X6 Premium ATV Angle Drive Fluid See page 54 Prop Shaft U joints 6X6 POL...

Page 51: ... or using a non recommended oil may cause serious engine damage Always use the recommended oil Never substitute or mix oil brands Always check and change the oil at the intervals outlined in the Periodic Maintenance Chart beginning on page 43 Always use the recommended engine oil Oil Check The oil dipstick and fill tube is located on the engine 1 Position the vehicle on a level surface 2 Remove th...

Page 52: ... the seat and the underseat storage box 10 Place shop towels beneath the oil filter Using an oil filter wrench turn the filter counter clockwise to remove it 11 Using a clean dry cloth clean the filter sealing surface on the crankcase 12 Lubricate the o ring on the new filter with a film of fresh engine oil Check to make sure the o ring is in good condition 13 Install the new filter and turn by ha...

Page 53: ...smission AGL PLUS Transmission Fluid 43 6 oz 1290 ml 12 ft lbs 16 3 Nm 12 ft lbs 16 3 Nm Front Gearcase Demand Drive Plus Fluid 9 3 oz 275 ml 8 10 ft lbs 11 13 6 Nm 11 ft lbs 15 Nm Middle Gearcase Premium ATV Angle Drive Fluid 6 75 oz 200 ml 14 ft lbs 19 4 Nm 14 ft lbs 19 4 Nm Rear Gearcase Premium ATV Angle Drive Fluid 18 oz 532 ml 14 ft lbs 19 4 Nm 14 ft lbs 19 4 Nm RANGER CREW Gearcase Specific...

Page 54: ... of the level check fill plug hole threads 1 Position the vehicle on a level surface 2 Remove the level check fill plug Check the oil level 3 Remove the rear fill plug and add the recommended oil as needed 4 Reinstall both fill plugs Torque to specification Oil Change The drain plug is located near the bottom of the gearcase 1 Remove the rear fill plug and the level check fill plug 2 Place a drain...

Page 55: ...urface 2 Remove the fill plug 3 Check the oil level 4 Add the recommended oil as needed 5 Reinstall the fill plug Torque to specification Oil Change The drain plug is located on the bottom of the transmis sion Access the drain plug through the drain hole in the skid plate 1 Remove the fill plug 2 Place a drain pan under the drain plug Remove the drain plug Allow the oil to drain completely 3 Wipe ...

Page 56: ...the right side of the front gearcase 1 Position the vehicle on a level surface 2 Remove the fill plug Check the oil level 3 Add the recommended oil as needed 4 Reinstall the fill plug Torque to specification Oil Change 1 Support the vehicle securely with a jackstand 2 Remove the front tire on the driver s side 3 Remove the fill plug 4 Place a drain pan under the drain plug on the bottom right hand...

Page 57: ...POLARIS products The middle gearcase fill plug is located on the side of the gearcase Oil Check 1 Position the vehicle on a level surface 2 Remove the fill plug Check the oil level 3 Add the recommended oil as needed 4 Reinstall the fill plug Torque to specification Oil Change 1 Remove the fill plug 2 Place a drain pan under the drain plug 3 Remove the drain plug Allow the oil to drain completely ...

Page 58: ...ear gearcase Oil Check Maintain the oil level even with the bottom thread of the fill plug hole 1 Position the vehicle on a level surface 2 Remove the fill plug Check the oil level 3 Add the recommended oil as needed 4 Reinstall the fill plug Torque to specification Oil Change 1 Remove the fill plug 2 Place a drain pan under the drain plug 3 Remove the drain plug Allow the oil to drain completely ...

Page 59: ... spark plug cap 2 Using the spark plug wrench provided in the tool kit remove the plug by rotating it counterclockwise 3 Reverse the procedure for spark plug installation Torque to specification Normal Plug The normal insulator tip is gray tan or light brown There will be few combustion deposits The electrodes are not burned or eroded This indicates the proper type and heat range for the engine an...

Page 60: ...s the use of POLARIS Premium 60 40 anti freeze coolant or a 50 50 mixture of high quality aluminum compatible anti freeze coolant and distilled water POLARIS Premium 60 40 is already premixed and ready to use Do not dilute with water See page 84 for the part numbers of POLARIS products Always follow the manufacturer s mixing recommendations for the freeze protection required in your area Any time ...

Page 61: ...st be added often or if the overflow bottle runs completely dry there may be a leak in the system Have the cooling system inspected by your POLARIS dealer Radiator Coolant Level 1 Lift the hood CAUTION Escaping steam can cause burns Never remove the pressure cap while the engine is warm or hot Always allow the engine to cool before removing the pressure cap 2 Slowly remove the radiator cap 3 View ...

Page 62: ...ted to ensure the safety of this product However as the owner you have the following responsibilities to make sure this system remains safe Always follow all recommended maintenance procedures Always look for and remove debris inside and around the clutch and vent system when replacing the belt See your dealer as outlined in the owner s manual This PVT system is intended for use on POLARIS product...

Page 63: ...ents and causes outer clutch covers to fail Switch to low range while operating at slower speeds to extend the life of the PVT components belt cover etc PVT Drying There may be some instances when water is accidently ingested into the PVT system Use the following instructions to dry it out before operating 1 Position the vehicle on a level surface 2 Remove the drain plug Allow the water to drain c...

Page 64: ...ehicle to your dealer for service as soon as possible whether you succeed in starting it or not 8 If water has been ingested into the PVT follow the procedure on page 59 for drying Filter Systems Air Filter Always change the air filter at the intervals outlined in the Periodic Maintenance Chart beginning on page 43 Service the air filter more frequently if the vehicle is operated in wet conditions...

Page 65: ...e the following procedure to periodically purge accumulated carbon from the exhaust pipe 1 Remove the arrester clean out plugs located on the bot tom of the muffler 2 Place the transmission in neutral 3 Engage the park brake 4 Start the engine 5 Purge accumulated carbon from the system by momen tarily revving the engine several times 6 If carbon is expelled cover or plug the exhaust outlet and rap...

Page 66: ...the Periodic Maintenance Chart beginning on page 43 Adjust the freeplay if necessary 1 Apply the brakes Engage the park brake Shift the trans mission to neutral 2 Start the engine Allow it to warm up thoroughly 3 Measure the distance the throttle pedal moves before the engine begins to pick up speed Freeplay should be 1 16 to 1 8 inches 1 6 3 2 mm Throttle Body Idle RPM Idle RPM is preset by the m...

Page 67: ...oir in the driver s side wheel well 3 The level should be between the upper MAX and lower MIN level lines 4 If the fluid level is lower than the upper level line add brake fluid to the upper MAX line 5 Apply the brake forcefully for a few seconds and check for fluid leakage around the fittings Brake Inspection 1 Check the brake system for fluid leaks 2 Check the brake pedal for excessive travel or...

Page 68: ...e cable as needed Steering Wheel Inspection Check the steering wheel for specified freeplay and smooth operation at the intervals out lined in the Periodic Maintenance Chart beginning on page 43 1 Position the vehicle on level ground 2 Lightly turn the steering wheel left and right There should be 0 8 1 0 20 25 mm of freeplay 3 If there is excessive freeplay or strange noises or the steering feels...

Page 69: ...ize and type when replacing tires Tire Tread Depth Always replace tires when tread depth is worn to 1 8 3 mm or less Axle and Wheel Nut Torque Specifications Inspect the following items occasionally for tightness and if they ve been loosened for main tenance service Do not lubricate the stud or the lug nut Nut Type Location Nut Torque Lug Nut Aluminum Wheels Front and Rear 30 ft lbs 41 Nm PLUS 1 4...

Page 70: ...ide and rotation arrows on the tire point toward forward rotation WARNING Improperly installed wheels can adversely affect tire wear and vehicle handling which can result in serious injury or death Always ensure that all nuts are torqued to specification Do not service axle nuts that have a cotter pin installed See your POLARIS dealer 5 Attach the wheel nuts and washers and finger tighten 6 Carefu...

Page 71: ...TION Hot components can cause burns to skin Allow lamps to cool before servicing 2 Unplug the headlamp from the wiring har ness Be sure to pull on the connector not on the wiring 3 Turn the lamp counterclockwise to remove it 4 Install the new lamp Tip Make sure the tab on the lamp locates properly in the housing 5 Reinstall the harness assembly into the headlight assembly Brake Lights When the bra...

Page 72: ...e same height 4 Apply the brakes Start the engine Turn on the headlights 5 Observe the headlight aim The most intense part of the headlight beam should be aimed 8 20 cm below the mark placed on the wall Include the weight of a rider on the seat while performing this step 6 If a headlight needs adjustment locate the adjustment screw at the back of the headlight 7 Loosen the screw adjust the headlig...

Page 73: ...vided in the fuse box The power steering fuse if equipped is located on the power steering wiring harness near the fuse box If you suspect that a fuse or relay may not be working properly please see your POLARIS dealer Fuse Feature Supported 20A Accessories 12V Power Receptacle 10A Electronic Fuel Injection 20A Engine Control Module 20A Lights 20A Main Fuse Ignition Instrument Cluster 30A Power St...

Page 74: ...a con ventional battery A sealed battery can be identified by its flat covers on the top of the bat tery A conventional battery has six filler caps on the top of the battery Always keep battery terminals and connections free of corrosion If cleaning is necessary remove the corrosion with a stiff wire brush Wash with a solution of one tablespoon baking soda and one cup water Rinse well with tap wat...

Page 75: ...nect the negative black cable last 1 Open the hood 2 On conventional batteries remove the battery vent tube 3 Disconnect the black battery cable first 4 Disconnect the red battery cable last 5 Lift the battery out of the vehicle Be careful not to tip a conventional battery sideways which could spill electrolyte NOTICE If electrolyte spills immediately wash it off with a solution of one tablespoon ...

Page 76: ...osion resulting in serious injury or death Always ensure that the vent tube is free of obstructions and is securely installed as recommended 5 On conventional batteries coat the terminals with dielectric grease or petroleum jelly 6 Connect and tighten the red cable first Connect and tighten the black cable last 7 Verify that cables are properly routed and install the hold down strap Battery Storag...

Page 77: ...ge WARNING An overheated battery may explode causing severe injury or death Always watch charging times carefully Stop charging if the battery becomes very warm to the touch Allow it to cool before resuming charging For a refresh charge follow all instructions carefully 1 Check the battery voltage with a voltmeter or multimeter A fully charged battery will register 12 8 V or higher 2 If the voltag...

Page 78: ...or reused cloths and pads may contain dirt particles that will scratch the finish Grease all zerk fittings immediately after washing Allow the engine to run for a while to evaporate any water that may have entered the engine or exhaust system If a high pressure water system is used for cleaning not recommended exercise extreme caution The water may damage components and could remove paint and labe...

Page 79: ...RIS Carbon Clean Fuel Treatment or POLARIS Fuel Stabilizer Follow the instructions on the container for the recommended amount Carbon Clean removes water from fuel systems stabilizes fuel and removes carbon deposits from pistons rings valves and exhaust systems 3 Allow the engine to run for 15 20 minutes to allow the stabilizer to disperse through the entire fuel delivery system Oil and Filter Cha...

Page 80: ... add 2 3 tablespoons of engine oil To access the plug holes use a section of clear 1 4 hose and a small plastic squeeze bottle filled with the pre measured amount of oil Do this carefully If you miss the plug holes oil will drain from the spark plug cavities into the hole at the front of the cylinder head and appear to be an oil leak 3 Reinstall the spark plugs Torque to specification See page 55 ...

Page 81: ...of the bolts nuts and other fasteners should be checked by an authorized POLARIS dealer 5 Lubricate at the intervals outlined in the Periodic Maintenance Chart beginning on page 43 Transporting the RANGER Follow these procedures when transporting the vehicle 1 Apply the brakes Engage the park brake 2 Stop the engine 3 Place the transmission in gear 4 Secure the fuel cap oil cap and seat 5 Always t...

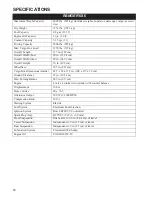
Page 82: ... Overall Width tires 58 in 147 3 cm Overall Height 76 in 193 cm Wheelbase 76 in 193 cm Cargo Box Dimensions Inside 36 5 x 54 x 11 5 in 93 x 137 x 29 cm Ground Clearance 12 in 30 5 cm Min Turning Radius 158 in 401 cm Engine 4 valve 4 stroke twin cylinder with counter balance Displacement 760 cc Bore x Stroke 80 x 76 5 Alternator Output 500 W 3000 RPM Compression Ratio 10 0 1 Starting System Electri...

Page 83: ...00 1 Gear Reduction High 3 6 1 Drive Ratio Front 3 818 1 Drive Ratio Rear 3 105 1 Tire Size Front 25 x 10 12 26 x 9 12 for select models Tire Size Rear 25 x 11 12 26 x 11 12 for select models Tire Pressure Front 10 psi 69 KPa Tire Pressure Rear 10 psi 69 KPa Brakes Front Rear Foot Activated 4 wheel hydraulic disc Brake Park Hand activated mechanical Hood Headlight 2 single beam 50W quartz halogen ...

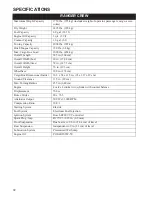
Page 84: ...7 cm Cargo Box Dimensions Inside 42 5 x 54 x 11 5 in 108 x 137 x 29 cm Ground Clearance 12 in 30 5 cm Min Turning Radius 243 in 617 cm Engine 4 valve 4 stroke twin cylinder with counter balance Displacement 760 cc Bore x Stroke 80 x 76 5 Alternator Output 500 W 3000 RPM Compression Ratio 10 0 1 Starting System Electric Fuel System Electronic Fuel Injection Ignition System Bosch EFI ECU Controlled ...

Page 85: ... 91 1 Gear Reduction High 3 85 1 Drive Ratio Front 3 818 1 Drive Ratio Final 3 70 1 Tire Size Front 25 x 10 12 Tire Size Center Rear 25 x 11 12 Tire Pressure Front 10 psi 69 kPa Tire Pressure Center Rear 10 psi 69 kPa Brakes Front Rear Foot Activated 4 wheel hydraulic disc Brake Park Hand activated mechanical Hood Headlight 2 single beam 50W quartz halogen Taillights 10 L E D 28W Brake Light 10 L ...

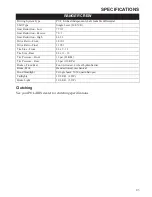
Page 86: ...rall Height 76 in 193 cm Wheelbase 108 in 274 cm Cargo Box Dimensions Inside 36 5 x 54 x 11 5 in 93 x 137 x 29 cm Ground Clearance 11 5 in 29 cm Min Turning Radius 255 in 648 cm Engine 4 valve 4 stroke twin cylinder with counter balance Displacement 760 cc Bore x Stroke 80 x 76 5 Alternator Output 500 W 3000 RPM Compression Ratio 10 0 1 Starting System Electric Fuel System Electronic Fuel Injectio...

Page 87: ... 1 Gear Reduction Reverse 7 0 1 Gear Reduction High 4 63 1 Drive Ratio Front 3 818 1 Drive Ratio Final 3 105 1 Tire Size Front 26 x 9 12 Tire Size Rear 26 x 11 12 Tire Pressure Front 12 psi 83 KPa Tire Pressure Rear 16 psi 110 KPa Brakes Front Rear Foot Activated 4 wheel hydraulic disc Brake Park Hand activated mechanical Hood Headlight 2 single beam 50W quartz halogen Taillights 10 L E D 28W Brak...

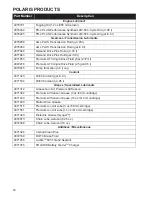
Page 88: ...TV Angle Drive Fluid 2 5 gal 9 5 l 2870465 Pump for Gallon 3 8 l Jug Coolant 2871323 60 40 Coolant gal 3 8 l 2871534 60 40 Coolant qt 95 l Grease Specialized Lubricants 2871312 Grease Gun Kit Premium All Season 2871322 Premium All Season Grease 3 oz 89 ml cartridge 2871423 Premium All Season Grease 14 oz 414 ml cartridge 2871460 Starter Drive Grease 2871515 Premium U Joint Lube 3 oz 89 ml cartridg...

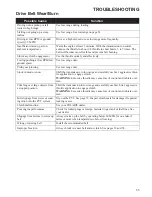
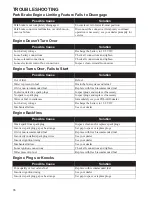
Page 89: ...to low range and carefully use fast aggressive throt tle application to engage clutch WARNING Excessive throttle may cause loss of control and vehicle over turn Climbing over large objects from a stopped position Shift the transmission to low range and carefully use fast brief aggressive throttle application to engage clutch WARNING Excessive throttle may cause loss of control and vehicle over tur...

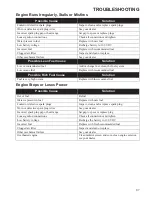
Page 90: ...d or non recommended fuel Replace with fresh recommended fuel Fouled or defective spark plugs Inspect plugs and replace if necessary No spark to spark plug Inspect plugs and replace if necessary Water or fuel in crankcase Immediately see your POLARIS dealer Low battery voltage Recharge the battery to 12 8 VDC Mechanical failure See your dealer Possible Cause Solution Weak spark from spark plug Ins...

Page 91: ...ion Low or contaminated fuel Add or change fuel clean the fuel system Low octane fuel Replace with recommended fuel Possible Rich Fuel Cause Solution Fuel is very high octane Replace with lower octane fuel Possible Cause Solution Out of fuel Refuel Water is present in fuel Replace with new fuel Fouled or defective spark plugs Inspect clean and or replace spark plug Worn or defective spark plug wir...

Page 92: ...accidental damage normal wear and tear abuse or improper handling This war ranty also does not cover any vehicle that has been altered structurally modified neglected improperly main tained used for racing or used for purposes other than for which it was manufactured or for any damages which occur during trailer transit or as a result of unauthorized service or the use of unauthorized parts In add...

Page 93: ...l year 2011 RANGER 800 4X4 is available in 49 state and 50 state versions Only the 50 state models are certified for sale in California The 50 state models available for sale in California are identified by the letter C in the 10th digit of the model name e g R11TH76A_C The 50 state RANGER 800 4X4 models are designed and built with a 600 pound 272 kg cargo box capacity Any modifications to the fac...

Page 94: ...ng dealer s authorized location as proof of residence Upon residence verification the servicing dealer will be authorized to perform the warranty repair If You Move If you move to another country be sure to contact POLARIS Customer Assistance and the customs department of the destination country before you move Vehicles importation rules vary considerably from country to country You may be require...

Page 95: ...s for evaporative emissions As related to the evaporative emission control system The exclusive remedy for breach of this limited warranty shall be at the exclusive option of POLARIS repair or replacement of any defective materials components or products THE REMEDIES SET FORTH IN THIS LIM ITED WARRANTY ARE THE ONLY REMEDIES AVAILABLE TO ANY PERSON FOR BREACH OF THIS WARRANTY POLARIS SHALL HAVE NO ...

Page 96: ... warranty claims for failures that have been caused by the owner s or operator s improper maintenance or use by accidents for which POLARIS has no responsibility or by acts of God Any qualified repair shop or person may maintain replace or repair the emission control devices or systems on your vehicle POLARIS recommends that you contact an authorized POLARIS dealer to perform any service that may ...

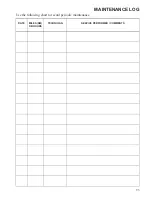
Page 97: ...93 MAINTENANCE LOG Use the following chart to record periodic maintenance DATE MILES KM OR HOURS TECHNICIAN SERVICE PERFORMED COMMENTS ...

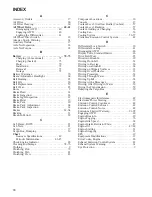
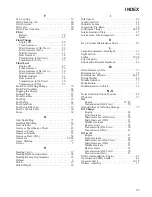
Page 98: ...ent Locations 16 Console 17 Coolant Level Overflow Bottle Coolant 57 Coolant Level Radiator 57 Coolant Adding or Changing 56 Cooling Fan 56 Cooling System 56 57 Crankcase Emission Control System 42 D Differential Lock Switch 18 Differential Locking 41 Disengaging AWD 40 Display Units Standard Metric 26 Drive Belt Wear 85 Drivetrain Break In 29 Driving Downhill 34 Driving in Reverse 36 Driving on a...

Page 99: ...ight Beam Adjustment 68 Headlight Lamp Replacement 67 Helmet 9 Hitch 19 Hitch Weight 38 I Idle Speed 62 Ignition Switch 18 Indicator Lamps 24 Inspection Pre Ride 30 Instrument Cluster 24 28 Intake Restrictor Plate 47 Interference Electromagnetic 42 K Key Periodic Maintenance Chart 43 L Lamp Replacement Headlight 67 Light Switch 18 Lights 67 68 Load Capacity 37 Lubrication Recommendations 46 M Main...

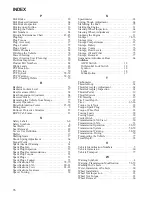
Page 100: ... Specifications 6X6 80 81 Specifications Crew 82 83 Specifications Gearcase 49 Speed Towing 38 S Speedometer 24 Spring Shock Adjustment 64 Stabilizing the Fuel 75 Starting the Engine 31 Steering Wheel Inspection 64 Steering Wheel Adjustment 19 Stopping the Engine 31 Storage 74 76 Storage Area 76 Storage Compartments 23 Storage Battery 72 Storage Covers 76 Storage Fluid Levels 76 Storage Oil and Fi...

Reviews: