background image

GENERAL INFORMATION

7.27

CONCENTRIC SWINGARM
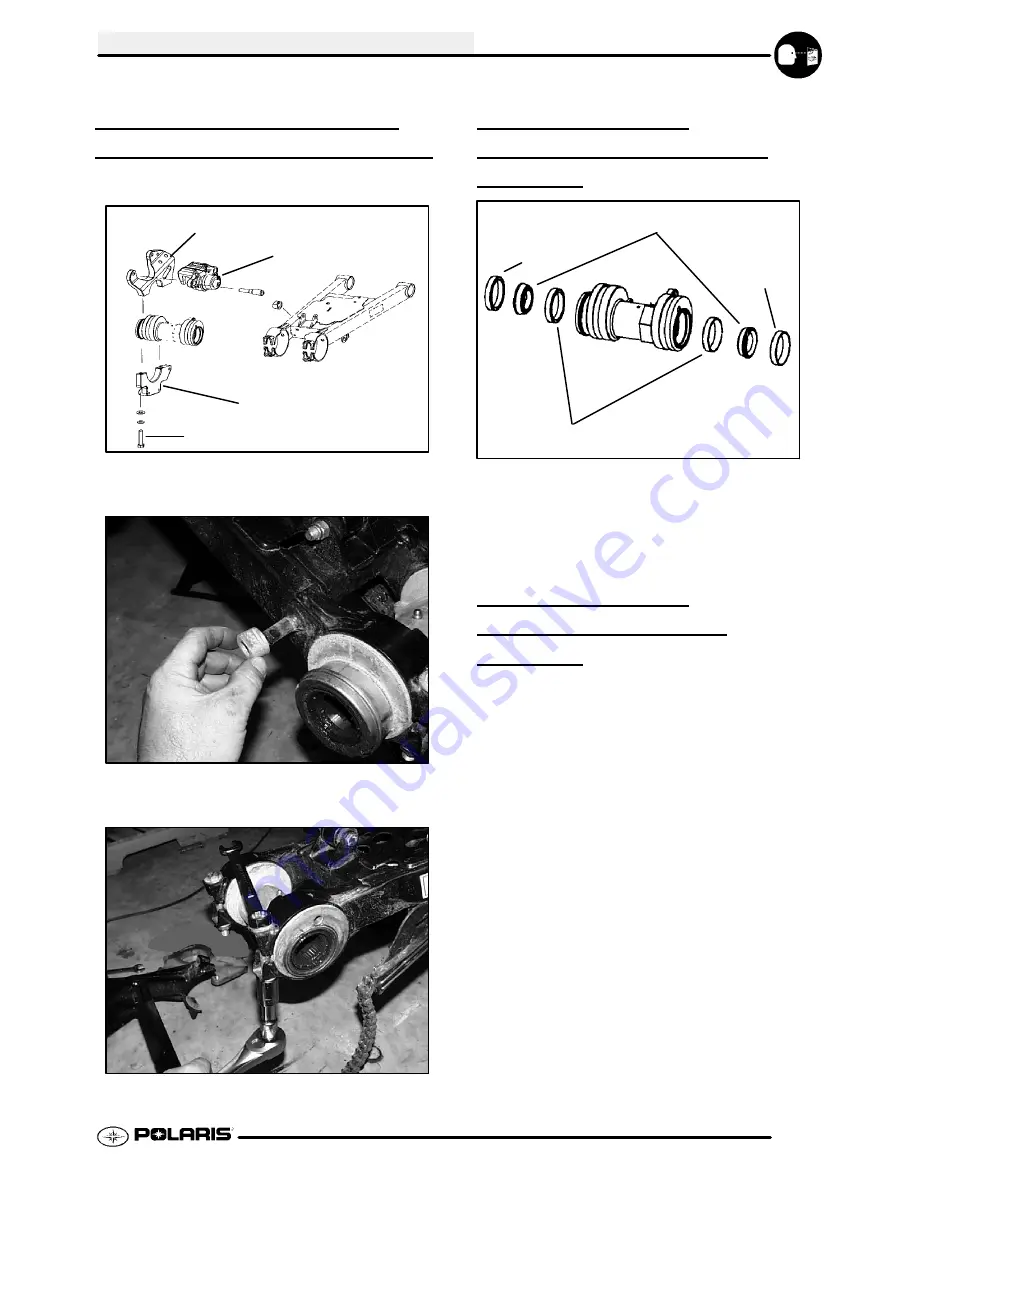
MIDDLE HOUSING REMOVAL

1. Remove middle axle. (See Page 7.20)

Lower

Caliper Mount

Upper

Caliper Mount

Caliper

Mount Bolts

2. Remove the upper and lowerbrake caliper

mounting brackets.

3. Remove brake caliper pivot bushing from stud.

NOTE:

Flange inward as shown.

4. Loosen pinch bolts and remove middle axle

housing.

MIDDLE HOUSING
DISASSEMBLY/BEARING
SERVICE

Seal

Bearing

Bearing Race

Seal

1. Remove seals from housing.
2. Remove bearings.
3. Drive bearing race out from opposite sides.
4. Inspect housing for cracks or wear. Replace if

damaged.

MIDDLE HOUSING
ASSEMBLY/BEARING
SERVICE

1. Drive in new bearing race with brass drift.
2. Lubricate and install new tapered bearings.
3. Lubricate and install new seals.

Summary of Contents for 2004-2005 Sportsman 6x6

Page 1: ...SPORTSMAN 6X6 6 59 0 18 31 504 SPORTSMAN 6X6 6 59 0 18 31 504...

Page 2: ...cations for Polaris Sportsman 6x6 ATVs Comments or suggestions about this manual may be directed to Service Publications Dept Polaris Sales Inc 2100 Hwy 55 Medina Minnesota 55340 Some Polaris factory...

Page 3: ...death to the operator bystander or person inspecting or servicing the ATV CAUTION A CAUTION indicates special precautions that must be taken to avoid personal injury or ATV or property damage NOTE A...

Page 4: ...GENERAL MAINTENANCE ENGINE CARBURETION CLUTCHING FINAL DRIVE BODY AND STEERING TRANSMISSION BRAKES ELECTRICAL...

Page 5: ...Dimensions 1 3 Specifications Sportsman 6x6 1 3 1 5 Optional Springs 1 6 Publication Numbers 1 6 Replacement Keys 1 6 Special Tools 1 7 1 12 Standard Torque Specifications 1 13 Decimal Equivalent Tap...

Page 6: ...Body Style Check Digit World Mfg ID This could be either a number or a letter ENGINE SERIAL NUMBER LOCATION Whenever corresponding about an engine be sure to refer to the engine model number and seri...

Page 7: ...1 9 cm Wheel Base 77 in 195 6 cm Ground Clearance 5 5 in 14 cm Gross Vehicle Weight 1965 lbs 891 kg Dry Weight 895 lbs 406 kg Oil Capacity 2 0 qts 1 9 ltr Coolant Capacity 2 25 qts 2 1 ltr Front Rack...

Page 8: ...Circuit Breakers Solid State in ECM Starting Electric Recoil Backup Instrument Cluster LCD Drivetrain Transmission Type H Pattern H L N R Transmission Fluid Capacity 32 oz Front Gearcase Capacity 4 o...

Page 9: ...Circuit Breakers Solid State in ECM Starting Electric Recoil Backup Instrument Cluster LCD Drivetrain Transmission Type H Pattern H L N R Transmission Fluid Capacity 32 oz Front Gearcase Capacity 4 o...

Page 10: ...0 6x6 A05CL50AA 9919500 9919501 9919502 NOTE Some manuals can be found at the Polaris website www polarisindustries com PAINT CODES FRAME COLOR All P067 Medium Gloss Black COLD WEATHER KITS FOR 4 CYCL...

Page 11: ...rut Spring Compressor 5 2870506 Clutch Puller 6 9314177 Clutch Holding Wrench 6 2871358 Clutch Holding Fixture 6 2870341 Drive Clutch Spider Removal and Install Tool 6 2870654 Clutch Offset Alignment...

Page 12: ...rvicing any Polaris product Standard Tools and Engine Tools PU 45432 Caliper or A Basic Caliper Basic Micrometer 2871043 Flywheel Puller 2870773 C Clip Install Tool 2870967 Slotted Nut Socket 8700229...

Page 13: ...Hone Oil 12 oz 2872105 Water Pump Seal Puller PV 35667 A Cylinder Leak down Tester 2200634 Valve Seat Reconditioning Kit Clutch PVT Tools 2870506 Drive Clutch Puller 2870913 Driven Clutch Puller 28706...

Page 14: ...Replacement Kit 2870338 Spider Nut Socket 2871358 Clutch Holding Fixture 2871025 Clutch Bushing Replace Tool Kit Suspension Tools 2870871 ATV Ball Joint Tool Kit 2871071 Shock Body Holding Tool 287062...

Page 15: ...s 2871702 Shaft Drive Transmission Front Gearcase Tool Kit 2871351 Shock IFP Depth Tool 2871282 Bearing Seal Driver 50 mm 2870772 1 75 Wrench Electrical Tools PV 43568 Fluke 77 Multimeter 2870836 Batt...

Page 16: ...ctrical Tools 2870630 Timing Light 2871745 Static Timing Light Harness 2460761 Hall Sensor Probe Harness PV 39991 Peak Reading Adapter PV 37453 Christie De Sulfating Multi Battery Charger PV 63070 Chr...

Page 17: ...sections Bolt Size Threads In Grade 2 Grade 5 Grade 8 Torque in lbs Nm 10 24 27 3 1 43 5 0 60 6 9 10 32 31 3 6 49 5 6 68 7 8 Torque ft lbs Nm 1 4 20 5 7 8 11 12 16 1 4 28 6 8 10 14 14 19 5 16 18 11 1...

Page 18: ...11 32 R 3 8 13 32 13 32 0 0995 0 0937 0 1285 0 125 0 166 0 161 0 196 0 234 0 277 0 265 0 3125 0 3125 0 3437 0 339 0 375 0 406 0 406 3 32 3 32 1 8 1 8 11 64 5 32 13 64 15 64 9 32 17 64 5 16 5 16 11 32...

Page 19: ...ubic centimeters cc x 0 061 Cubic inches cu in Imperial pints Imp pt x 0 568 Liters l Liters l x 1 76 Imperial pints Imp pt Imperial quarts Imp qt x 1 137 Liters l Liters l x 0 88 Imperial quarts Imp...

Page 20: ...a rotational direction g Gram Unit of weight in the metric system gal Gallon ID Inside diameter in Inch inches Inch Pound In lb 12 in lbs 1 ft lb kg cm 2 Kilograms per square centimeter kg m Kilogram...

Page 21: ...uel System 2 17 2 18 Compression Test 2 19 Battery Maintenance 2 19 2 20 Ignition Sparkplug 2 20 Coolant System Maintenance 2 21 2 22 Air Filter Service 2 22 2 24 Air Box Sediment Tube Service 2 24 Br...

Page 22: ...il level begins to rise Monitor the oil level and if it continues to rise discontinue use and determine the cause or see your dealer Maintenance Chart Key The following symbols denote potential items...

Page 23: ...nt every 2 years Headlamp tail lamp Daily Check operation apply dielectric grease if re placing E Air filter main element Weekly Inspect replace as needed Recoil housing Weekly Drain water as needed c...

Page 24: ...e Cable ETC Switch 50 H 6 M 310 500 Inspect adjust lubricate replace if necessary J E Choke cable 50 H 6 M 310 500 Inspect adjust lubricate replace if necessary E Carburetor air intake ducts flange 50...

Page 25: ...ect replace as needed J E Ignition Timing 100 H 12 M 620 1000 Inspect Wiring 100 H 12 M 620 1000 Inspect for wear routing security apply dielectric grease to connectors subjected to water mud etc J Cl...

Page 26: ...RS ARE LISTED ON PAGE 2 5 Item Type Notes See Pages Engine Oil Polaris Premium 4 Synthetic 0W 40 PN 2871567 Add to proper level on dipstick 2 25 Transmission Polaris AGL Gearcase Lu bricant PN 2873602...

Page 27: ...nt 2871534 60 40 Coolant Quart 12 Count NOTE Each item can be purchased separately at your local Polaris dealer Part No Description Additives Sealants Thread Locking Agents Misc 2870585 Loctitet Prime...

Page 28: ...PORTSMAN 6X6 MODELS Pure Polaris Lubricants and Maintenance Kits can be purchased at your local Polaris dealer 2873554 ATV Oil Change Kit Oil Filter 3 Qts of 0W 40 oil Reservoir Gasket Drain Plug Gask...

Page 29: ...90 Fill master cylinder reservoirs to 1 4 6 4mm from top or between indicated lines See Page 2 29 As required Change fluid every 2 years 4 Drive Chain Polaris Chain Lube Apply to chain link plates and...

Page 30: ...ock position If lubricant is not visible add until it flows from filler hole Reinstall screw Semi annually 9 Strut Assembly Polaris All Season Grease PN 2871423 Locate grease fitting and grease with g...

Page 31: ...n Semi annually 12 Rear Scissors and Lower Rear Shock Bushings Polaris All Season Grease PN 2871423 Locate and grease Semi annually More often under severe use such as operated in water or under sever...

Page 32: ...evel is correct when it reaches the bottom of the fill hole as shown at right To change lubricant 1 Remove footwell from the right side of the vehicle 2 Remove transmission drain plug drain the oil Ca...

Page 33: ...e drain plug located on the bottom and drain oil Catch and discard used oil properly 2 Clean and reinstall drain plug using a new sealing washer 3 Remove fill plug 4 Add proper amount of lubricant 5 I...

Page 34: ...ct the adjustment of the other rod 5 Place gear selector in neutral Make sure the transmission bell cranks are engaged in the neutral position detents Adjust to align linkage rod end studs with holes...

Page 35: ...r slightly while lifting on the cover to release snap 3 Repeat procedure at the other five locations as shown NOTE Do not attempt to remove cover until all latch points are released 1 2 3 4 5 6 ETC Co...

Page 36: ...ENT Pilot Screw FRONT Engine Pilot Screw View Right Cover Panel Removed 1 Start engine and warm it up to operating temperature about 10 minutes 2 Turn pilot screw in clockwise until lightly seated Tur...

Page 37: ...play 1 16 1 8 Freeplay Direction of travel Ill 2 6 Tighten lock nut securely and slide boot completely in place to ensure a water tight seal 7 Turn handlebars from left to right through the entire tur...

Page 38: ...Remove line clamps at both ends of the filter 3 Remove fuel lines from filter 4 Install new filter and clamps onto fuel lines with arrow pointed in direction of fuel flow 5 Install clamps on fuel line...

Page 39: ...OUNTS Inspect rubber engine mounts A for cracks or damage Check engine fasteners and ensure they are tight A A A BATTERY MAINTENANCE WARNING Battery electrolyte is poisonous It contains sulfuric acid...

Page 40: ...ter 10 for ignition timing procedures Ignition Timing 500 Engines 30 2 BTDC 5000RPM Engine To Frame Ground Inspect engine to frame ground cable connection Be sure it is clean and tight SPARK PLUG 1 Re...

Page 41: ...trength of the coolant using an antifreeze hydrometer Antifreeze Hydrometer G A 50 50 or 60 40 mixture of antifreeze and distilled water will provide the optimum cooling corrosion protection and antif...

Page 42: ...tle has run dry or if overheating is evident the level in the radiator should be inspected and coolant added if necessary WARNING Never remove the pressure cap when the engine is warm or hot Escaping...

Page 43: ...tallation NOTE Apply a small amount of general purpose grease to the sealing edges of the filter before reinstalling 9 Reinstall pre filter element over main filter Be sure the element covers entire s...

Page 44: ...filters can be installed with the arrow pointing in either direction In Line Breather Filter Location A Typical Breather Filter Location BREATHER HOSE 1 Be sure breather line is routed properly and se...

Page 45: ...the bottom line on the dipstick Add oil as indicated by the level on the dipstick Do not overfill NOTE A rising oil level between checks in cool weather driving can indicate contaminants collecting i...

Page 46: ...hand until filter gasket contacts the sealing surface then turn and additional 1 2 turn Engine Sump Drain Plug Bottom View Crankcase Drain 18 Approximately 1 cup of engine oil will remain in the crank...

Page 47: ...h of air should be heard indicating the oilpump is properly primed and ready for field operation Note If the system is primed properly you should hear some air release If you do not the system has not...

Page 48: ...djustment procedure if necessary until clearance is correct with locknut secured 6 Repeat this step for the other intake valve 006 15 mm INTAKE VALVE CLEARANCE EXHAUST VALVE CLEARANCE ADJUSTMENT Feele...

Page 49: ...tie rod end grasp the steering tie rod pull in all directions feeling for movement G Repeat inspection for inner tie rod end on steering post G Replace any worn steering components Steering should mov...

Page 50: ...approximately 10 25 4 cm from the floor or as close to the hub axle center line as possible NOTE It is important that the height of both marks be equally positioned in order to get an accurate measur...

Page 51: ...After alignment is complete torque jam nuts to 12 14 ft lbs 16 19 Nm FRONT HUB FLUID LEVEL INSPECTION To check front hub fluid 1 Place vehicle on a level surface 2 Turn wheel until front hub fill che...

Page 52: ...revving the engine several times 3 If some carbon is expelled cover the exhaust outlet and rap on the pipe around the clean out plugs while revving the engine several more times 4 If particles are sti...

Page 53: ...1cm Minimum Thickness HOSE FITTING INSPECTION Check brake system hoses and fittings for cracks deterioration abrasion and leaks Tighten any loose fittings and replace any worn or damaged parts AUXILI...

Page 54: ...y forward to gain slack at the top side of the chain Then pull up and down on the chain Total slack should be as specified below If slack is not within specification adjust the chains If the chains ap...

Page 55: ...pension Damping should be smooth throughout the range of travel G Check all front suspension components for wear or damage G Inspect front strut cartridges for leakage CENTER REAR SUSPENSION G Compres...

Page 56: ...uts 50 Ft Lbs 68 Nm Front Spindle Nut Refer to procedure listed in Chapter 7 Rear Hub Retaining Nut 80 Ft Lbs 109 Nm WHEEL REMOVAL FRONT OR REAR Front Wheel 27 ft lbs See Chapter 7 for Hub Nut Rear Wh...

Page 57: ...decal applied to the vehicle Tire Pressure Inspection PSI Cold Center Front Center 5 PSI 5 PSI 5 PSI TIRE INSPECTION G Improper tire inflation may affect ATV maneuverability G When replacing a tire a...

Page 58: ...MAINTENANCE 2 38 NOTES...

Page 59: ...3 11 EH50PL Engine Oil Flow charts 3 12 EH50PL Engine Exploded Views 3 13 EH50PL Engine Top End Disassembly 3 14 3 23 EH50PL Valve Seat Service 3 23 3 26 EH50PL Cylinder Head Assembly 3 26 3 27 EH50PL...

Page 60: ...ine Assembly for torque procedure Drive Clutch Bolt 7 16 20 40 55 Nm Flywheel 16mm 58 72 78 98 Nm Oil Delivery Pipe 12mm 11 15 15 21 Nm Oil Drain Bolt Crankcase 14mm 14 17 19 23 Nm Oil Filter Pipe Fit...

Page 61: ...1 4970 38 005 38 025 mm Camshaft Oil clearance Std 0022 0035 055 090 mm Limit 0039 10 mm Cylinder Head Surface warpage limit 0020 05 mm y Standard height 3 870 98 3 mm Valve Seat Contacting width In S...

Page 62: ...be a push by hand fit at 68 F 20 C Piston Ring Piston ring installed Top Std 0079 0138 20 36 mm g g gap p ring Limit 039 1 0 mm Second Std 0079 0138 20 36 mm ring Limit 039 1 0 mm Oil ring Std 0079 02...

Page 63: ...not have an identification mark the direction for placement of the piston does not matter Note the directional and identification marks when viewing the pistons from the top The letter F or must alwa...

Page 64: ...filler neck will aid in purging the system of air Pump the hose using your hand several times as shown in the diagram Elevating the rear of the ATV with a floor jack rear tires 4 6 off the ground als...

Page 65: ...Temperature Hot Light On 178 190 215 F 102 C Fan Off 296 316 180 F 82 C Fan On 236 251 195 F 91 C System Capacity 2 25 Quarts 2 13L Radiator Cap Relief Pressure 13 PSI RECOMMENDED COOLANT Use only hi...

Page 66: ...bolts and remove chain and sprockets as an assembly 13 Refer to PVT System to remove outer clutch cover drive belt drive clutch driven clutch and inner cover 14 Starter motor Note ground cable locati...

Page 67: ...sing honing oil and a coarse roughing stone Measure the piston see piston measurement and rough hone to the size of the piston Always leave 002 003 05 07 mm for finish honing Refer to piston to cylind...

Page 68: ...one shown in the illustration at right squeeze the crankshaft at point A Use tool from alignment kit A HIGH 002 05mm HIGH 005 13mm A 3 If the crank rod pin location is 180_ from the dial indicator op...

Page 69: ...bypass the filter element At this point the oil is diverted in two directions Oil is supplied to the camshaft through the left front cylinder stud and an oil passage in the head Oil enters the camsha...

Page 70: ...ry Crankcase Small End Bearing Cylinder Sleeve Main Bearing PTO Large End Bearing Crank Pin Crankshaft Screen Fitting Bottom of Tank EH50PL Oil Flow Chart Top of Oil Tank Union Fitting Lower Oil Jet U...

Page 71: ...GENERAL INFORMATION 3 13 EH50PL ENGINE EXPLODED VIEW Crankcase Cylinder Cylinder Head Crankshaft and Piston Valve Train A...

Page 72: ...rotate engine slowly watching camshaft sprocket marks and the mark in the timing inspection hole 4 Align single TDC mark on flywheel with projection in inspection hole and the cam sprocket pin facing...

Page 73: ...sioner Spring Free Length 2 320I 5 9 cm 4 Measure free length of tensioner spring Replace spring if excessively worn Compare to specifications 5 Replace entire tensioner assembly if any part is worn o...

Page 74: ...t supports and visually inspect surface Compare to specifications 6 Subtract rocker shaft O D from rocker arm shaft support I D This is the oil clearance Compare to specifications 7 Inspect rocker adj...

Page 75: ...h a wire to prevent it from falling into the crankcase Inspect for Areas of Tooth Wear or Damage Sprocket Teeth 9 Inspect cam sprocket teeth for wear or damage Replace if necessary Decompressor Ball R...

Page 76: ...osition and install the release lever shaft If Camshaft Is Installed In The Engine 4 Use a small magnet to draw the actuator ball outward or rotate the engine until the cam lobes face upward and insta...

Page 77: ...2 0035I 055 090 mm Limit 0039I 10 mm NOTE Replace camshaft if damaged or if any part is worn past the service limit NOTE Replace cylinder head if camshaft journal bore is damaged or worn excessively C...

Page 78: ...GENERAL INFORMATION 3 20 CYLINDER HEAD EXPLODED VIEW EH50PL EH50PL...

Page 79: ...CYLINDER HEAD DISASSEMBLY WARNING Wear eye protection or a face shield during cylinder head disassembly and reassembly NOTE Keep all parts in order with respect to their location in the cylinder head...

Page 80: ...ots To check for bent valve stems mount valve in a drill or use V blocks and a dial indicator A B 3 Check end of valve stem for flaring pitting wear or damage A 4 Inspect split keeper groove for wear...

Page 81: ...rvicing the valve guides and valve seats requires special tools and a thorough knowledge of reconditioning techniques Follow the instructions provided in the cylinder head service tool kit CAUTION Wea...

Page 82: ...Installed Height Valve Guide Height 689 709I 17 5 18 0 mm 4 Place a new guide in the valve guide installation tool and press guide in to proper depth Check height of each guide above the cylinder hea...

Page 83: ...e 60 or 75 cutter to raise the seat When contact area is centered on the valve face measure seat width S If the seat is too wide or uneven use both top and bottom cutters to narrow the seat S If the s...

Page 84: ...l valve carefully with a rotating motion to avoid damaging valve seal 5 Dip valve spring and retainer in clean engine oil and install spring with closely spaced coils toward the cylinder head 6 Place...

Page 85: ...he 500 engine valves NOTE Both feeler gauges should remain inserted during adjustment of each valve 006 15 mm EXHAUST VALVE CLEARANCE 3 When clearance is correct hold adjuster screw and tighten locknu...

Page 86: ...inforced areas only until loose 7 Rock cylinder forward and backward and lift it from the crankcase supporting piston and connecting rod Support piston with Piston Support Block PN 2870390 8 Remove do...

Page 87: ...p rail first followed by the bottom rail 6 Remove the expander CYLINDER INSPECTION 1 Remove all gasket material from the cylinder sealing surfaces 2 Inspect the top of the cylinder for warpage using a...

Page 88: ...ston Pin Bore Piston Pin Bore 9055 9057I 23 0 23 006 mm 1 Measure piston pin bore Piston Pin Measurement Locations Piston Pin O D 9053 9055I 22 994 23 0 mm 2 Measure piston pin O D Replace piston and...

Page 89: ...in specified range NOTE Always check piston ring installed gap after re boring a cylinder or when installing new rings A re bored cylinder should always be scrubbed thoroughly with hot soapy water rin...

Page 90: ...ve flywheel nut and washer 2 Install Flywheel Puller PN 2871043 and remove flywheel CAUTION Do not thread the puller bolts into the flywheel more than 1 4 or stator coils may be damaged 3 Mark or note...

Page 91: ...ling washer B spring C and one way valve D from PTO side crankcase 2 Inspect free length of spring and check coils for distortion One Way Valve Spring Free Length Std 1 450 3 68 cm 3 Inspect valve for...

Page 92: ...drive gear C 3 Inspect drive gear teeth for cracks damage or excessive wear 4 Remove three oil pump retaining bolts and pump 5 Inspect mating surface of crankcase and oil pump Check for nicks burrs o...

Page 93: ...haft for wear OIL PUMP ASSEMBLY 1 Clean and dry all parts thoroughly Apply clean engine oil to all parts Do not use gasket sealer on the pump body mating surfaces or oil passages will become plugged 2...

Page 94: ...ing or galling Turn the inner race of each bearing The bearings should turn smoothly and quietly The outer race of each bearing should fit tightly in the crankcase The inner race should be firm with m...

Page 95: ...shaft bearings and pump shaft bearing use a blind hole bearing puller NOTE Bearings are stressed during the removal process and should not be re used PUMP SHAFT OIL SEAL WATER PUMP MECHANICAL SEAL RE...

Page 96: ...PLAY INSPECTION ADJUSTMENT Before reassembling the crankcase the following steps should be performed to determine the amount of crankshaft counter balancer shaft and pump shaft end play Excessive end...

Page 97: ...5 and record below Total Case Width 7 Measure the width of the crankshaft at the bearing seats with a micrometer or dial caliper and record Crankshaft Width 8 Subtract the Crankshaft Width measured in...

Page 98: ...measured in Step 2 from the figure obtained in Step 5 7 Subtract the thickness of the existing shim from the result of Step 6 to determine if a different shim is needed The result must be within the...

Page 99: ...t 4 Place the balancer shaft in the PTO crankcase aligning the timing marks on the crankshaft and balancer gears Install the proper shim washer on the shaft 5 Inspect the oil pump sealing surface on t...

Page 100: ...per or careless use of this tool or procedure can result in a bent water pump shaft Pump shaft replacement requires engine removal and crankcase separation Use caution while performing this procedure...

Page 101: ...f mechanical seal has been removed from the cases Ill 6 Pump shaft oil seal can also be replaced at this time if necessary 7 The Water Pump Install Kit PN 5131135 is required to install the new mechan...

Page 102: ...rotation The tab must be positioned in the notch on the side of the piston as shown A A 3 Install the bottom rail with the gap at least 30 from the end of the expander on the side opposite the top rai...

Page 103: ...new cylinder base gasket A 2 Position the Piston Support Block PN 2870390 A beneath the piston skirt to support the piston during cylinder installation 3 Apply clean engine oil to the ring compressor...

Page 104: ...bolt threads and washers and hand tighten the bolts The following procedure must be used to torque the cylinder head properly Torque all bolts evenly in a criss cross pattern Torque bolts to 22 ft lbs...

Page 105: ...cing outward and the alignment pin notch facing directly upward A B 5 Before positioning the sprocket on the camshaft check the position of the cam sprocket alignment pin When the cam is positioned pr...

Page 106: ...GENERAL INFORMATION 3 48 CAMSHAFT TIMING Single TDC Mark Aligned Crankshaft to Camshaft Centerline Sprocket Alignment Pin Do Not Use Advance Marks Rotation TDC Mark Dots...

Page 107: ...ease to the crankshaft seal Apply molybdenum disulfide grease or assembly lubricant to the crankshaft bushing 2 Install a new O Ring in the oil passage recess in the crankcase 3 Apply 3 Bond 1215 PN 2...

Page 108: ...wer surfaces 4 Rotate the engine until the cam lobes are pointing downward 5 Be sure the dowel pins are in place and install the rocker shaft assembly 6 Apply a light film of engine oil to the threads...

Page 109: ...to enter the recoil housing through the rope NOTE The handle must seal tightly on the recoil housing to prevent water from entering 11 Remove center bolt from recoil friction plate A 12 Inspect plate...

Page 110: ...2871423 To complete recoil assembly 1 Route rope through guide bushing in recoil housing and into reel Tie a secure knot in end of the rope 2 Wind rope counterclockwise onto the reel as viewed from ra...

Page 111: ...ded S Low compression high cylinder leakage S No spark Spark plug fouled Engine Does Not Turn Over S Dead battery S Starter motor does not turn S Engine seized rusted or mechanical failure Engine Runs...

Page 112: ...Valve sticking S Air leaks in intake S Lean condition COOLING SYSTEM TROUBLESHOOTING Overheating S Low coolant level S Air in cooling system S Wrong type of coolant S Faulty pressure cap or system lea...

Page 113: ...umbers 4 4 CV Carburetor System Function 4 Cycle 4 5 CV Carburetor Vent System 4 Cycle 4 5 CV Carburetor Operation 4 5 4 7 Disassembly Notes CV Carburetor 4 7 4 8 Cleaning CV Carburetor 4 8 Inspection...

Page 114: ...9 E Ring 20 Cap 21 Screw 22 Drain Screw 23 O Ring 24 Washer 25 Adjuster 26 Spring 27 Pilot Jet 28 Main Jet 29 Washer 30 Jet Needle 31 Float Assembly 32 Float Body Assembly 33 Float Pin 34 Needle Valve...

Page 115: ...orward Cap Seal Foam Gasket Vent Line Mounting Bracket Foil Fuel Valve Knob Fuel Valve Fuel Outlets Foil Fuel Tank Fuel Valve Engine Filter Fuel Pump Carburetor Fuel Tank Vent Carburetor Vent Fitting...

Page 116: ...an altitude of 0 6000 ft 0 1800 meters and ambient temperatures between 40 and 80 F 5 to 26 C Carburetors must be re calibrated if operated outside this temperature and or altitude range The jetting...

Page 117: ...range and high throttle settings 1 4 to full throttle VENT SYSTEMS CV CARBURETOR The carburetor float bowl vent lines supply atmospheric pressure to the float bowl The lines must be free of kinks res...

Page 118: ...uni BST carburetor PILOT IDLE AND SLOW SYSTEM This system supplies fuel during engine operation with throttle valve closed 1 or slightly opened The fuel from float chamber 2 is metered by pilot jet 3...

Page 119: ...AIN SYSTEM As throttle valve 1 is opened engine speed rises and this increases negative pressure in the venturi Consequently the vacuum slide 2 moves upward The fuel in float chamber 3 is metered by m...

Page 120: ...eaner in your eyes or if you swallow cleaner seek medical attention immediately Carburetor cleaners can be extremely caustic Extended periods of soaking can loosen the adhesive sealer on the passage d...

Page 121: ...edle Jet 2 Inspect the inlet needle tapered surface for any sign of wear or damage Be sure the spring loaded pin is free moving and returns freely when pushed The inlet needle and seat should be press...

Page 122: ...dle valve pin without compressing the spring Float Height Std BST 34 13 14 mm 51 55 inches 2 Measure the height from the float bowl mating surface to the top of step in float as shown Both sides of fl...

Page 123: ...sconnect impulse line from pump 3 Connect Mity Vact PN 2870975 to the impulse line fitting on the pump 4 Apply 5 inches Hg vacuum to the pump fitting The diaphragm should hold vacuum indefinitely If f...

Page 124: ...12 FUEL PUMP EXPLODED VIEW 3 2 1 5 5 4 1 Fuel Pump Assembly 2 Diaphragm Gasket Set 3 Screw and Washer Assembly 4 Screw and Washer Assembly 5 Screw and Washer Assembly 6 Pressure Regulator 7 Fuel Inle...

Page 125: ...hoke plunger sticking incorrectly adjusted choke S Choke cable binding or improperly routed S Incorrect pilot air fuel screw adjustment S Faulty inlet needle and seat S Faulty inlet needle seat O Ring...

Page 126: ...GENERAL INFORMATION 4 14 NOTES...

Page 127: ...l Removal 5 6 Steering Assembly Exploded View 5 7 A Arm Replacement 5 8 Concentric Swing Arm Removal 5 9 Concentric Swing Arm Assembly Installation 5 10 Rear Strut Stabilizer Exploded View 5 11 Rear S...

Page 128: ...99 Seal Sleeve Installation Tool Kit COVER PANEL REMOVAL To remove perform these steps Seat S Pull release lever at the rear of the seat S Lift and pull seat rearward disengaging seat from tabs at the...

Page 129: ...Box Support Shock Tailgate Box Latch Paddle Latch Shaft Latch Rod Hinge Tailgate Cover Tailgate Cable Tail Brake Light Box Latch Headrest Latch Brackets Reflector NOTE All warning information labels...

Page 130: ...ASSEMBLY EXPLODED VIEW Rear Cab Assembly Front Cab Assembly Seat Rear Mud Guard Rear Cab Side Cover Front Cover Front Cab Footrest Front Mud Guard NOTE All warning information labels must be in place...

Page 131: ...ble D S Remove headlight with adjuster S Remove two screws securing bottom half of pod E Assembly S Install bottom of pod onto handlebar and secure to brackets S Install key switch choke cable and hea...

Page 132: ...ehind the fuel tank With a quick and firm motion push down on the side panel to disengage the top rear two tabs Then pull up on side panel to disengage front upper and lower tab 3 To reinstall side pa...

Page 133: ...1 30 ft lbs 41 Nm A 2 12 14 ft lbs 17 19 Nm 40 45 ft lbs 54 61 Nm Steering Post Steering Post Arm Frog 1 2 Right Hand Tie Rod End Positioned Between Steering Post Arms NOTE To avoid damage to tie rods...

Page 134: ...ting bolts were destroyed during removal DO NOT reuse old bolts Serious injury or death could result if fasteners come loose during operation 8 Attach A arm to hub strut assembly Tighten ball joint nu...

Page 135: ...g 7 and swingarm bushing 6 from swingarm 10 Place flats of right side pivot bushing 4 in a vise to hold while removing nut 1 Heat nut with a pro pane torch to soften LocTitet 11 Remove two piece bushi...

Page 136: ...ed The top flat on the nut should be approximately parallel with top surface of the swingarm 6 Install swingarm assembly in frame 7 Install and tighten pivot bolts slowly until the flats of the pivot...

Page 137: ...GENERAL INFORMATION 5 11 REAR STRUT STABILIZER 30 ft lbs 41 Nm 30 ft lbs 41 Nm 30 ft lbs 41 Nm Grease Fittings 40 ft lbs 54 Nm Upper Stabilizer Lower Stabilizer Swingarm...

Page 138: ...GENERAL INFORMATION 5 12 REAR SWING ARM WELDMENT 30 ft lbs 48 Nm 50 ft lbs 54 Nm Guide 55 ft lbs 76 Nm Hitch Chain Cover Swing Arm Extension Lower Chain Guard Swing Arm Bracket Chain Cover Mounts...

Page 139: ...acement will be necessary Grease fitting 2 location Check lubrication guide for recommended service intervals Specified pole gap is 0 001 0 0254mm 1 2 15 ft lbs 21 Nm Nut 15 ft lbs 21 Nm 18 ft lbs 25...

Page 140: ...ut Torque 15 ft lbs 21 Nm BALL JOINT REPLACEMENT NOTE Refer to the illustration on the previous page for this procedure 1 Loosen front wheel nuts slightly 2 Elevate and safely support machine under fo...

Page 141: ...involves the use of an open flame Perform this procedure in a well ventilated area away from gasoline or other flammable materials Be sure the area to be flame treated is clean and free of gasoline o...

Page 142: ...GENERAL INFORMATION 5 16 NOTES...

Page 143: ...ons 6 8 Shift Weights 6 9 Drive Clutch Inspection 6 10 Drive Clutch Disassembly Inspection 6 11 6 12 Drive Clutch Assembly 6 12 6 13 Drive Belt Tension 6 13 Drive Belt Removal Inspection 6 14 6 15 Dri...

Page 144: ...nts of the drive clutch and driven clutch control engagement initial vehicle movement clutch upshift and backshift During the development of a Polaris ATV the PVT system is matched first to the engine...

Page 145: ...set Belt Width See Page 6 16 6 18 2 Drive and Driven Clutch Buttons and Bushings Drive Clutch Shift Weights and Pins Drive Clutch Spider Rollers and Roller Pins Drive and Driven Clutch Springs See Pag...

Page 146: ...at least 5 min then with transmission in neutral advance throttle to approx 1 8 throttle in short bursts 5 to 7 times The belt will become more flexible and prevent belt burning Slow and easy clutch e...

Page 147: ...or drive belt removal A B 6 Install the Drive Clutch Holder PN 9314177 A 7 Remove drive clutch retaining bolt and remove drive clutch using the Drive Clutch Holder PN 9314177 B Drive Clutch Puller PN...

Page 148: ...ar 12 ft lbs 16 6 Nm Driven Clutch Retaining Bolt Torque 17 ft lbs 23 5 Nm Drive Clutch Retaining Bolt Torque 40 ft lbs 55 Nm Offset Spacer Offset Spacer 7 Install clutch offset spacers on transmissio...

Page 149: ...H EXPLODED VIEW Outer Cover Exhaust Duct Inner Cover Seal Inlet duct Inner Cover Outer Cover Seal Drive Clutch Mark with permanent marker before disassembly Teflont coated brass bushing Teflont coated...

Page 150: ...subject to during operation it should always be inspected for tolerance limits during any clutch operation diagnosis or repair With the spring resting on a flat surface measure its free length from th...

Page 151: ...gement RPM and shifting patterns Shift weights should not be changed or altered without first having a thorough understanding of their positioning and the effects they may have on belt to sheave clear...

Page 152: ...arance exists replace all buttons and inspect surface of towers See SPIDER REMOVAL Page 6 11 Button to Tower Clearance 000 001I 2 Inspect sheave surfaces Replace the entire service clutch if worn dama...

Page 153: ...shing A The outer cover bushing is manufactured with a Teflont coating Bushing wear is determined by the amount of Teflont remaining on the bushing Inspect shaft 4 Inspect area on shaft where bushing...

Page 154: ...Tool PN 2870910 to replace rollers and pins Take care not to damage roller bushing or bearing surface of the new pin during installation 2 Rubber backed buttons can be used in all ATV clutches if the...

Page 155: ...to avoid damage to the stationary sheave Refer to Page 6 2 for torque specification CAUTION Be sure the spider spacer washers are fully seated in the recessed area in the spider Any misalignment will...

Page 156: ...fect on belt deflection DRIVE BELT REMOVAL INSPECTION 1 Remove outer PVT cover as described in PVT Disassembly 2 Mark drive belt direction of rotation so that it can be installed in the same direction...

Page 157: ...ominal length may require driven shimming or a shorter center distance Remember proper belt deflection is the desired goal not a specific center distance 8 Replace belt if worn past the service limit...

Page 158: ...ecessary NOTE On some models minor adjustments can be made by adding shims between the frame and front lower left engine mount to increase the distance at point A If a shim is present it can be remove...

Page 159: ...o bench vise and lightly grease puller threads Piston Pin Puller PN 2870386 2 Remove nut from puller rod and set aside Piston Pin Puller PN 2870386 Main Puller Adaptor 8 3 Install the Main Puller Adap...

Page 160: ...center of sheave and with towers pointing away from vise slide sheave onto puller rod 4 Install nut on puller rod and hand tighten Turn barrel to apply additional tension if needed 5 Turn sheave and...

Page 161: ...hing PN 3576510 Loctitet 680 PN 2870584 2 With the Main Puller Adapter 8 PN 5020632 on the puller insert cover onto puller rod placing outside of cover toward vise 3 Install nut on rod and hand tighte...

Page 162: ...sheaveand replace if worn NOTE The ramp buttons are secured by Torxt screws T20 Belt deflection adjustment washers 7 Remove moveable sheave and note the number of spacer washers One spacer must remain...

Page 163: ...er 1 or Illustration 2 above The driven clutch helix moveable assembly has several different spring locations which affect clutch shifting and RPMs The greatest amount of spring tension will raise eng...

Page 164: ...5020632 onto the Piston Pin Puller PN 2870386 2 Insert Adapter Reducer 9 PN 5010279 onto the puller sliding it inside the main adapter 3 Remove ramp buttons from moveable sheave 4 Using an electric or...

Page 165: ...from adapters Discard bushing DRIVEN CLUTCH MOVEABLE SHEAVE BUSHING INSTALLATION Number Two Puller Adapter 10 Piston Pin Puller PN 2870386 1 Working from the top insert Number Two Puller Adapter 10 P...

Page 166: ...rn clutch sheave counterclockwise until bushing is seated 6 Remove nut from puller rod and set aside 7 Remove installation tool and clutch sheave from puller 8 Repeat installation procedure for other...

Page 167: ...ts Disassemble and clean clutch inspecting shift weights and rollers Reassemble without the spring and move sheaves through entire range to further determine probable cause Disassemble clean and inspe...

Page 168: ...lutch engagement Caution operator to operate machine within guidelines Vehicle operated with park brake on Inspect brake system Fast effective use of throttle for efficient engagement PVT noise Belt w...

Page 169: ...AWD Front Drive Axle Exploded View 7 12 AWD Strut Casting Seal Replacement 7 13 AWD Strut Seal Sleeve Replacement 7 13 7 14 AWD Front Prop Shaft Removal 7 14 U Joint Disassembly 7 15 U Joint Assembly...

Page 170: ...ring in the hub See Ill 1 When the hub clutch assembly wheel hub and drive axle are engaged the front wheels will drive and stay engaged until rear wheel traction is regained When traction is regained...

Page 171: ...Remove the two brake caliper attaching bolts CAUTION Do not hang the caliper by the brake hose Use wire to hang the caliper to prevent possible damage to the brake line 4 Place a catch pan beneath th...

Page 172: ...25 Nm 5 Install cotter pin Bend each leg of cotter pin around castle nut in different directions NOTE If cotter pin hole does not align tighten slightly to align and install pin Do not exceed 144 in l...

Page 173: ...Plate Brake Disc Bearing Race Bearing 1 000 I D Garter Spring Spacer Cotter Pin Washer Wheel Nut Refer to text on page 7 5 for more information Detail Front Hub Clutch Bearing 1 000 I D Use new cotte...

Page 174: ...surface CAUTION Do not use a hammer as damage to the seal will result 5 Thoroughly clean the brake disc with brake cleaner It is very important that the brake disc be free of any oil or solvents 6 Rei...

Page 175: ...s Make sure the foam block is bonded well to protect the coil wires NOTE Coil wires must be contained in the brake line clip on the back side of the upper strut casting and the wires must be snug agai...

Page 176: ...8 Current electro mechanical spring PN 3250032 wire diameter 018 46 mm spring free length end to end inside hooks 6 968 177 mm Measure wire diameter Measure free length to inside of loops as shown AWD...

Page 177: ...e front hub and remove the hub cap 7 Remove cotter pin and nut 8 Remove hub bearings hilliard assembly and armature plat 9 Remove cotter pin and nut from lower A arm ball joint Remove lower A arm from...

Page 178: ...face ground areas and splines of shaft are protected during handling to avoid damage S Do not allow boots to come into contact with sharp edges or hot engine and exhaust components S The driveshaft is...

Page 179: ...le CV boot replacement requires 30g of grease If CV joint is cleaned an additional 30g of grease is required Refer to information below 8 Before installing the new boot remove all grease from the boot...

Page 180: ...nt Assy Yoke Front Drive Axle Components Front Prop Shaft Components O Ring Yoke Propshaft to Transmission Prop Shaft Cross and Bearing Kit Spring Pin Yoke Front Gearcase Propshaft Assembly GENERAL IN...

Page 181: ...er pin hole does not align at the above torque tighten slightly until the cotter pin hole aligns and install the pin with open ends toward rear of machine BEARING REPLACEMENT NOTE FOR FRONT DRIVE AXLE...

Page 182: ...ight edge on the outer pole so that it just intersects with the inner pole The gap between the straight edge and inner pole should be 0 to 001I 0 025mm This measurement should be checked in three diff...

Page 183: ...3 Support U joint in vise as shown and drive inner yoke down to remove remaining bearing caps 4 Force U joint cross to one side and lift out of inner yoke U JOINT ASSEMBLY 1 Install new bearing caps i...

Page 184: ...directions AWD FRONT HOUSING REMOVAL 1 Stop engine place machine in gear and set parking brake 2 Loosen right front wheel nuts slightly 3 Elevate and support machine under footrest frame area CAUTION...

Page 185: ...ed broken or missing teeth 5 Remove pinion cover and O ring 6 Unscrew fill plug and remove pinion shaft assembly Inspect pinion gear for chipped broken or missing teeth NOTE Pinion shaft assembly will...

Page 186: ...ough spots discoloration or corrosion The bearings should turn smoothly and quietly with no detectable up and down movement and minimal movement side to side 5 Clean pinion shaft and lock nut with Pri...

Page 187: ...o ring and torque bolts to 14 ft lbs 19 Nm Cover Bolts Torque 14 ft lbs 19 Nm FRONT HOUSING INSTALLATION Fill Plug 1 To install housing reverse removal procedure Use new roll pins in drive shafts 2 A...

Page 188: ...ERAL INFORMATION 7 20 AWD FRONT HOUSING EXPLODED VIEW Pinion Cover Seal O Ring Bearing Pinion Shaft Output Shaft Bearing Shim O Ring Output Cover Thrust Button Shim Seal Vent Bushing Seal Retaining Ri...

Page 189: ...ve middle wheels and hubs 2 Remove the rear chain gaurd 3 Remove rear and middle drive chains 4 Remove swing arm brackets from rear swing arm weldment Lower rear swing arm to the ground A B C 5 Remove...

Page 190: ...als replace if worn or damaged J K 9 Remove the 30 tooth spocket J and the 38 tooth sprocket K 10 Remove rear brake caliper Support with wire or tie strap Do not hang caliper by brake line 11 Slide ax...

Page 191: ...of axle is identified by the small groove in the middle of the spline Stop ring 2 Install disc hub assembly on axle Be sure hub covers stop ring Install disc in soft jawed vise Apply Never Seize to t...

Page 192: ...grease to sealing area on inside of middle chain sprocket hub and slide sprocket hub assembly onto the axle as the axleis being installed Seat the hub against O ring and bearing Lubricate and install...

Page 193: ...brake caliper mounting bracket 10 12 ft lbs 14 17 Nm Verify proper chain adjustment after torquing eccentric by rolling ATV forward and checking chain tension in several places on chain 9 Torque brak...

Page 194: ...ng 10 Rear Axle Seal 11 O ring 12 Bearing Spacer 13 Nylok Nut 14 Brake Disc Hub 15 Locking Brake Disc Hub 16 O ring 17 Axle Spacer 18 O ring 19 Lip Seal 20 Bearing Cone 21 Bearing Cup 22 Rear Axle Hou...

Page 195: ...ud NOTE Flange inward as shown 4 Loosen pinch bolts and remove middle axle housing MIDDLE HOUSING DISASSEMBLY BEARING SERVICE Seal Bearing Bearing Race Seal 1 Remove seals from housing 2 Remove bearin...

Page 196: ...eplace if worn or damaged A worn collar will allow dirt to enter axle bearing area 1 3 4 Straight Wrench PN 2870772 REAR AXLE INSTALLATION 1 Slide locating collar on left end of axle with recess facin...

Page 197: ...aring G Rear Housing H 30T Sprocket I Jam Nut J Chain K Rear Hub Sprocket L Rear Axle A B E F H I J C F E D K L 242 Apply Loctitet 242 to the bolt threads 242 REAR AXLE BEND The rear axle shaft is har...

Page 198: ...GENERAL INFORMATION 7 30 NOTES...

Page 199: ...2 Gear Shift Selector Disassembly 8 2 8 3 Gear Shift Selector Assembly 8 3 8 4 Gear Shift Selector Installation 8 4 Boot Replacement 8 4 Transmission Removal Installation 8 5 Transmission Disassembly...

Page 200: ...ear selector out of mounting bracket and away from frame GEAR SHIFT SELECTOR DISASSEMBLY CAUTION Wear eye protection during this procedure Read each step completely before proceeding Essential parts m...

Page 201: ...or penetrating oil to remove all moisture 10 Dry all gear shift selector parts and remove any corrosion with a wire brush GEAR SHIFT SELECTOR ASSEMBLY 1 Insert slides into gear shift selector body ta...

Page 202: ...ace five bolts 2 Reconnect linkage rods to gear shift selector slides Adjust as required See linkage adjustment procedures 3 Replace remaining parts BOOT REPLACEMENT NOTE If moisture is found in the g...

Page 203: ...f transmission case 12 Remove recoil 13 Remove transmission from right side of frame TRANSMISSION INSTALLATION 1 Reverse removal steps to install transmission NOTE Install the 10 Center Distance Tool...

Page 204: ...e bellcrank and remove low range shift fork with dog gear NOTE High Reverse bell crank must be in neutral to remove low gear shift fork shaft 10 Remove snap ring from front drive input shaft 11 Remove...

Page 205: ...en teeth 20 Remove seals from transmission case NOTE New seals should be installed after the transmission is completely assembled 21 Inspect bearings for smooth operation Check for excessive play betw...

Page 206: ...ush the assembly into case until seated 10 Install thrust washer with larger inside diameter on shaft against splines of shaft 11 Install low gear with slots facing dog gear 12 Lubricate and install n...

Page 207: ...Position Switch 19 Bearing 20 Silent Chain 21 H L R 14T Shaft 22 Bearing 23 Seal 24 Bearing 25 Roller Chain 26 16 26T Sprocket 27 Output Shaft 28 98T Gear 29 Bearing 30 LH Gearcase 31 Screws 32 H R S...

Page 208: ...inkage rod adjustment and rod end positioning G Worn broken or damaged internal transmission components NOTE To determine if shifting difficulty or problem is caused by an internal transmission proble...

Page 209: ...embly 9 8 9 9 Master Cylinder Installation 9 9 Front Pad Removal 9 10 9 11 Front Pad Assembly Adjust 9 11 9 12 Brake Pad Burnishing Procedure 9 12 Front Disc Inspection 9 12 Front Disc Removal Replace...

Page 210: ...m Brake Disc Thickness 178 198 4 52 5 03mm 168 4 27mm Brake Disc Thickness Variance Between Measurements 002 051mm Brake Disc Runout 010 254mm TORQUE SPECIFICATIONS Item Torque ft lbs except where not...

Page 211: ...OOTING Dirt or dust buildup on the brake pads and disc is the most common cause of brake noise squeal caused by vibration If cleaning does not reduce the occurrence of brake noise Permatext Disc Brake...

Page 212: ...id will allow air to enter the system and cause the brakes to feel spongy Too much fluid could cause brakes to drag due to fluid expansion Located within the master cylinder is the compensating port C...

Page 213: ...nd brake system applies hydraulic pressure to both front calipers and only the outer diameter of the rear caliper piston The right hand brake applies pressure to the inner portion of the rear caliper...

Page 214: ...Pin Boot Square O Rings Adjuster Screw MASTER CYLINDER RIGHT BRAKE CALIPER LEFT BRAKE CALIPER REAR BRAKE CALIPER MASTER CYLINDER BRAKE LINE CROSS FITTING SWITCH Caliper Body Bleeder Screw 35 60 IN LBS...

Page 215: ...emove brake lever when reservoir fluid level is low MAX 5 Add brake fluid to the upper level mark on reservoir Polaris DOT 3 Brake Fluid PN 2870990 Left hand brake bleeder screw Right hand brake bleed...

Page 216: ...ning caliper s 12 Add brake fluid to the proper level Master Cylinder Fluid Level MAX level inside reservoir Sight glass must look dark if sight glass is clear fluid level is too low 13 Install diaphr...

Page 217: ...l damage finished surfaces Do not allow brake fluid to come in contact with finished surfaces 3 Remove master cylinder from handlebars Banjo Bolt Master Cylinder Piston Assy Cover Diaphragm Sight Glas...

Page 218: ...lowly two to three times with finger over the outlet end to purge master cylinder of air Brake Line Banjo Bolt Sealing Washers Torque to 15 ft lbs 21 Nm 2 Place new sealing washers on each side of ban...

Page 219: ...uired 5 Push mounting bracket inward and slip outer brake pad past edge Remove inner pad 6 Measure the thickness of the pad material Replace pads if worn beyond the service limit Measure Thickness Fro...

Page 220: ...lbs 25 Nm Front Caliper Mounting Bolts Torque 18 ft lbs 25Nm 4 Slowly pump the brake lever until pressure has been built up Maintain at least 1 2 12 7 mm of brake fluid in the reservoir to prevent ai...

Page 221: ...sc if worn beyond service limit Brake Disc Thickness Service Limit 140 3 56 mm New 150 165 3 81 4 19 mm Brake Disc Thickness Variance Service Limit 002 051 mm difference between measurements 3 Mount d...

Page 222: ...or fall Severe injury may occur if machine tips or falls 1 Remove brake pads See Page 9 10 9 11 2 Using a line wrench loosen and remove brake line to caliper Place a container under caliper to catch f...

Page 223: ...n Components FRONT CALIPER INSPECTION 1 Inspect caliper body for nicks scratches or wear Measure bore size and compare tospecifications Replace if damage is evident or if worn beyond service limit Fro...

Page 224: ...ile pushing inward Piston should slide in and out of bore smoothly with light resistance 3 Lubricate the mounting bracket pins with Polaris Premium All Season Grease and install the rubber dust seal b...

Page 225: ...7 9 8 5 Install wheels and torque wheel nuts to specification Front Wheel Nut Torque 20 ft lbs 27 Nm REAR BRAKE PAD REMOVAL 1 Remove caliper mounting bolts and lift caliper off of disc NOTE When remo...

Page 226: ...reservoir to prevent air from entering the master cylinder Auxiliary Brake Master Cylinder Fluid Level Between MIN and MAX lines 5 It is recommended that a burnishing procedure be performed after inst...

Page 227: ...piston and install carefully with a twisting motion to ease assembly Install dust seal on piston before fully seating piston 2 Seat dust seal in caliper body 3 Install new O rings in caliper mounting...

Page 228: ...contaminated friction pads S Improper alignment S Worn disc S Worn disc splines S Poor Brake Performance S Air in system S Water in system brake fluid contaminated S Caliper disc misaligned S Caliper...

Page 229: ...10 24 10 25 ETC System Operation 10 25 Flywheel Identification 10 26 DC CDI Operation 10 26 250 Watt Alternator Exploded View 10 27 Ignition System Testing Flow Chart 10 28 Charging System Testing Flo...

Page 230: ...used for when diagnosing electrical problems Readings obtained with other meters may differ GPay attention to the prefix on the multimeter reading K M etc and the position of the decimal point GFor re...

Page 231: ...ovisions for detecting an open thermistor An open thermistor will cause the engine hot indicator to light and cause the fan motor to come on The engine temperature controller is enabled by the RUN sig...

Page 232: ...d be used to carry current Pink F Provides 12V When engine is running or cranking Red White G RUN At 12V when ignition switch is on and RUN OFF switch is RUN Orange Black J Signal that enables operati...

Page 233: ...ic speedometer provides the following functions See Illustration 1 Hour meter 2 Programmable Service Interval 3 Gear Indicator 4 High Engine Coolant Temperature 5 High Low Battery Voltage Vehicle Spee...

Page 234: ...number hold the button down until the count turns over to 0 At this point you can re attempt to set the number 4 The P S I then counts down from this total per hours of engine operation 5 When the num...

Page 235: ...information is only briefly displayed Ill 1 Use the mode reverse override button to toggle through the diagnostic screens The first screen indicates battery voltage Refer to Ill 2 Ill 2 Screen three I...

Page 236: ...CLUSTER LEAVE HEADLIGHT POD DISASSEMBLED SHIFT TO LOW OR HIGH LEAVE AWD ON Y REMOVE THROTTLE CONTROL COVER CHECK FOR CONTINUITY ACROSS AWD INDICATOR BULB Y REPLACE INSTRUMENT CLUSTER BAD AWD BULB PRO...

Page 237: ...button 4 Black Ignition Kill 5 N C 6 N C 7 Yellow Red RPM Input 8 Brown Ground 9 Blue White Engine Overheat Switch 10 Purple Yellow Oil Pressure Switch 11 Orange Red Park Gear 12 Purple Reverse Gear 1...

Page 238: ...UITS TO GROUND DISCONNECT CONNECTOR MEASURE BETWEEN HUB COIL BROWN WHT GROUND REPAIR HUB COIL WIRING REPLACE SPEEDOMETER NO PROBLEM N N Y Y Y 1 Red 12V Constant 2 Red White 12V Switched 3 Grey Orange...

Page 239: ...te front right side of vehicle until tire is off the ground 4 Slowly turn right front wheel while observing the test light 5 If light flashes sensor is O K Be sure connections are good and 9 volt batt...

Page 240: ...7 SHIFT INDICATOR NOT WORKING TRANSMISSION SWITCH Operation The Instrument cluster sends signals from the 12 13 14 and 15 output wires on the connector to the transmission switches These signals comp...

Page 241: ...ing the speed at which the vehicle was traveling when the speedometer lost power For example If the ATV was traveling 30 mph when the engine stop switch is turned off speedo may indicate 30 mph until...

Page 242: ...V Tachometer displays engine RPM This feature will also display with the vehicle in motion NOTE Small RPM fluctuations from day to day are normal because of changes in humidity temperature and elevati...

Page 243: ...is excessive This is usually the result of an open battery condition and the gauge is designed to survive such an event NOTE If the gauge will not indicate what gear it is in and will not allow AWD op...

Page 244: ...icon will flash quickly for 10 seconds each time the vehicle is started as a reminder that the periodic maintenance is due Set at 50 hrs from Factory SETTING A NEW SERVICE INTERVAL Setting Service Int...

Page 245: ...press the mode button in until the wrench icon flashes Press the mode button again to set the desired service increment Release the button and wait for the wrench icon to stop flashing The new servic...

Page 246: ...T POD DISASSEMBLED SHIFT TO LOW OR HIGH LEAVE AWD ON Y REMOVE THROTTLE CONTROL COVER CHECK FOR CONTINUITY ACROSS AWD SWITCH Y REPLACE INSTRUMENT CLUSTER PROCEED TO IF AWD PROBLEM PERSISTS MECHANICAL A...

Page 247: ...IS REVERSE INDICA TOR ON Y VEHICLE EXCEEDS 7 9 MPH IN REVERSE TEST TRANSMISSION SWITCH SHIFT MODULE AND WIRING N REPLACE SPEEDO JUMPER TO PIN 4 BLACK TO PIN 8 BROWN DOES ENGINE STOP INSPECT WIRING AN...

Page 248: ...COIL WIRING FOR SHORT CIRCUITS TO GROUND DISCONNECT CONNECTOR MEASURE BETWEEN HUB COIL BROWN WHT GROUND REPAIR HUB COIL WIRING REPLACE SPEEDOMETER NO PROBLEM N N Y Y Y NOTE IF THE AWD ICON DOES NOT C...

Page 249: ...side of vehicle until tire is off the ground 4 Slowly turn right front wheel while observing the test light 5 If light flashes sensor is O K Be sure connections are good and 9 volt battery is in good...

Page 250: ...NOT WORKING TRANSMISSION SWITCH Operation The Instrument cluster sends signals from the 12 13 14 and 15 output wires on the connector to the transmission switches These signals complete their path on...

Page 251: ...allow alcohol or petroleum products to come in contact with the instrument cluster lens 1 Spray a soap and water mixture onto the outer surface area of the instrument cluster This will help the instru...

Page 252: ...g Min Max Temperature Hot Light On 178 190 215 F 102 C Fan Off 296 316 180 F 82 C Fan On 236 251 195 F 91 C FAN MOTOR CURRENT DRAW A current draw test will provide a good indication of fan motor condi...

Page 253: ...mechanism cable tension is lost the switch contacts close connecting the CDI black wire to ground which prevents ignition spark This is the same as turning the key or engine stop switch OFF Test the E...

Page 254: ...em relies on battery power for ignition Instead of generating DC voltage via magnetic induction a 12 volt DC current is supplied directly to the CDI unit from the battery At the CDI 12 volt DC current...

Page 255: ...I boxes may look the same but have different internal circuitry Be sure to always use the correct CDI box part number Battery Charging Coils 10 5k Pulse Coil Trigger Air Gap 016 030 4 75 mm Flywheel a...

Page 256: ...or engine 3 to 5 Ohms Secondary Side High Tension Wire to High Ten sion Wire Cap installed 10 500 Cap removed 6300 Are these values within specs Replace the ignition coil No Yes If all of the above te...

Page 257: ...erminal on harness side of voltage regulator connector Is it Check regulator rectifier connections and ground battery connections cir cuit breaker and connecting wires Repair or replace faulty wiring...

Page 258: ...H PEAK READING VOLTMETER The following peak voltage tests will measure the amount of output directly from each component A peak reading voltmeter must be used to perform the tests A variety of peak re...

Page 259: ...and start the engine With the engine running at idle disconnect the negative cable from the battery post without disturbing the meter leads Observe meter readings 5 Increase engine RPM while observing...

Page 260: ...cian immediately Eyes Flush with water for 15 minutes and get prompt medical attention Batteries produce explosive gases Keep sparks flame cigarettes etc away Ventilate when charging or using in an en...

Page 261: ...yte level NEVER attempt to add electrolyte or water to a Low Maintenance battery Doing so will damage the case and shorten the life of the battery Refer to the Battery Activation and Maintenance Video...

Page 262: ...one cup water and one tablespoon baking soda Rinse well with clean water and dry thoroughly 2 Route the cables correctly 3 Reinstall battery attaching positive red cable first and then the negative b...

Page 263: ...following basic battery maintenance items must be performed GRemove the battery from the machine and wash the case and battery tray with a mild solution of baking soda and water Rinse with lots of fr...

Page 264: ...h large quantities of cool water and seek immediate medical attention NOTE New Battery Battery must be fully charged before use or battery life will be significantly reduced 10 30 of the battery s ful...

Page 265: ...esult If electrolyte contacts the vehicle frame corrosion will occur 5 Reinstall the holder strap CONVENTIONAL BATTERY TESTING Whenever a service complaint is related to either the starting or chargin...

Page 266: ...ltage while cranking the engine Continue the test for 15 seconds During cranking the observed voltage should not drop below 9 5 volts If the beginning voltage is 12 6 volts or higher and the cranking...

Page 267: ...hicle to battery vent WARNING Vent tube must be free from obstructions and kinks and securely installed If not battery gases could accumulate and cause an explosion Vent should be routed away from fra...

Page 268: ...LLIGHT BRAKELIGHT LAMP REPLACEMENT If the taillight brakelight does not work the lamp may need to be replaced Lens Cover Bulb 1 From the rear of the taillight remove two screws holding lens cover in p...

Page 269: ...20 3 cm in 25 from the center of the low beam lamp 5 Adjust beam to desired position HIGH BEAM HEADLIGHT LAMP REPLACEMENT CAUTION Do not service while headlight is hot Serious burns may result 1 Remo...

Page 270: ...nnections at battery cable starter motor or starter solenoid see Voltage Drop Tests GFaulty starter button GFaulty ignition switch Do other systems function GFaulty starter solenoid or starter motor G...

Page 271: ...er to the chart on next page to perform voltage drop tests on the starter system Voltage should not exceed 1 DC volts per connection STARTER MOTOR DISASSEMBLY NOTE Use only electrical contact cleaner...

Page 272: ...s if they are discolored or have inadequate tension 4 Inspect surface of commutator for wear or discoloration See Steps 3 6 of armature testing on Page 10 44 5 Install a new carbon brush assembly in t...

Page 273: ...end of armature shaft with phenolic washer outermost on shaft Engage tabs of stationary washer in drive end housing holding it in place with a light film of grease 3 Install case sealing O Ring Make s...

Page 274: ...ith the end bent in a hook and pick the old spring out of its channel Slide it off the end of the shaft Slide the new spring over the overrun clutch and into the spring groove Make sure that the sprin...

Page 275: ...olenoid Connect the tester black lead to the battery positive and the red lead to the solenoid end of the battery to solenoid wire De press starter button Reading should be less than 1 V D C Clean the...

Page 276: ...ELECTRICAL 10 48 NOTES...

Page 277: ...ELECTRICAL WIRING DIAGRAM 2004 SPORTSMAN 6X6...

Page 278: ...ELECTRICAL WIRING DIAGRAM 2004 SPORTSMAN 6X6 NOTES...

Page 279: ...ELECTRICAL WIRING DIAGRAM 2005 SPORTSMAN 6X6 BUILT BEFORE JULY 12 2004...

Page 280: ...ELECTRICAL WIRING DIAGRAM 2005 SPORTSMAN 6X6 BUILT BEFORE JULY 12 2004 NOTES...

Page 281: ...ELECTRICAL WIRING DIAGRAM 2005 SPORTSMAN 6X6 BUILT AFTER JULY 12 2004...

Page 282: ...ELECTRICAL WIRING DIAGRAM 2005 SPORTSMAN 6X6 BUILT AFTER JULY 12 2004 NOTES...

Page 283: ...ake Fluid Level 2 32 Brake Hose Fitting Inspection 2 33 Brake Light Switch Testing 10 40 Brake Noise 9 3 Brake Pad Application 9 3 Brake Pad Assembly Front 9 11 Brake Pad Inspection 2 33 Brake Pad Ins...

Page 284: ...oses 2 21 Cooling System Overview 2 21 Cooling System Pressure Test 3 7 Cooling System Test 2 21 Cooling System 4 Stroke Bleeding Procedure 3 6 Counter Balancer Installation 3 41 Counter Balancer Shaf...

Page 285: ...e Service Data 3 3 3 4 Engine to Frame Ground 2 20 Engine Top End Disassembly 3 14 3 15 3 16 3 17 3 18 3 19 3 20 3 21 3 22 ETC Operation Test 10 25 ETC Switch Adjustment 2 17 ETC Switch Testing 10 25...

Page 286: ...sting 10 28 Ignition Timing Curve 10 2 Instrument Cluster Installation 10 23 Instrument Cluster Overview 2005 Model 10 14 Instrument Cluster Removal 10 23 Instrument Cluster Speedometer ID 10 5 Instru...

Page 287: ...Rear Axle Installation 7 28 Rear Axle Removal 7 28 Rear Drive Axle Exploded View 7 29 Rear Strut Stabilizer 1 11 Rear Swing Arm Weldment 1 12 Recoil Assembly 3 52 Recoil Disassembly Inspection 3 51 R...

Page 288: ...mission Disassembly 8 5 Transmission Exploded View 8 9 Transmission I D Location 1 2 Transmission Installation 8 5 Transmission Linkage Adjustment 2 13 Transmission Removal 8 5 Troubleshooting Brakes...

Page 289: ...31 504 3ULQWHG LQ 86...

Reviews: