background image

PM75 Android 11 User Manual  


Learning the Basics 


40 

©  2021 Point Mobile Co., Ltd. All rights reserved 


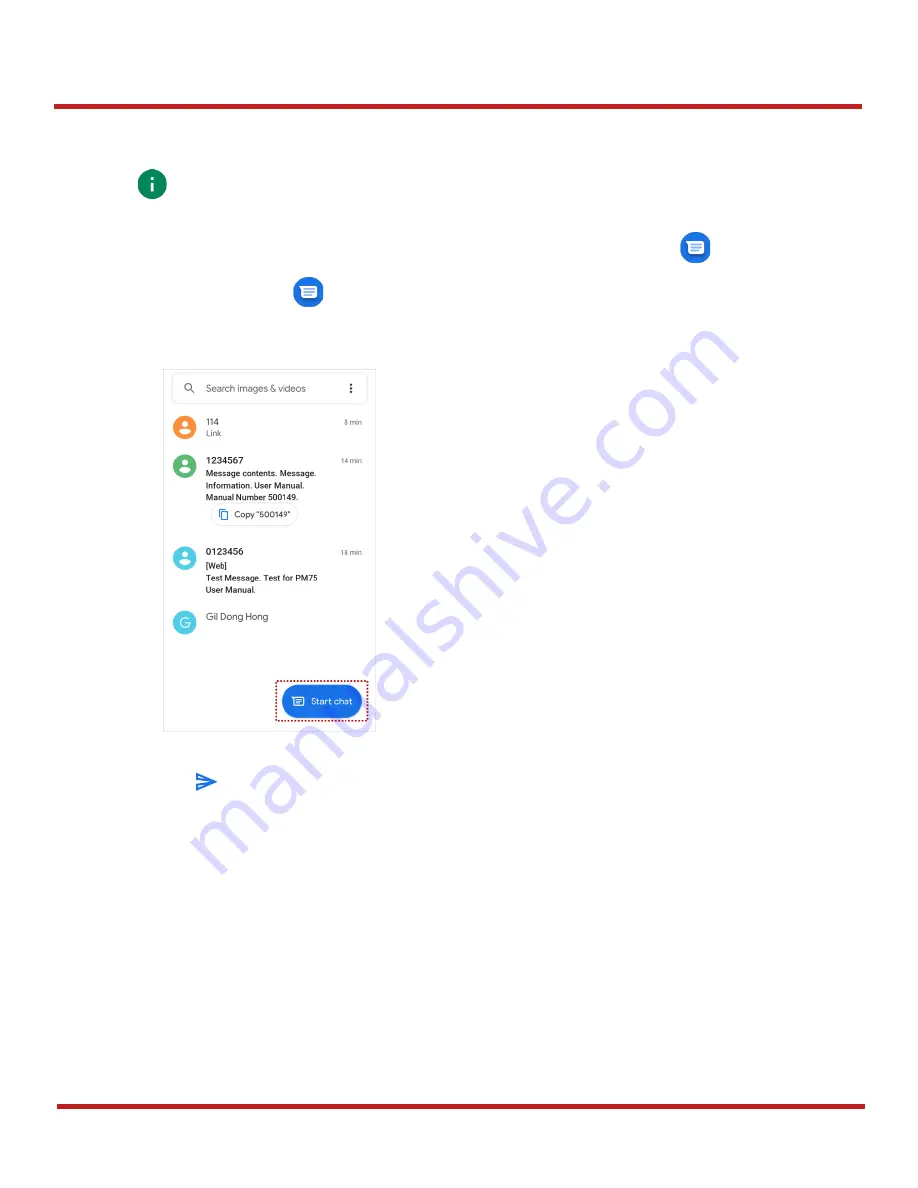
Message 

Send a message or find the received message through Message application 

1.  Launch 

Message


 from App drawer. 

2.  Tap 

Start Chat


and type the receiver’s name or phone number. 

3.  Input a message. 

4.  Tap 

 icon to send. 


  Note:  Message feature is only available on LTE SKU (SKU4 ~ 7). And it requires a SIM 

card. 

Figure 39 Message list


Summary of Contents for PM75

Page 1: ...Enterprise Mobility User Manual For AndroidTM 11 Google Android Google Play and other marks are trademarks of Google LLC Copyright 2006 2021 Point Mobile Co Ltd All rights reserved PM75...

Page 2: ...se read this manual carefully before using your handy payment device and peripherals to ensure safe and proper use Revision History Revision Date Description V01 05 Jul 2021 Initial release V02 12 Oct...

Page 3: ...C Wi Fi BT 3G 32G N3601 SR Extended SKU2 PM75G3Q03BJE0C Wi Fi BT 3G 32G N6603 SR Standard SKU2 1 PM75G3Q04BJE0C Wi Fi BT 3G 32G N6603 SR Extended SKU3 PM75G3Q04DJE0C Wi Fi BT 4G 64G N6603 SR Extended...

Page 4: ...D card 10 Install Remove Battery 12 Install the battery 12 Remove the battery 13 Battery Hot Swap 13 Charge the device 14 Battery Specification 14 Smart Charging 14 Charge with power adapter 16 Chargi...

Page 5: ...all 37 Contacts 38 Add a contact 38 Contact detail 39 Message 40 MTP Connection with PC 41 Manage the Files 42 Lock the Screen 44 Settings 45 Adjust display brightness 45 Adjust sound 45 Adjust font s...

Page 6: ...SKU 60 ScanDemo 61 WIRELESS 62 Mobile Network 62 Wi Fi 63 Bluetooth 64 Turn on off 64 Pair and Connect 64 Unpair and Disconnect 65 Change the Bluetooth device details 66 NFC 67 RFID 68 SYSTEM MAINTEN...

Page 7: ...app 74 Factory data reset via recovery mode 75 ACCESSORIES 76 Hand Strap 76 Attach hand strap 77 Gun Handle 79 Attach Use gun handle 79 Attach hand strap 79 RF750 RFID Sled 81 Charging cradle 81 Sing...

Page 8: ...all 3 Screen Display all operating screen 4 Microphone Use for collecting sound 5 I O connector for cradle Connector for charging and communication with cradle 6 USB connector USB Type C connector for...

Page 9: ...to release the battery cover and replace the battery 12 Battery cover Protect the battery from detaching and damage 13 Hand strap hole bottom Attach hand strap 14 Scan button right Scan a barcode by p...

Page 10: ...bile Co Ltd All rights reserved Product Standard Accessories The following items are in the product box Accessory Name Battery pack AC DC Adapter Country plug USB type C cable LCD protection film Hand...

Page 11: ...ed Install SIM SD card PM75 supports Nano SIM card LTE SKU SKU4 7 only microSD card To install the cards 1 Open the battery cover while pressing the battery cover release button Using the small latch...

Page 12: ...the top of the battery slot 4 Put Nano SIM card and SD card you prepared onto each slot with the contacts facing up 5 Gently insert the card tray Caution Do not push the card tray into the device too...

Page 13: ...y 1 Open the battery cover while pressing the battery cover release button Using the small latch on both sides of the cover pull it up 2 Align the connector gold contact of the battery with the batter...

Page 14: ...wap PM75 supports the Battery hot swap mode which allows you to replace the battery without turning off the device When the battery is removed from the device the display turns off and the device ente...

Page 15: ...rging modes to provide optimal battery performance for your work Each mode controls the charging current or the maximum charging level to meet the needs When the device is charged to the maximum charg...

Page 16: ...2021 Point Mobile Co Ltd All rights reserved To set smart charging mode go to Settings Battery Smart Charging or EmKit EmSettings Smart Charging Find detail information of each mode in Detail and sel...

Page 17: ...and cables are not wet Follow the battery safety information for safety of using the battery 1 Assemble the country plug AC DC power supply and USB type C cable 2 Connect the cable to the USB connect...

Page 18: ...nly PM75 sled accessory gun handle or RF750 mounted To charge device and battery using SSC 1 Assemble the power adapter and AC plug and connect it to the cradle to provide power 2 Install PM75 only or...

Page 19: ...nd power cable 2 Connect it to the cradle to provide power 3 Install PM75 from top to bottom as the cradle charging connector on PM75 is facing down Make sure the charging LED of the PM75 lights on an...

Page 20: ...Slot Battery Cradle 4SBC has four battery charging slots so it can charge up to 4 batteries at the same time 4SBC is common for PM85 and PM75 batteries Insert the battery into the slot and make sure t...

Page 21: ...arging With charger Battery is low Without charger Blinking red Charging temperature is too low or too high With charger Battery is very low Without charger Alternately blinking red green Cannot recog...

Page 22: ...the device Press and hold the power button on the right side of the PM75 until SMART BEYOND RUGGED logo displays on the screen To turn off the device Press and hold the power button when the screen i...

Page 23: ...sture Description Tap One finger press Double tap One finger press lift one finger press lift for zoom in action Long press One finger press wait lift for select action Drag Swipe or Fling One finger...

Page 24: ...le Co Ltd All rights reserved Action Description Scroll Vertical or horizontal swipe in a single direction Pinch Open Close Two finger press move outwards and inwards lift for zoom in out action Rotat...

Page 25: ...as a default and it is located at the bottom of the screen The app overview button home button and back button are placed on the bar in order Shape Button Function App overview button Tap to see the r...

Page 26: ...ystem Gesture System navigation and change the setting to Gesture navigation Then the navigation bar will be hidden Note To use the navigation bar again change the setting to 3 button navigation Find...

Page 27: ...ry first time or boot after factory reset Setup wizard is launched Following the steps on the screen set system language Google account Wi Fi connection and copy the data etc Some settings can be skip...

Page 28: ...pressing the Home button No Item Description 1 Status bar Indicates device status and notification 2 App Tap to run the application Long press to see the application s options 3 Google search Search...

Page 29: ...Connection issue LTE LTE CA connected Data disabled VoLTE enabled No data connection Airplane mode Hotspot enabled Connected to a Wi Fi network Wi Fi data communication Connected to a Bluetooth devic...

Page 30: ...Email Connected to VPN network Upcoming event Other input method available File uploaded File downloaded File copied OTG device connected There are more notifications Notification panel Notification p...

Page 31: ...uetooth etc To use the Quick setting panel 1 Open the Notification panel 2 Drag down the Notification panel 3 Tap a setting icon to enable disable the setting or long press an icon to see more detail...

Page 32: ...ile Co Ltd All rights reserved Apps Widget App folder To create the app folder long press an app icon and drag it to another app icon To change the folder name tap the Unnamed Folder and input a new n...

Page 33: ...awer To open the App drawer swipe up the Home screen To close the App drawer swipe down the Home screen Favorites tray To organize an app in the Favorites tray 1 Long press an app icon from the App dr...

Page 34: ...Organize app in Home screen To organize an app in the Home screen 1 Long press an app icon from the App drawer Then drag it slightly until the Home screen is shown 2 Place the app icon where you want...

Page 35: ...n 1 Long press the empty space of the Home screen 2 In three menus select Widgets 3 Among the list tap and hold a widget you want to add 4 Place the widget to the Home screen by dragging Note To remov...

Page 36: ...ive a phone call SIM card is required Insert SIM card to PM75 first regarding Install SIM SD card Making a call 1 Tap Phone from Home screen or App drawer 2 Tap to open a dialer 3 Input a phone number...

Page 37: ...Mobile Co Ltd All rights reserved 5 Control the Tap to hang up the phone Icon Function Name Description Mute Mute microphone Keypad Open the keypad Speaker Speakerphone mode Add call Add another call...

Page 38: ...ng the Basics 37 2021 Point Mobile Co Ltd All rights reserved Answering a call Check the caller s name and number and tap ANSWER button to answer the phone call Or tap DECLINE button to decline the ph...

Page 39: ...ler 1 Navigate to dialer through Phone and enter the number 2 Tap Create new contact or Add to a contact to save the number 3 Input additional information 4 Tap Save Add a contact via contacts app Nav...

Page 40: ...ed Contact detail Select a contact from the list to find more detail information Tap to open advanced options such as delete share block etc Figure 38 Contact advanced options Advanced options Tap to...

Page 41: ...d a message or find the received message through Message application 1 Launch Message from App drawer 2 Tap Start Chat and type the receiver s name or phone number 3 Input a message 4 Tap icon to send...

Page 42: ...with PC To transfer the files with a PC connect the device to the PC via USB cable first 1 Drag down Status bar and tap Android System notification to change USB preference option 2 Change the option...

Page 43: ...le explorer of the PC Manage the Files No Description 1 Select media file type or storage 2 Search a file 3 Open the advanced option Create a new window or folder Select all files and folders etc 4 Ch...

Page 44: ...ible only with files 2 Delete the files or folders 3 Open the advanced option Open with Select which app to open the file Sort by Sort the list by file name size type etc Select all Select all files a...

Page 45: ...sonnel by setting up the screen lock 1 Navigate to Settings Security 2 Tap Screen lock 3 Choose a screen lock method None Screen unlocks immediately Swipe Swipe the lock screen to unlock Default Patte...

Page 46: ...ing panel and adjust display brightness bar Go to Settings Display Brightness level Adjust sound To adjust sound volume go to Settings Sound and control the Media Call Ring Alarm volume bars Caution U...

Page 47: ...int Mobile Co Ltd All rights reserved Adjust font size If the font size of the screen is too small or too large adjust the font size 1 Go to Settings Display 2 Tap Advanced 3 Tap Font size 4 Referring...

Page 48: ...button and then tap Screenshot among the power menus The screenshot image will be saved to Pictures Screenshots folder in the internal storage Program Buttons All buttons on the PM75 except power but...

Page 49: ...bile Co Ltd All rights reserved Note SCANNER_B Trigger button on the gun handle 3 Choose one function you want to remap 4 Tap OK 5 After changing all key mapping tap Apply to save the changes PTT_L SC...

Page 50: ...No Name Description 1 Focus zone You can change the focusing area by touching the other area 2 Advanced camera option Set timer Display the grid on the screen Set flash mode Activate Deactivate Auto...

Page 51: ...r working environment and improve the efficiency Turn on off the Scanner The scanner is turned off by default To turn on the scanner follow the steps 1 Go to EmKit or Settings and tap ScanSettings 2 T...

Page 52: ...f Basic Options Notification Wedge Symbologies About Basic Control the scanning options and wedge mode options 1 Scanning Change the scanner s trigger timeout and set Auto scan Continuous scan Enable...

Page 53: ...ult type of decoded data among the below list User Message Keyboard Event Clipboard KEYCODE_PASTE Clipboard Ctrl V Intent Broadcast Custom Intent Set Terminator as None Space Tab LF Tap LF Options Ena...

Page 54: ...PM75 Android 11 User Manual Scanner 53 2021 Point Mobile Co Ltd All rights reserved Notification Control the beep sound LED and vibration option Figure 59 ScanSettings Notification...

Page 55: ...User Manual Scanner 54 2021 Point Mobile Co Ltd All rights reserved Wedge Set below items in Wedge settings Barcode ID Aim ID Group separator Prefix Suffix Character set Extended Wedge Figure 60 Scan...

Page 56: ...s to edit the decoded data Tap Enable extended wedge toggle switch and then set a rule in Configuration extended wedge For example make a rule that add a string Point Mobile at the start of decoded da...

Page 57: ...ual Scanner 56 2021 Point Mobile Co Ltd All rights reserved 2 Tap Symbologies and select CODE128 among the symbologies 3 Tap Style 1 and select Actions 2 Figure 63 Extended wedge example_2 Figure 64 E...

Page 58: ...e Co Ltd All rights reserved 4 Tap ADD and select Move to start to point the start of the decoded data 5 Add another action of which action type is Send string Set value as Point Mobile Figure 65 Exte...

Page 59: ...PM75 Android 11 User Manual Scanner 58 2021 Point Mobile Co Ltd All rights reserved 6 Point Mobile string will be added to decoded COD 128 data Before After...

Page 60: ...erved Symbologies Enable or disable the specific symbology or set detail options By tapping each symbology name to access detail options About Find the scanner information or restore the scanner setti...

Page 61: ...ttons Refer to Use the Buttons Program buttons it can trigger the scan action too N3601 Scanner SKU Center the green dot aimer over the barcode The entire barcode must be inside the illumination squar...

Page 62: ...e Co Ltd All rights reserved ScanDemo Using Scan Demo app demonstrate the scanning feature 1 Execute EmKit ScanDemo 2 Scan a barcode by pressing the scan button on the device or tapping Start scan but...

Page 63: ...hen network is connected a network icon will be appeared on the status bar Find network information and adjust the network settings in Settings Network internet This setting menu can also be accessed...

Page 64: ...onnected under the SSID means the device complete to connect to the Wi Fi Note There are Open Wi Fi network and Secured Wi Fi network You can tell those apart by lock icon in the nearby Wi Fi list To...

Page 65: ...s Pair new device Pair and Connect Bluetooth is turned off as default To turn on the Bluetooth and connect with a new device 1 Go to Settings Connected devices 2 Tap Pair new device Bluetooth will be...

Page 66: ...a device previously connected select the device name from the PREVIOUSLY CONNECTED DEVICES list Unpair and Disconnect To unpair the device select the name of the device you want to unpair from CURREN...

Page 67: ...vice name from CURRENTLY CONNECTED or tap icon next to the device name from PREVIOUSLY CONNECTED DEVICES list If no devices are listed under the PREVIOUSLY CONNECTED DEVICES tap See all To change the...

Page 68: ...make sure the NFC is enabled from the Quick setting panel PM75 s NFC antenna is located around the battery cover release button Bring the NFC tag close to the battery cover release button Rear upper...

Page 69: ...ID Control application is required Download RFID Control from Service Portal and install the app on the PM75 To attach the PM75 onto the RF750 1 Insert the PM75 into the retention fixture of the RF750...

Page 70: ...on Legal information Certificates Model SIM status Hostname Android version IMEI IP address Wi Fi MAC address Bluetooth address Build number On EmKit Go to EmKit System Information Following informati...

Page 71: ...s cannot charge the device or rapid battery discharge To use open EmKit and launch EmHealthReport You can see the simple device health information on main screen To find detailed information tap each...

Page 72: ...he update process OS update via storage To update the OS using storage 1 Download an OS image file into the root folder of microSD card or device internal storage 2 In case of using SD card Insert SD...

Page 73: ...e PM75 4 Go to Settings System Advanced System Update 5 Check if the OS image file shows up under AVAILABLE VERSIONS 6 Tap UPDATE to start the update process OS update via FOTA If PM75 can connect to...

Page 74: ...image file 7 To complete the update rebooting is required Tap OK on the Restart required dialog to restart the device Note Basically OS update via FOTA works over Wi Fi or Ethernet only To enable the...

Page 75: ...settings and data saved in the device such as Google account apps user data etc And factory data reset cannot undo Factory data reset via Settings app If the device can be turned on and access Settin...

Page 76: ...a reset through Android recovery mode 1 Press and hold power button volume up scan Right buttons simultaneously when PM75 turned off 2 After short vibration release the power button 3 Using the keys b...

Page 77: ...andle Provide additional scan trigger button Programmable RF750 Reading RFID tags Charging cradle SSC Single Slot Cradle Charge one PM75 and one PM75 battery Provide USB type C port 2SC 2 Slot Cradle...

Page 78: ...Point Mobile Co Ltd All rights reserved Attach hand strap 1 Using a sharp tool detach the rubbers on the marked location in the figure below 2 Disassemble the hand strap into three parts Figure 98 At...

Page 79: ...Co Ltd All rights reserved 3 Slide the thin ropes of the strap parts into the hand strap holes 4 Pass the other end through the loop of the rope and pull it tight 5 Reassemble the hand strap parts Fi...

Page 80: ...can use additional programmable button The button is used for triggering scanner usually If you want to change the function mapped to the trigger button access Program Buttons and set SCANNER_B to the...

Page 81: ...ile Co Ltd All rights reserved 1 Thread the strap through the hole on the bottom side of the retention fixture 2 Slide the strap through the buckle at the appropriate length Figure 104 Gun handle Atta...

Page 82: ...re detail find Charge the device SSC chapter or SSC Quick start guide 2SC 2 Slot Cradle 2SC has 2 device slots so it can charge up to two units of PM75 simultaneously And it can charge the PM75 only A...

Page 83: ...t circuit the battery or allow a foreign object to battery contacts 5 Do not burn expose to water or other liquids the battery 6 If battery leakage is observed avoid any contact with the skin or eyes...

Page 84: ...ure ranges of 20 5 2 Keep batteries away from corrosive substances 3 Keep batteries away from fire and heat 4 Batteries are charged while producing to below 20 30 of full capacity for safety regulatio...

Page 85: ......

Reviews: