


14
Removing the Document Cover
The document cover has been designed for easy removal so that larger items,
such as bound books, can be placed on the scanner glass. To remove the cover, open
it all the way. Place your other hand firmly at the back of the scanner and lift the
document cover, separating it from the back of the scanner. To replace the cover,
simply slide it back into place.
Using the Transparency Adapter*
(*This section applies only to select models that include a transparency adapter)
When scanning transparencies or photo negatives, it is necessary to use the
transparency adapter included with your scanner. The adapter changes the light source
for scanning from inside the scanner to the lid. In order to do this, you must plug in
the transparency. After this is done, transparencies can be scanned much like normal
images.
Be sure to change the SOURCE setting in the TWAIN window to 35mm
Negative (See the
Software User’s Guide
for information about how to use
TWAIN)!
T
T
h
h
e
e
F
F
r
r
a
a
m
m
e
e
H
H
o
o
l
l
d
d
e
e
r
r
s
s
When scanning photo negatives or slides, you must use a frame holder
7
. The
illustrations below instruct you on the precise usage of these important tools.
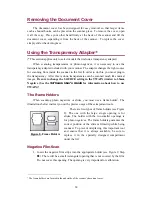
There are two types of frame holders (see Figure
8). The one with the large, single opening is for
slides. The holder with the two smaller openings is
for photo negatives. The frame holders guarantee the
correct position of the slide or filmstrip while being
scanned. To prevent misplacing this important tool
and ensure that it is always available, be sure to
replace it in the specially designed compartment
under the lid.
N
N
e
e
g
g
a
a
t
t
i
i
v
v
e
e
F
F
i
i
l
l
m
m
S
S
c
c
a
a
n
n
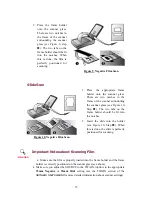
1. Insert the negative film stripe into the appropriate holder (see Figure 9, Step
*
). There will be a small rectangular opening that is not covered by the film.
Do not cover this opening. The opening is very important for calibration.
7
The frame holders are located in the underside of the scanner’s document cover.
Figure 8. Frame Holders