Plura VF-PBM-207 Operating Instructions Manual Download Page 12

USO 

RESTRITO

Page 12 of 32 

CAMERA MOUNTING PROCEDURES 

Viewfinder Adaptors for Hitachi HDTV Cameras 


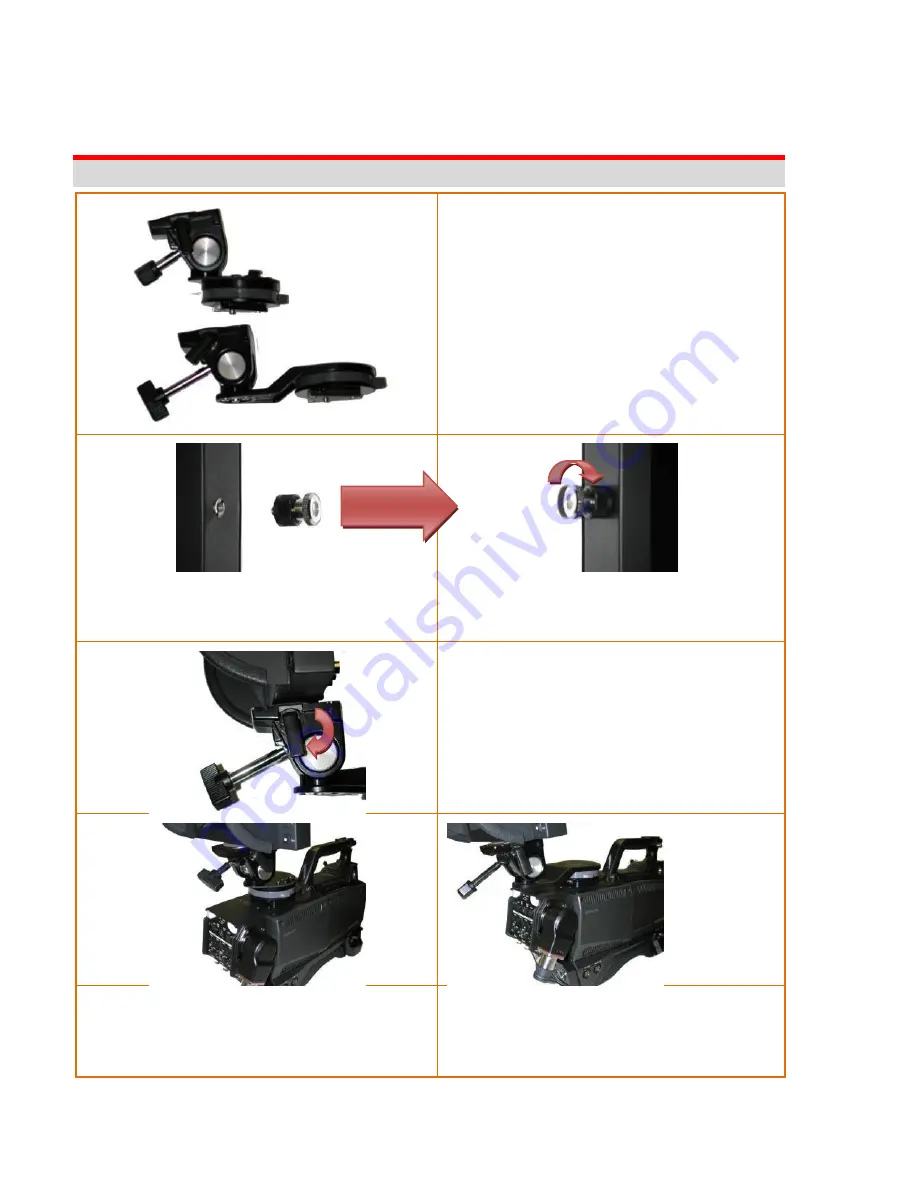
There are 2 different types of viewfinder mounts 
that can be used with the VF-PBM207. 

The top left unit is model AT-90 

The bottom left unit is model AT-500 

Both  mounts  can  be  used  with  Hitachi  HDTV 
cameras  models  SK-HD1200,  SK-HD1000,  Z-
HD5000 & Z-HD6000.  Note that the VF mount is 
installed  on  the  CA-HF1200,  CA-HF1000  or  CX-
HD1000 cable adapter chassis as shown below. 


Install the supplied Fixing Screw on the threaded 

mount on the bottom part of the viewfinder 

chassis. 


Secure the Fixing Screw such that it does not 

easily come out.  (We recommend you affix it 

with some thread locking glue.) 


After mounting the Viewfinder on the Adapter, 
move the lock level downward to secure it in 
place. 


The VF-PBM207/ AT-90 mount combination places 
the  center  of  gravity  closer  to  the  front  of  the 
camera body and does not have as much front-aft 
movement as the AT-500. 

The  VF-PBM207/  AT-500  mount  combination 
shown above, places the viewfinder closer to the 
camera  operator  and  has  a  superior  tilt  range 
and longer movement lock handle. 

AT-90 

AT-500 

Tighten 

Tighten 

AT-500 

AT-90 

Summary of Contents for VF-PBM-207

Page 1: ...USO RESTRITO HD COLOR VIEWFINDER OPERATING INSTRUCTIONS Please read these operating instructions carefully for proper operation and keep them for future reference VF PBM 207...

Page 2: ...USO RESTRITO Page 2 of 32 This page left intentionally blank...

Page 3: ...level 10 Typical Menu Operation 11 COMPOSITION 11 CAMERA MOUNTING PROCEDURES 12 VIEWFINDER ADAPTORS FOR HITACHI HDTV CAMERAS 12 BASIC OPERATION 13 TURNING ON THE MONITOR 13 ON SCREEN MENU LANGUAGE SEL...

Page 4: ...ECT 22 I P MODE 22 DITHERING 22 INTERNAL PATTERN 22 NR NOISE REDUCTION 23 OSD ON SCREEN DISPLAY 23 OSD OPTION 23 UNDER MONITOR DISPLAY COLOR TALLY R G MODE ACTION 23 INFORMATION 24 ON SCREEN DISPLAY M...

Page 5: ...d with your safety in mind However improper use can result in potential electrical shock or fire hazards To avoid defeating the safeguards that have been built into this new product please read and ob...

Page 6: ...uct yourself as opening or removing covers may expose you to dangerous voltages or other hazards Refer all servicing to qualified service personnel 12 Safety Check Upon completion of any service or re...

Page 7: ...4X 5X Mono Color display modes Preset Gamma selection User selectable gamma curves OSD Graphic based On Screen Display 6 Languages UNICODE System Markers Preset and user programmable Safety Zone 16 9...

Page 8: ...SD menu Executes function by OSD help commands in main OSD menu DOWN Decreases values of the function selected on the main OSD menu Executes function by OSD help commands in main OSD menu ENTER Activa...

Page 9: ...PIN N A 2 PIN Y shield 12 PIN N A 3 PIN Pb Video 13 PIN N A 4 PIN N A 14 PIN R Tally ON 3 3v OFF 0V 5 PIN Pr Video 15 PIN G Tally ON 3 3v OFF 0V 6 PIN N A 16 PIN N A 7 PIN N A 17 PIN N A 8 PIN N A 18...

Page 10: ...provided Most menus consist of three levels to set up the options but some require greater depth for the variety of settings If you press the MENU button only the first and second level of the menu s...

Page 11: ...select the second menu option 5 Press ENTER to move to the third level Some menu options require additional steps 6 Press MENU to return to the previous menu to return to monitor viewing Composition 1...

Page 12: ...supplied Fixing Screw on the threaded mount on the bottom part of the viewfinder chassis Secure the Fixing Screw such that it does not easily come out We recommend you affix it with some thread lockin...

Page 13: ...s or more The monitor has a stand by or power save mode When in standby mode the display is off but the electronics inside the VF are on In order to turn monitor on press the POWER button 3 The camera...

Page 14: ...adjust the OSD screen 1 Press the MENU button and then UP DOWN button to select each menu 2 Press the ENTER button and then use UP DOWN ENTER MENU button to display the available menu Your monitor s O...

Page 15: ...trol For Setting the Color temperature or adjusting RGB gain value directly User User setting RGB gain value VAR 3200o K 11000o K Often used value 11000o K 9300o K 6500o K 5400o K 3200o K SCAN Over Sc...

Page 16: ...utton is depressed NOTE When operating the VF in 4 3 aspect ratio also select 4 3 aspect on the camera VF Menu to avoid geometric distortion to the displayed image Zoom Magnifies the picture by 2X 3X...

Page 17: ...5x 25 zone divisions Mono Blue Only Mono Color Displays a monochrome B W or Color image Blue Only Picture is displayed in blue color only For verification of proper color display with SMPTE color bars...

Page 18: ...x User Marker User programmable marker size adjustment using the X1 2 3 and Y1 2 3 row column settings Example of 16 9 preset marker Yellow User marker white Example of 4 3 preset marker Yellow User m...

Page 19: ...dth Marker line thickness setting 0 10 0 thin lilne 10 thick line Marker Color Crosshair Marker Line Color Select Marker line color White Yellow Blue RED Black Safety Zone Line Color Select the Safety...

Page 20: ...2 button Description Undefined No Assignment Aspect Sets the aspect ratio of the images Mono Blue Only Execute Mono color or Blue Only Marker size Marker size Select Safety Marker size Safety size Se...

Page 21: ...bles screen saver functions to avoid panel burning BG Background Gray Selects the gray background level of the monitor for images that do not fill the entire screen Power save Mode Power Save Mode on...

Page 22: ...Backlight Adjust Inverter dimming Level select 0 100 Gamma Select Gamma Level Select 0 8 high 3 0 low I P Mode Line Doubler Inter Field Field Merge function on off Dithering Dithering 1 bit 2 bit 3 b...

Page 23: ...ncy Disable blending OSD background with video image OSD Timeout OSD gone time setting 3 200 Under Monitor Display color Tally R G mode action UMD UMD display on off UMD Character UMD Character Select...

Page 24: ...ID Style Select Input Format Custom Label Input Label Can be used to program the Camera ID number or the cameraperson s name so that it is superimposed on the display Information Version Release day R...

Page 25: ...USO RESTRITO Page 25 of 32 ON SCREEN DISPLAY MENU SYSTEM Menu Tree Organization...

Page 26: ...USO RESTRITO Page 26 of 32 Video...

Page 27: ...USO RESTRITO Page 27 of 32 Marker...

Page 28: ...USO RESTRITO Page 28 of 32 Setup...

Page 29: ...USO RESTRITO Page 29 of 32 OSD Information...

Page 30: ...07 Display Panel 7 LCD Resolution 800 horizontal by 480 vertical Contrast 400 1 Brightness 350 cd m2 Viewing Angle R L 130 Typ U D 110 Typ Supported Signals Component YPbPr RGB 1080p 1080i 720P 480i 5...

Page 31: ...ly packed to an authorized Hitachi Kokusai Service Station Any damage caused by failure to observe proper packing or to observe instructions for installation operation and maintenance as contained in...

Page 32: ...USO RESTRITO Page 32 of 32...

Reviews: