background image

Plikc S.r.l.

 - Via del Lago Terrione, 83 - 00165 Roma

6

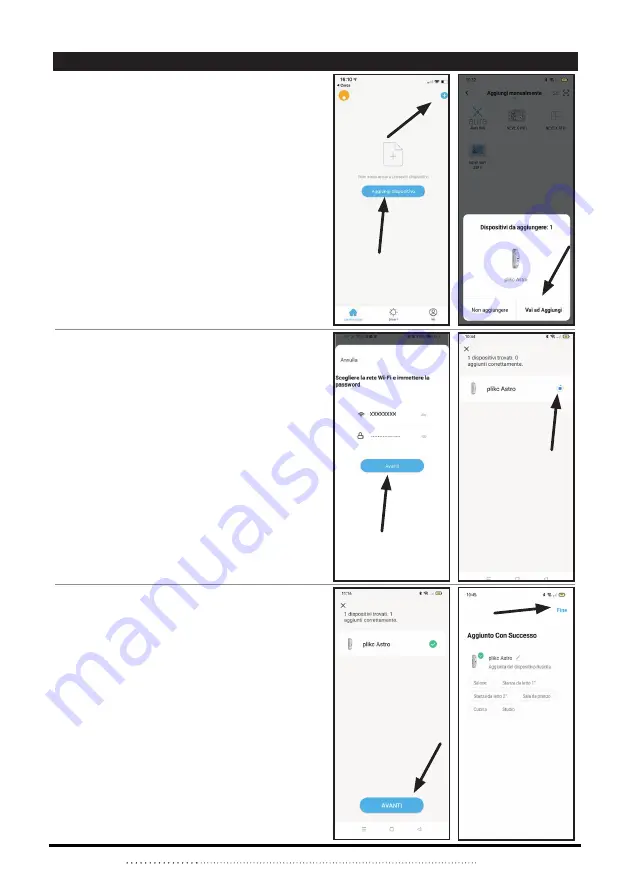
1.  Press “Add devices” or the + button up on the 

right.

2.  When the  “plikc astro” device icon appear on 

the display, press “Add”. 

3.  Choose  the  wifi  network  and  enter  the  pas-

sword. 

4.  Wait for the pairing of the “plikc astro wifi” devi-

ce to the “plikc smart” app.

5.  When the green symbol appeears press 

“forward”. 

6.  The device has been paird successfully, then 

press “End” up on the right.

Please Note:

  after  paired  “plick  astro  wifi”  with  a  

smartphone or a tablet all app set up will be repor-

ted on the device.

PAIRING THE DEVICE

Summary of Contents for ASTRO WIFI

Page 1: ...Multifunctional astronomic timer PLK202020 astro wifi Instructions manual For Spanish or Italian manual send an email to info plikc com...

Page 2: ...o la propria responsabilit che la macchina sopraindicata conforme alle disposizioni delle seguenti direttive e successivi emendamenti Dichiara inoltre che la persona autorizzata a costituire il fascic...

Page 3: ...n signs external lights or every other system or electronic device The timer also has a useful astronomic function thet allows to manage such devices acording with dawn and dusk considering the actual...

Page 4: ...on When it stays on it s connected to wifi When however it s off it means that it s not connected to wifi NUM 3 RED LED Indicate the relay status Qwhen it s on the relay is on When it s off the relay...

Page 5: ...i networks Once downloaded open the Plikc Smart APP and procede through a quick registration Needed only for the first use REGISTRATION Press Create a new acount Read the privacy policy and press on I...

Page 6: ...the wifi network and enter the pas sword 4 Wait for the pairing of the plikc astro wifi devi ce to the plikc smart app 5 When the green symbol appeears press forward 6 The device has been paird succes...

Page 7: ...e advanced menu that manage all programming timer and astronomic functions APP FUNCTIONS SWITCH COUNTDOWN The Countdown function allow the user to enter a countdown When the countdown end the device t...

Page 8: ...seconds and confirm Select Cyclic Plan ning and press Add Set up he beginning and end select the days you want to use the cycle set up the turn on off time and press Save The Cycle will remain on dis...

Page 9: ...ndom program The random range will remain in memory to be executed with the proper command You can add multiple cycles DELAYED PROGRAMMING Enabling this function the device will start the delayed shot...

Page 10: ...Astronomic and enter the managing pa nel Select sunrise before or after and how much advance or de lay Then press on the days of the week you will activate the program Choose ON or OFF Finally press S...

Page 11: ...og View your astro wifi plick acti vities Switching on off ACTIVITY LOG RELAY STATUS Select Relay Status Select timer status when the electric power return Setting up the Relay Status it s possible to...

Page 12: ...Led Functions option it s possible choose if and when turn on aforementiones Led RED LED FUNCTIONS BUTTON LOCK With the Button lock option you can avoid some turning on off program unpleasant manipul...

Page 13: ...e now connected to Alexa press back or the left arrow symbol 1 Open Alexa APP press devices and press symbol up on the right 2 Press on Add Device 3 Scroll downward until the option Other 4 Press Find...

Page 14: ...Press on Use the verification code 4 Press on Copy 1 Open the Google Home App on your smartphone 2 Press on symbol up on the right 3 Press on Set Up Device 4 Press on Compatible with Google 5 Press th...

Page 15: ...s the arrow symbol 3 Press on Accept 4 Select plikc astro and then press Next 5 Select a house symbol and press Next The written values have to be meant in milimeters 1 Select a room and press Next 2...

Page 16: ...devices do not garantee a proper functioning Switch off the main power before connecting a device Pay utmost atention Prestare la massima attenzione when making wiring with devices or the grid an inc...

Reviews: