background image


14 

Plextor DVD Writer User’s Manual

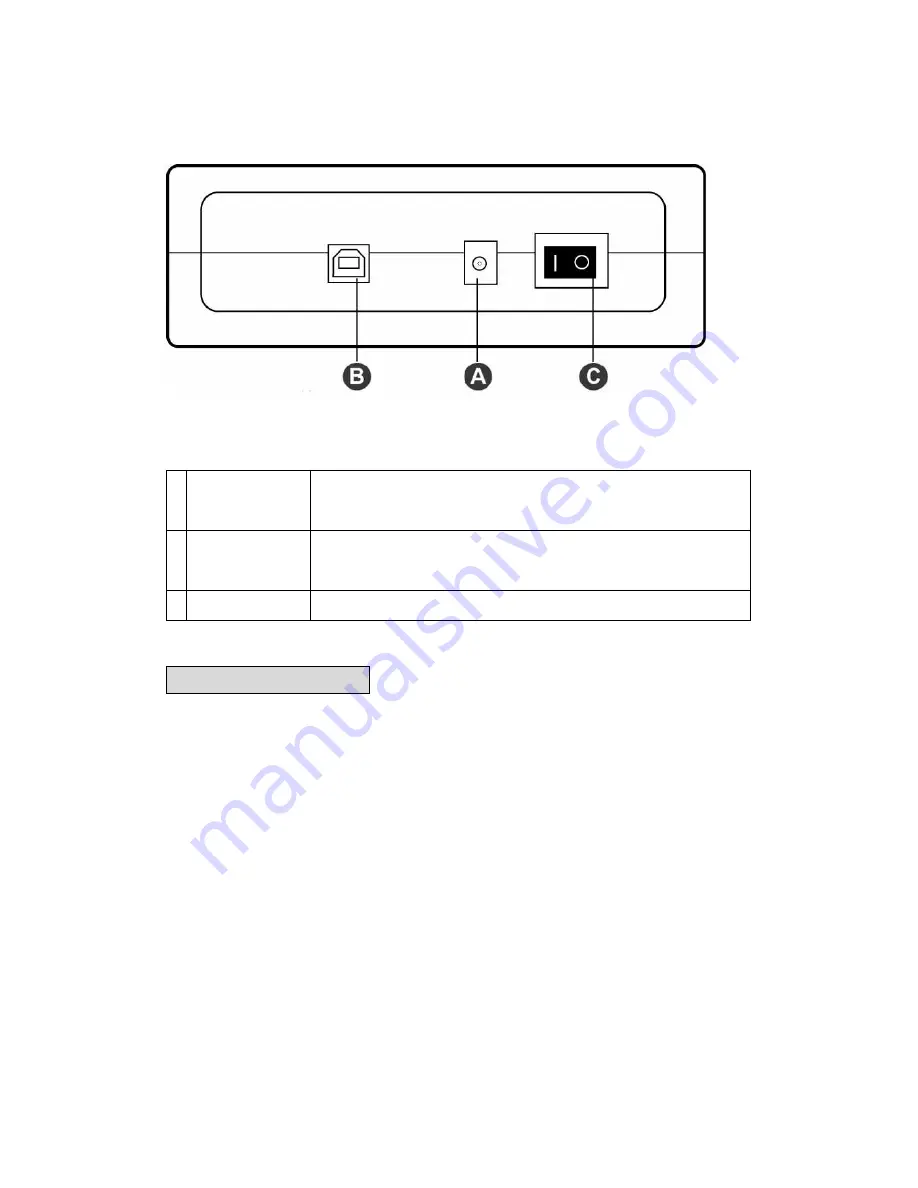
Rear View 


Figure: Rear view of DVD Writer (your drive may differ)


Power Connector 

Five-pin connector for DC power input 


USB Connector 

Standard USB B type jack 


Power Switch 

Turn On/ Off the power of the drive 


Installing the Drive 

Here’s an overview of what you’ll do to connect the drive: 


1.  Connect the USB cable to the External DVD Drive 

Plug in the USB cable into the USB port on the back of the drive. 


2.  Connect the USB cable to your PC 

Locate an available USB port on your PC and plug the other end of the USB cable in that port. 


NOTE

: High Speed USB (2.0) ports provide high-speed data transfer rates. You can connect the drive to 

a USB (1.1) port, but this is not recommended because it will significantly lower the drive’s performance. 

If you are unsure about which ports are available on your PC, check your PC manual or Windows device 

manager. 

Summary of Contents for H/H DVD Writer

Page 1: ...Internal External H H DVD Writer User s Manual...

Page 2: ...cleaning Do not use liquid or sprayed detergent for cleaning use a moist cloth 10 Never pour any liquid into computer equipment openings internal contact with liquid could cause fire or electrical sho...

Page 3: ...off and on the user is encouraged to try to correct the interference by one of the following measures Reorient or relocate the receiving antenna Increase the separation between the equipment and rece...

Page 4: ...lean Using a soft dust free cloth to clean the disc surface before recording will improve data integrity The copyright laws of each country govern the reproduction of copyrighted works The person usin...

Page 5: ...12 Installing External Drives 13 Drive Overview 13 Front View 13 Rear View 14 Installing the Drives 14 Using your Plextor DVD Writers Features of the drive 16 System Requirements 16 Recording Modes Su...

Page 6: ...ce to eject tray Push again to insert the tray back into the drive To prevent wear on the drive always use the eject button to insert the tray B On Busy LED Indication of drive s operation status The...

Page 7: ...r slave or cable select Analog Audio Output Connector Four pin connector for analog audio output Use to connect to a sound board or audio amplifier Digital Audio Output Connector Two pin connector for...

Page 8: ...follows 1 Turn off your computer system and unplug it from the power outlet 2 Remove the computer cover 3 Set the Master Slave jumper on the rear panel of the drive following the instructions below N...

Page 9: ...our hardware configuration This setting requires a Cable Select cable If in doubt about which setting to use use one of the configurations recommended below IDE Drive Configurations The following inst...

Page 10: ...uctions B 2 for performance reasons we do not recommend having an optical drive on the same IDE channel as a hard disk drive Disconnect the CD ROM or DVD ROM from the primary IDE port keep the jumper...

Page 11: ...it to the secondary IDE port 4 Connect the necessary cables to your DVD drive Figure Connecting Cables A IDE Cable Plug one connector of the IDE cable into the IDE connector on the rear panel of the d...

Page 12: ...the rear panel of your drive and to your sound card If your sound board is equipped with the Sony Philips digital interface SPDIF or Digital In and you wish to use the digital audio output from your d...

Page 13: ...connector should be the same as that in the following figure 6 Optional It may be necessary for you to use a 4 pin to Serial ATA power adapter It depends on the power connectors of your PC power suppl...

Page 14: ...prevent wear on the drive always use the eject button to insert the tray B Disc busy indicator Indication of drive s operation status The light lit stands for Busy the light blinking stands for Write...

Page 15: ...USB cable to the External DVD Drive Plug in the USB cable into the USB port on the back of the drive 2 Connect the USB cable to your PC Locate an available USB port on your PC and plug the other end...

Page 16: ...your drive has power by pressing the EJECT button on the front of the drive to open and close the tray If the tray does not open ensure that the cables are plugged in properly and securely 5 Install...

Page 17: ...CSS Content Scrambling System encrypted content on dedicated DVD download disc for CSS managed recording This function is only available on Qfix compatible drives Please refer to your drive s origina...

Page 18: ...lows less disc space to be used than session at once mode allows because a gap is created between sessions Packet Writing Data can be added directly to or deleted from rewritable media Useful for data...

Page 19: ...DVD Audio Video CD CD DA Photo CD CD ROM CD R CD RW CD ROM XA Karaoke CD Enhance CD CD extra CD Plus Writing and Reading DVD RAM DVD RW DVD R R DL DVD RW DVD R R DL CD R CD RW Loading and Unloading th...

Page 20: ...nstall the DVD playback software to your computer You can immediately play Audio CDs and pre recorded DVD discs including movies and other DVDs To play a CD or a DVD insert the disc with the label sid...

Page 21: ...ins carefully and that both sides are connected USB cable is not connected properly between the computer USB port and the drive Ensure that both connectors of the USB cable is properly connected to th...

Page 22: ...maged disc Always use high quality media Always handle discs with care and keep them clean Deep scratches fingerprints or other contaminants on a disc s surface can make it unreadable Writing errors o...

Page 23: ...al Symptom Possible Cause Solution Defective or damaged disc Always use high quality media Always handle discs with care and keep them clean Deep scratches fingerprints or other contaminants on a disc...

Reviews: