background image

4

ASSEMBLY INSTRUCTIONS

Hardware Used

1.   Attach the two feet (B) to the front of the screen 

(A) by inserting four M6x20mm bolts (AA) 

through the pre-drilled holes in the feet (B) and 

through the screen frame (A). Secure with four 

M6 nuts (BB). Use a wrench (DD) to hold the 

bolt (AA) in place while using the other wrench 

(DD) to tighten the nut (BB).  Repeat for all 4 

bolts (AA)/nuts (BB).

M6x20mm Bolts

x 4

AA

1

M6 Nut

x 4

BB

Hardware Used

2.  Attach the back feet (C) to the back side of the 

  screen (A) by inserting one M6X25mm bolt (CC)  

  into the hole in each foot (C) as illustrated    

  in figure 2. Adjust feet (C) to desired width.    

  Tighten against the screen (A) using

  the wrench (DD).

  NOTE: The back feet are designed to adjust to 

  the inside width of your fireplace opening so  

  that, if desired, the screen can be placed flush 

  against the fireplace.

2

x 2

CC

A

CC

C

Wrench

Wrench

DD

DD

M6x25mm Bolts

A

B

AA

BB

x 1

Summary of Contents for AMHERST FA811S

Page 1: ...________________ Questions problems missing parts Before returning to your retailer call our customer service department at 1 877 447 4768 8 30 a m 4 30 p m CST Monday Friday or email us at customerservice ghpgroupinc com 30 10 161 AMHERST FIREPLACE SCREEN MODEL FA811S Español p 7 Français p 13 2018 05 02 ...

Page 2: ...2 PACKAGE CONTENTS PART DESCRIPTION QUANTITY A Screen 1 B Front Foot 2 C Back Foot 2 A B C ...

Page 3: ... Make sure screen is large enough to completely cover fireplace opening Use heat resistant fireplace gloves when moving or adjusting screen HARDWARE CONTENTS M6x20mm Bolt Qty 4 AA PREPARATION Before beginning assembly of product make sure all parts are present Compare parts with package contents list and hardware contents above If any part is missing or damaged do not attempt to assemble the produ...

Page 4: ...eat for all 4 bolts AA nuts BB M6x20mm Bolts x 4 AA 1 M6 Nut x 4 BB Hardware Used 2 Attach the back feet C to the back side of the screen A by inserting one M6X25mm bolt CC into the hole in each foot C as illustrated in figure 2 Adjust feet C to desired width Tighten against the screen A using the wrench DD NOTE The back feet are designed to adjust to the inside width of your fireplace opening so ...

Page 5: ... 30 p m CST This warranty does not cover defects resulting from improper or abnormal use misuse accident or alteration Failure to follow all instructions in the owner s manual will also void this warrranty The manufacturer will not be liable for incidental or consequential damages or common erosion of out door products Some states do not allow the exclusion or limitation of incidental or consequen...

Page 6: ...mer service department at 1 877 447 4768 8 30 a m 4 30 p m CST Monday Friday BB Printed in China PART DESCRIPTION PART A Screen 30 01 233 B Front Foot 30 01 234 C Back Foot 30 01 235 AA DD Hardware Pack 30 09 538 N A Instruction Manual 30 10 161 AA BB CC DD A B C ...

Page 7: ...departamento de servicio al cliente al 1 877 447 4768 de lunes a viernes de 8 30 a m a 4 30 p m hora central estándar o envíenos un correo electrónicoa customerservice ghpgroupinc com Número de serie ____________________________ _ Fecha de compra ___________________________ English p 1 Français p 13 30 10 161 2018 05 02 MODELO FA811S ...

Page 8: ...8 CONTENIDO DEL PAQUETE PIEZA DESCRIPCIÓN CANTIDAD A Pantalla 1 B Pie frontal 2 C Pie trasero 2 A B C ...

Page 9: ...al antes de intentar ensamblar usar o instalar el producto No permita que los niños jueguen con la pantalla o cerca de ella No intente limpiar la pantalla mientras esté caliente No toque la pantalla con las manos descubiertas cuando esté en uso ya que podrían adherirse partículas calientes a la superficie de la pantalla Asegúrese de que la pantalla sea lo suficientemente grande para cubrir por com...

Page 10: ... procedimiento con los 4 pernos AA tuercas BB Ferreteria utilizado 2 Fije las patas posteriores C a la parte trasera de la pantalla A insertando un perno M6 x 25 mm CC en el orificio de cada pata C como se muestra en la figura 2 Ajuste las patas C al ancho deseado Ajústelas a la pantalla A usando la llave DD NOTA Las patas posteriores están diseñadas para ajustarse al ancho interior de la abertura...

Page 11: ... Para solicitar piezas u obtener el servicio de la garantía llame al 1 877 447 4768 de lunes a viernes de 8 30 a m a 4 30 p m hora central estándar Esta garantía no cubre defectos ocasionados por uso incorrecto o anormal uso indebido accidentes o alteraciones Si no respeta todas las instrucciones del manual del propietario esta garantía quedará anulada El fabricante no será responsable de daños in...

Page 12: ... al Cliente al 1 877 447 4768 de lunes a viernes de 8 30 a m a 4 30 p m hora central estándar Impreso en China BB BB PIEZA DESCRIPCIÓN PIEZA A Pantalla 30 01 233 B Pie frontal 30 01 234 C Pie trasero 30 01 235 AA DD Paquete de tornillería 30 09 538 N A Manual de instrucciones 30 10 161 AA BB CC DD A B C ...

Page 13: ...e détaillant contactez notre centre de service à la clientèle au 1 877 4478 4768 entre 08h30 à 16h30 heure du Centre du lundi au vendredi ou nous envoyer un courriel à customerservice ghpgroupinc com Numéro de série ____________________________ _ Date d achat ______________________________ English p 1 Español p 7 30 10 161 2018 05 02 ...

Page 14: ...CONTENU DE L EMBALLAGE 14 PIÈCE DESCRIPTION QUANTITÉ A Grille 1 B Pied avant 2 C Pied arrière 2 A B C ...

Page 15: ...des particules brûlantes peuvent s y coller Assurez vous que le pare étincelles est suffisamment grand pour couvrir l ouverture du foyer en entier Servez vous de gants résistant à la chaleur pour retirer ou ajuster le pare étincelles PRÉPARATION Avant de commencer l assemblage du produit assurez vous d avoir toutes les pièces Comparez le contenu de l emballage avec la liste des pièces et celle de ...

Page 16: ...étape pour les quatre boulons AA écrous BB Matériel utilisé 2 Fixez les pieds arrière C à l arrière du pare flammes A en insérant un boulon M6 x 25 mm CC dans le trou de chaque pied C comme illustré à la figure 2 Ajustez les pieds C à la largeur désirée Serrez les sur le pare flammes A avec le clé DD REMARQUE Les pieds arrière sont conçus pour être ajustés à la largeur de l ouverture de votre foye...

Page 17: ...undi au vendredi entre 8 h 30 et 16 h 30 HNC La présente garantie ne couvre pas les défectuosités résultant d une utilisation non conforme ou anormale d une mauvaise utilisation d un accident ou d une modification Omettre de suivre toutes les instructions contenues dans le présent guide annule aussi cette garantie Le fabricant ne sera en aucun cas tenu responsable pour tout dommage consécutif ou i...

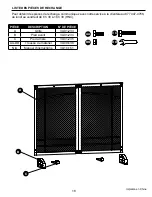
Page 18: ...service à la clientèle au 877 447 4768 du lundi au vendredi de 8 h 30 à 16 h 30 HNC Impremé en Chine BB BB PIÈCE DESCRIPTION N DE PIÈCE A Grille 30 01 233 B Pied avant 30 01 234 C Pied arrière 30 01 235 AA DD Trousse de matériel 30 09 538 N A Manuel d instructions 30 10 161 AA BB CC DD A B C ...

Reviews: