www.playcraftsystems.com
For Customer Service Call
800.333.8519 (U.S.A.) or 541.955.9199 (International)
DRUM SOUND PANEL INSERT R5
INSTALLATION INSTRUCTIONS
Rev B
3/29/2018
R5-16043
Page 2 of 4
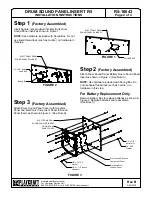
SQUARE NUT
ELECTRONIC DRUM
SOUND PANEL R5 INSERT
FIGURE 2
1/4" x 5/8" Button
Head Bolt
Battery Box
ELECTRONIC DRUM
SOUND PANEL R5 INSERT
FIGURE 3
DRUM SOUND
PANEL COVER
3/8" x 5/8"
Barrel Nut
1/2" SAE
Washer
3/8" x 7/8" O.D.
Washer
3/8" x 1-1/2" Button
Head Bolt
Drum Sound Electronic
Component Panel
Electronic Drum
Graphic Panel
ELECTRONIC DRUM
SOUND PANEL R5 INSERT
Step 1
(Factory Assembled)
Insert Square nuts provided into Electronic Drum
Sound Panel Insert as shown in Figure 1.
NOTE:
Use hardware included with Sound Box. Do not
use liquid thread lock (such as Loctite
®
) on hardware in
this step.
Step 2
(Factory Assembled)
Attach Drum Sound Panel Battery Box to Sound Panel
Insert as shown in Figure 2. (See Note A)
NOTE:
Use hardware included with Sound Box. Do
not use liquid thread lock (such as Loctite
®
) on
hardware in this step.
For Battery Replacement Only
Remove Battery Box to replace batteries as shown in
Figure 2. Replace batteries and reassemble.
(See Note C)
FIGURE 1
Step 3
(Factory Assembled)
Attach Drum Sound Panel Cover with Graphics
Panel and Electronic Component Panel to Sound
Panel Insert as shown in Figure 3. (See Note A)


