background image

WPG-120 User Manual 


3.5.9


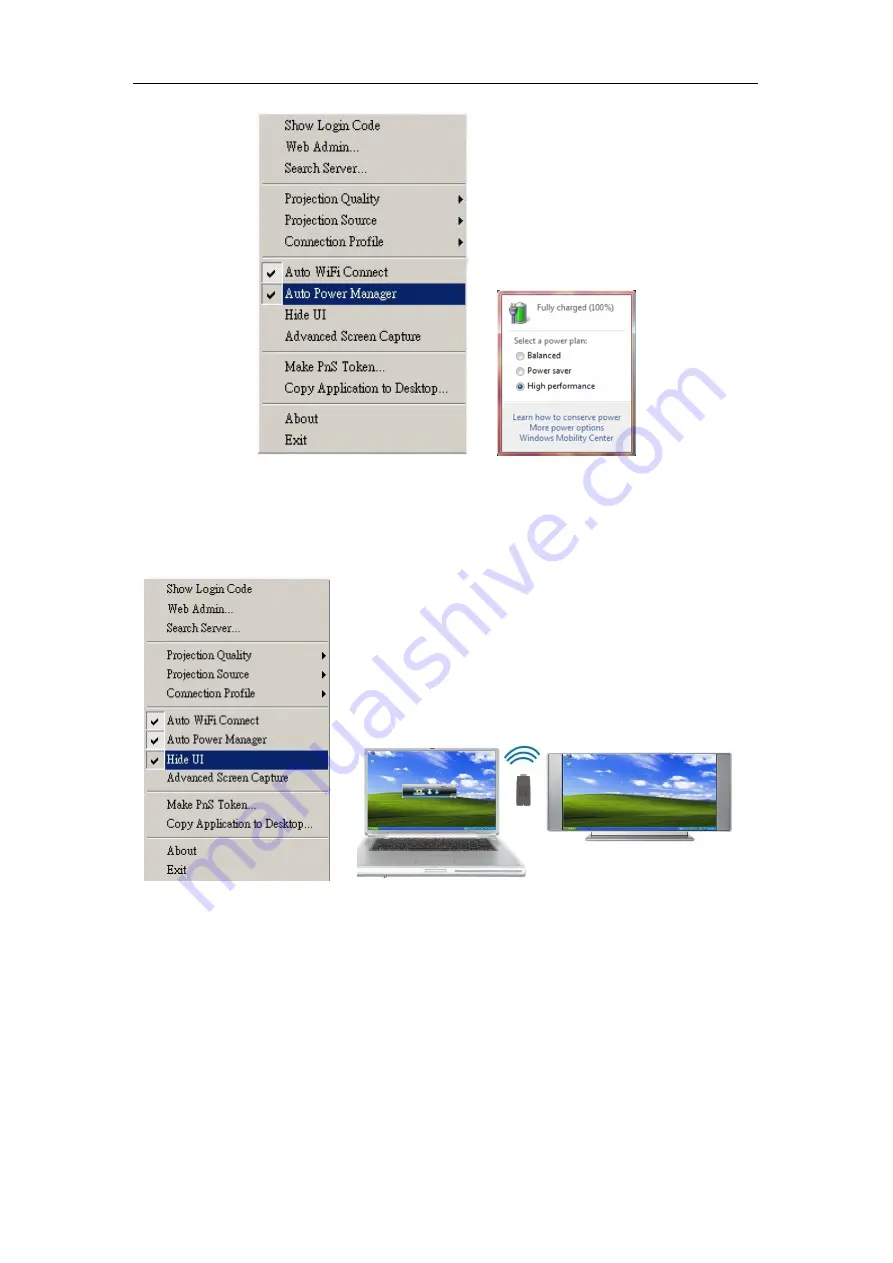
Hide UI 

Click the “Hide UI” to hide or display the application control panel. 


3.5.10


Advanced Screen Capture 

Click “Advanced Screen Capture” to see tip windows and other layered windows 
(including the main UI) on the connected display. 
The mouse cursor may blink from time to time when you are projecting your PC 
screen!   
 

z


Disable “Advanced Screen Capture”. 


17

Summary of Contents for WPG-120

Page 1: ...WPG 120 User Manual Wireless Presentation Gateway WPG 120 User s Manual ...

Page 2: ...any person of such revision or changes All brand and product names mentioned in this manual are trademarks and or registered trademarks of their respective holders Federal Communication Commission Interference Statement This equipment has been tested and found to comply with the limits for a Class B digital device pursuant to Part 15 of FCC Rules These limits are designed to provide reasonable pro...

Page 3: ...5 CE OF THE EUROPEAN PARLIAMENT AND THE COUNCIL OF 9 March 1999 on radio equipment and telecommunication terminal Equipment and the mutual recognition of their conformity R TTE The R TTE Directive repeals and replaces in the directive 98 13 EEC Telecommunications Terminal Equipment and Satellite Earth Station Equipment As of April 8 2000 Safety This equipment is designed with the utmost care for t...

Page 4: ...Projection Source 14 3 5 6 Connection Profile 15 3 5 7 Auto WiFi Connect 16 3 5 8 Auto Power Manager 16 3 5 9 Hide UI 17 3 5 10 Advanced Screen Capture 17 3 5 11 Make PnS Token 18 3 5 12 Copy Application to desktop 19 3 5 13 About 20 3 5 14 Exit 20 4 Web Management 21 4 1 Home Page 21 4 2 Download Software 22 4 3 Login Web Admin 23 4 3 1 System Status 23 4 3 2 Network Setup 24 4 3 3 Projection Set...

Page 5: ...oad the utility from the WPG 120 web screen CD or USB adapter that offers the most convenient way for the new user access to presentation in seconds Plug Show With Plug Show USB Token wireless presentation becomes easy Just link your PC Laptop to WPG 120 plug the token into a USB port and in seconds your screen will be wirelessly projected to the connected projector High performance screen project...

Page 6: ...VGA input or connect a VGA cable to the WPG 120 VGA connector and turn on projector power 2 Turn on WPG 120 When projector shows the default menu on the screen as below it indicates the WPG 120 is ready 3 Make sure your PC WLAN is enabled then connect to your PC with the 6 ...

Page 7: ...o access the WPG 120 web home page The default IP address of WPG 120 is 192 168 1 1 or refers to the IP address shown on the bottom left corner of projector screen 5 Download the client software select Windows Vista XP 2000 and execute the installation program After installing the program you will see the WPG 120 shortcut on the PC screen 7 ...

Page 8: ...ual 6 Make sure your personal firewall allows WPG 120 software to pass through 7 Enter the LOGIN CODE and You can see the login code is the top left of the projector screen 8 Click the Play button to start projection 8 ...

Page 9: ...m via web page successfully follow the steps below to start 1 Click WPG 120 icon to execute the program 2 Program will start to search for WPG 120 automatically 3 If WPG 120 is found the Login Code dialog box will pop up on the PC screen z Searching for WPG 120 z When WPG 120 is found enter login code to start 9 ...

Page 10: ... of the projector screen 3 3 Main User Interface Menu Area Login Coded 3 4 Screen Projection Status Indicator Control Area for Screen Projection Feature Click the Play button for full or split screen you can project the main screen on to the display immediately click the Pause button to freeze the image and click the Stop button to end the presentation 10 ...

Page 11: ...2 Project to Split 3 Project to Split 4 Stop projecting Pause projecting 3 5 Menu Description Login Code Menu Exit Minimize 3 5 1 Show Login Code Click Show Login Code to display the login code on the top right of the desktop and it will close automatically after 10 seconds You can also click on 11 ...

Page 12: ...l the area to close this window manually 3 5 2 Open Admin Web Page Click to open the function menu and select Web Admin management web page The detailed functions of the web page will be described in the next chapter 12 ...

Page 13: ...Click Search Server to search for the WPG 120 again 3 5 4 Projection Quality Click the Projection Quality choose Normal for faster projection speed with lower screen image quality and Best for better image quality but slower projection speed 13 ...

Page 14: ... 5 Projection Source Click Projection Source to project the main screen of the desktop or the virtual extended screen Note This function is only supported by Windows XP and a virtual display utility must first be installed 14 ...

Page 15: ...configuration into Profile or click the Manage Profile to add delete or modify current profiles z Save Current as Click Save current as to save your current connection as a profile for future quick connect z Manage Profile Click Manage Profile to view current profile add or delete the profile and edit the existing profile 15 ...

Page 16: ...ZC function this function can save the WiFi connection steps 3 5 8 Auto Power Manager For best projection performance the auto power manager application will switch the PC s current power setting to highest performance Click the Auto Power Manager to enable or disable this function 16 ...

Page 17: ... control panel 3 5 10 Advanced Screen Capture Click Advanced Screen Capture to see tip windows and other layered windows including the main UI on the connected display The mouse cursor may blink from time to time when you are projecting your PC screen z Disable Advanced Screen Capture 17 ...

Page 18: ... Screen Capture Tip windows is not shown in projector Tip windows is shown in projector 3 5 11 Make PnS Token Click Make PnS Token to make a USB Token you can insert a USB thumb drive and follow the wizard instructions to make the Token 18 ...

Page 19: ...WPG 120 User Manual 3 5 12 Copy Application to desktop Click Copy Application to desktop to copy the application to your desktop immediately even if you don t have the system privilege 19 ...

Page 20: ... 13 About Click About to show system information including Client version IP address and other information 3 5 14 Exit Click Exit to exit this application It will stop current session and close the application immediately 20 ...

Page 21: ...Page 1 Make sure your PC connects to WPG 120 successfully 2 Open your browser it will enter WPG 120 home page automatically 3 If not enter your IP address on the browser you can see the IP on the projector screen 4 The default IP is 192 168 1 1 21 ...

Page 22: ...cute the installation program 3 Follow Installation Wizard instructions to proceed till the installation process complete 4 If pop up Windows Security Alert because Windows firewall block this program You just press Unblock button to continue installation 5 Once installation complete a utility shortcut come out on the screen 22 ...

Page 23: ...nd then enter password to login web page 2 The password default value is admin 4 3 1 System Status Click System Status shows current system status Model Name Product model name Versions 1 Firmware version no Product firmware version number Network Status 23 ...

Page 24: ...figurations as below Wireless Setup Region default value is Worldwide SSID SSID string max Length is 32 bytes SSID Broadcast The default value is Enable Channel to set fixed channel or Auto In Auto mode the WPG 120 will scan all of wireless channels and select one clear channel automatically Encryption you can select Disable or one of WEP WPA WPA2 64bit or 128bit in ASCII or HEX string Key If Encr...

Page 25: ... Setup button Resolution XGA 1024x768 and SVGA 800x600 The default value is XGA Login Code You can select Disable Random or Use the following code to set a specified 4 characters Number Apply Confirm and Save modifications Cancel Cancel all the modifications 4 3 4 Change Passwords 25 ...

Page 26: ... confirm new password Apply Confirmation and Save modifications 4 3 5 Reset to Default Click Reset to Default button to restore factory default settings Apply Confirmation and action Another way to restore Factory Default Settings Follow below procedures 1 Press Reset button and Hold 2 Turn on WPG 120 3 Wait for over 10 seconds and release Reset button 4 It will take effect to restore factory defa...

Page 27: ...ware 1 First download latest firmware 2 Click Browse to select file you want to upgrade 3 Click Upgrade to start 4 A warning message and countdown timer will appear on screen 5 After a few minutes a complete message will appear on screen 6 Restart WPG 120 to allow upgrade to take effect 27 ...

Page 28: ...WPG 120 User Manual 4 3 7 Reboot System Click Reboot System button to restart system Reboot reboot system automatically 28 ...

Page 29: ...WPG 120 User Manual 29 4 3 8 Logout Click Logout button to leave the control system ...

Page 30: ...lied EN 55022 2006 A1 2007 Class B EN 61000 3 2 2006 EN 61000 3 3 1995 A1 2001 A2 2005 EN 55024 1998 A1 2001 A2 2003 IEC 61000 4 2 2001 IEC 61000 4 3 2006 IEC 61000 4 4 2004 IEC 61000 4 5 2005 IEC 61000 4 6 2003 A1 2004 A2 2006 IEC 61000 4 8 2001 IEC 61000 4 11 2004 EN 62311 2008 11 EN 301 489 1 V1 8 1 2008 04 EN 301 489 17 V1 3 2 2008 04 EN 300 328 V1 7 1 2006 10 EN 60950 1 2006 A11 2009 IEC 6095...

Reviews: