background image

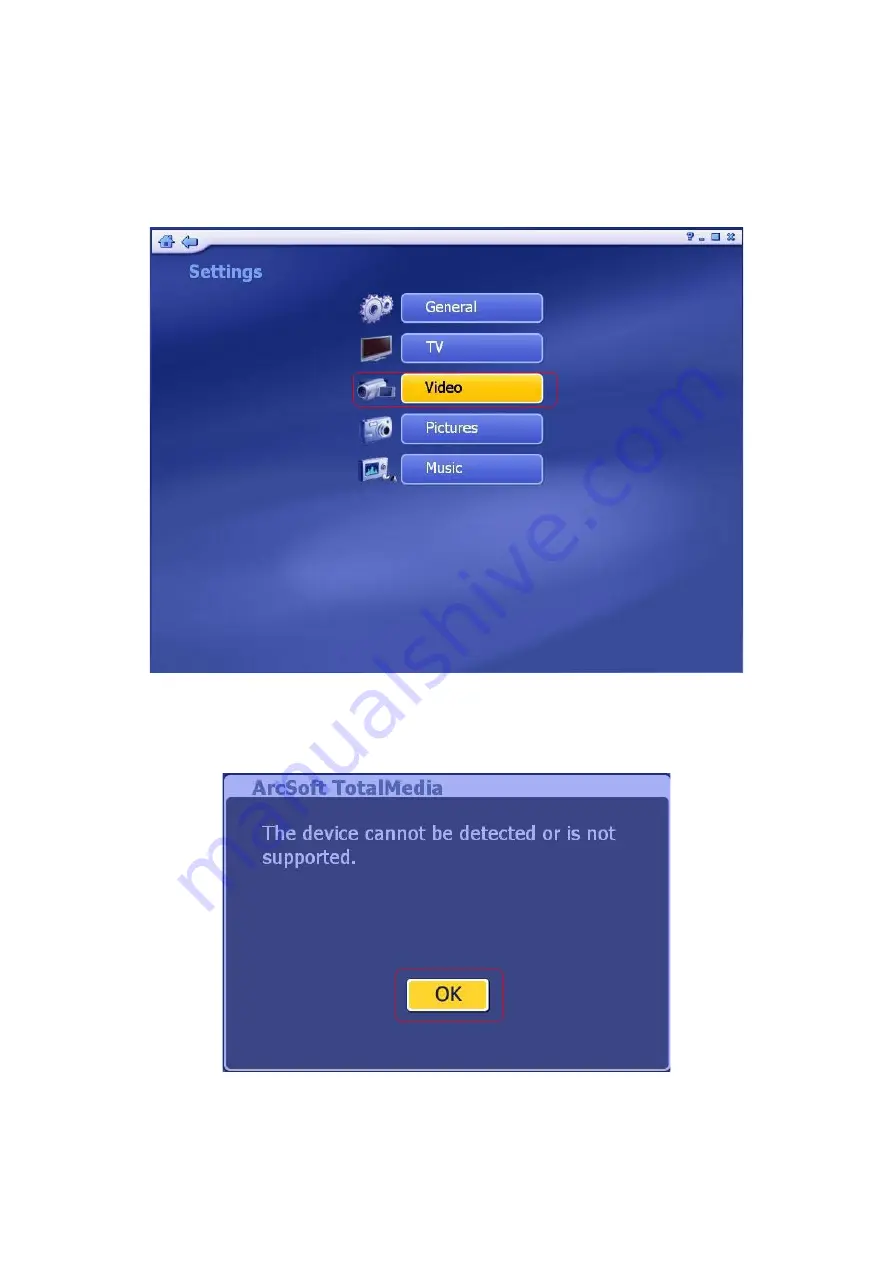
3.2.5.3 Video   

Modify settings for capturing video: 


This device does 

NOT 

support Video Capture function, please skip Video setting. 

If you click “

Video

” on the Settings section, the window below will be shown: 


Click “

OK

” button to close the window and you will enter into “

Capture Settings

” 

window below. Due to this device does not support Video Capture function; you can 


75

Summary of Contents for DTR-100D

Page 1: ...USB 2 0 Digital TV Receiver DVB T DTR 100D User s Manual ...

Page 2: ... company reserves the right to revise this publication and to make changes from time to time in the contents hereof without obligation to notify any person of such revision or changes All brand and product names mentioned in this manual are trademarks and or registered trademarks of their respective holders CE mark Warning The is a class A device In a domestic environment this product may cause ra...

Page 3: ...d of the computer manufacture must therefore be allowed at all times to ensure the safe use of the equipment Revision User s Manual for DTR 100D Model DTR 100D Rev 1 0 April 2008 Part No 2081 K10030 000 3 ...

Page 4: ...stall DTR 100D s driver 22 Chapter 3 User Interface 27 3 1 Launch TotalMedia Monitor 27 3 2 Main Monitor 28 3 2 1 TV 31 3 2 1 1 Search TV channels 31 3 2 1 2 Channel Preview 35 3 2 1 3 Full Screen 37 3 2 1 4 Favorite Channel List 38 3 2 1 5 EPG 39 3 2 1 6 Channel 41 3 2 1 7 Recorded TV 42 3 2 1 8 Scheduling 43 3 2 1 9 TV Settings 46 3 2 2 Picture 54 3 2 3 Music 59 3 2 3 1 My Playlists 61 3 2 3 2 R...

Page 5: ...3 2 5 Setup 69 3 2 5 1 General 70 3 2 5 2 TV 74 3 2 5 3 Video 75 3 2 5 4 Pictures 76 3 2 5 5 Music 77 5 EC Declaration of Conformity 79 ...

Page 6: ...f HDTV standard and enables a high quality playback of the recordings DTR 100D also can deliver Electronic Program Guide EPG which offers you more information about the TV programs You can pause while watching TV program and continue from where you left with Time Shifting feature and will never miss a scene The supplied Remote Controller gives you easy access to the key functions of the DVB T rece...

Page 7: ... portable receiver Supports Subtitle Multiple language English German French Italian Dutch Spanish Portuguese Traditional Chinese and Simplified Chinese Software Upgradeable 1 2 Package Contents 1 DTR 100D USB 2 0 Digital TV Receiver 2 Installation CD Include User Manual Quick Installation Guide Utility and Driver 3 Remote Controller 4 DVB T TV Antenna 1 3 Physical Details Outlook DTR 100D USB 2 0...

Page 8: ...st channel you just selected Subtitle This only available with the local TV provider which also support this feature Click this button and you can view the extra text on the channel screen Timeshift With this button you can pause while watching TV program and continue from where you left Mute To switch volume to mute mode Snapshot To capture the channel screen you are just watching Keyboard 0 9 Yo...

Page 9: ... above 512MB recommended VGA card with minimum 32MB memory AC97 compatible sound card HD space at least 1 GB free for installation Microsoft DirectX 9 or above Windows 2000 or above Windows Media Player 9 or above 2 2 Hardware Installation This chapter explains how to install DTR 100D with your computer or notebook 1 Connecting USB Port Connect USB connector of the DTR 100D to the USB port on your...

Page 10: ...e system will find a new hardware device as the below figure Found New Hardware Wizard will appear Please click Cancel to exit the Wizard 2 Please insert the supplied CD into your CD drive and then install the utility and driver There are three utilities in the supplied CD Windows Media Player 9 10 ...

Page 11: ...ftware and this is user interface allow you to access and work with the digital photo video recorded TV programs and music library directly from your TV or home computer 2 2 4 Driver To install the DTR 100D s driver Note 1 If you install the DTR 100D with Notebook please make sure the Power Saving function is turned OFF The Power saving function will lower down the CPU Performance and may effect t...

Page 12: ... can skip this part of installation Step 1Î Click Windows Media Player 9 button from setup program of the installation CD Step 2Î Select the language version which you want to install and click OK to continue Step 3Î Click I Accept to continue the next step 12 ...

Page 13: ...Step 4Î Please wait for a few seconds for Installing Step 5Î Click Next to continue 13 ...

Page 14: ...Step 6Î Select your Privacy Options in this step and click Next to continue Step 7Î Configure your desktop and Windows Media Player 9 Series default settings and then click Finish to exit the wizard 14 ...

Page 15: ... higher version for your Operating System If your system already has Windows Media Player 9 and DirectX 9 or higher version you can skip this part of installation Step 1Î Click Microsoft DirectX 9 to start installing DirectX 9 Step 2Î In Installing Microsoft DirectX window select I accept the agreement and then click Next to continue 15 ...

Page 16: ...Step3 Î Click Next to continue installation Step 4Î Waiting for the operating system finishes installing DirectX 9 components 16 ...

Page 17: ...Step 5Î After operating system completes DirectX9 installation and click Finish to restart your system 17 ...

Page 18: ...Install ArcSoft TotalMedia Software To execute TotalMedia application your system must have Media Player 9 and DirectX 9 or higher version If your system is not installed yet please refer to 2 2 1 Install Windows Media Player 9 and 2 2 2 Install Microsoft DirectX 9 for the installation Step 1Î Run the Installation CD and click ArcSoft TotalMedia for ArcSoft TotalMedia software installation 18 ...

Page 19: ...Step 2Î Select the languages for this installation from the choices below and then click OK to next step Step 3Î The Welcome wizard will appear and click Next to continue 19 ...

Page 20: ...owing license agreement carefully To install ArcSoft TotalMedia you must accept this agreement and click Yes Step 5Î To install to this folder click Next or to install a different folder click Browser and select another folder 20 ...

Page 21: ...Step 6Î Select Program Folder and click Next to continue Step 7Î Please wait for while for setup procedure 21 ...

Page 22: ...on Desktop after the installation 2 2 4 Install DTR 100D s driver Your Operating System MUST has DirectX9 or higher version before you install the driver If your system is not installed yet please refer to 2 2 1 Install Windows Media Player 9 and 2 2 2 Install Microsoft DirectX 9 for the installation Step 1Î Click Install Driver to start installing driver 22 ...

Page 23: ...Step 2Î The InstallShield wizard will appear and click Next to continue Step 3Î Click Install to begin installation 23 ...

Page 24: ...e during device driver is installing Step 5Î Before using the device it is recommend that restarting the computer for device complete the setting Choose Yes I want to restart my computer now and click Finish to restart computer 24 ...

Page 25: ...ver is properly installed For Windows 2000 Click Start Î Settings Î Control Panel Î System Î Hardware tab Î choose Device Manager For Windows XP Click Start SettingsÎControl PanelÎ System Î Hardware tab Î choose Device Manager 25 ...

Page 26: ...26 ...

Page 27: ...directly from your TV or home computer Note that some versions of TotalMedia may not contain all sections listed on the Help file which depending on the hardware configuration and the specific version of TotalMedia installed 3 1 Launch TotalMedia Monitor There are three methods to lunch your TotalMedia Monitor 1 Double click Desktop Icon TotalMedia 3 2 Double click Tray Bar icon TotalMedia Monitor...

Page 28: ...art All Program ArcSoft TotalMedia 3 TotalMedia 3 3 2 Main Monitor After launch your TotalMedia Monitor it is divided into the main sections as TV Picture Music Video and Setup You will see the screen as below 28 ...

Page 29: ... files stored on your computer 3 2 5 Setup Allow you configure the basic settings for each module of the program Click on one of these parameters and then proceed to the manual s relevant sub section 3 2 1 3 2 2 3 2 3 3 2 4 or 3 2 5 You can simply go to each section and start your TotalMedia If you have any question about your ArcSoft TotalMedia s functions or settings you can click Help icon on t...

Page 30: ... Play Pause Stop Record plus Volume and Channel controls Special controls for TV playback and only appear when necessary 3 When watching movie discs video files and recorded TV show Use these buttons to adjust the playback speed at variable rates 4 When watching MPEG 2 videos and recoded TV shows Use these buttons to skip forward by roughly 27 seconds or backwards by roughly 27 seconds These butto...

Page 31: ...annels or use the channel control button in the floating toolbar at the bottom of the screen You may pause and rewind TV while you re watching using both the Remote Controller and the toolbar 3 2 1 1 Search TV channels Step 1Î Once you first enter TV section from ArcSoft Startup screen you will see the Setup TV Signal wizard as below Simply click Next to begin configuring your TV signal 31 ...

Page 32: ...Step 2Î Select your region and click Next to continue 32 ...

Page 33: ...Step 3Î Click Start button to scan the available TV channels Step 4Î Please wait for few minutes for channel scanning 33 ...

Page 34: ...Step 5Î After scanning is completed the message will show the number of available channels was found Click OK to exit this screen Step 6Î Click Finish button to continue 34 ...

Page 35: ...ep 7Î After TV channel configuration is completed you can start watching your TV 3 2 1 2 Channel Preview After you save all scanned TV channels you can use hot key Shift Ctrl S to preview all channels 35 ...

Page 36: ...Step 1Î Select TV in the Startup Screen Step 2Î After enter the TV section press hot key Shift Ctrl S on keyboard 36 ...

Page 37: ...channel on the preview screens simply click the screen to view it 3 2 1 3 Full Screen Display the Video over the entire program display area Typically the entire screen You can click the Full Screen Button to switch into full screen mode Press Esc or double click the mouse to go back to a normal window 37 ...

Page 38: ... Note You should check the Time Shift option in TV Settings to display the time bar 3 2 1 4 Favorite Channel List Press Ctrl D to display the Favorite Channel List and select a channel to watch 38 ...

Page 39: ...t of each channel z Click on the UP DOWN arrow buttons on the left to browse the channel list 3 2 1 5 EPG This section lets you view the channel program lists If you are using a digital device please select to access EPG or network to view the program lists While using analog device the program will take you to the network EPG directly 39 ...

Page 40: ... Note This option is only available if you are using an EPG service The Internet EPG may not be available in all countries and the EPG on some digital services may bit be supported 40 ...

Page 41: ...o play it in Full Screen mode Press Esc to exit Full Screen Double click a channel will take you back to the TV main screen and the program will start showing z Add to Favorite Highlight a channel on the list and click on the button to set it as a favorite channel A checkmark indicates favorite channel z Delete from Favorite If you select a favorite channel click on this button to remove it from t...

Page 42: ...Both views show you thumbnails of the available photos and folders Detail view includes file folder names and dates z From the Sort section choose to arrange the photos according to name or date z To trim a video click the Scissors icon to the right of the file z To rename a video file click the A_ icon to access a virtual keyboard z Click the Delete Trash can icon to delete a file Note When you u...

Page 43: ...e Trim a Video 3 2 1 8 Scheduling This section lets you program the application to record TV shows then the application will monitor the schedule and record the scheduled programs automatically on the correct day and time 43 ...

Page 44: ...he name of the program Click A_ to access a virtual keyboard then select a channel record frequency once daily or weekly and set the start stop recording times z The Frequency option enables you to filter shows by how often they are recorded once daily weekly 44 ...

Page 45: ... 2 Modify Let you edit the recording details of the selected item 3 History Display a history of your recorded TV shows 45 ...

Page 46: ...its right 5 Scheduling conflicts If conflicting recording sessions are scheduled you will be presented with a summary of the conflicts and asked to update the schedule 3 2 1 9 TV Settings Here you can view and edit default settings for recording from TV 1 Reset TV Signal This section lets you view and edit the setting for TV Signal 46 ...

Page 47: ...Step 1Î Reset TV Signal will clear all your previous configuration data If you want to reset the TV Signal click Yes to continue Step 2Î Select your region and click Next to continue 47 ...

Page 48: ...Click Start to scan for available channels This process may take several minutes Step 4Î After TV Channel rescanning is completed the message will show the numbers of channels are found Click OK to continue 48 ...

Page 49: ...Step 5Î Click Next to continue Step 6Î Click Finish to exit 49 ...

Page 50: ...tup pages 2 Edit Channels View and edit channels for recording from TV z To add channels automatically simply click Start The program will scan through each channel and determine if there is an available signal Channels will appear in the channel list z To select the channels you can click on one by one or using the Select All option z To rename the channel click A_ icon to access a virtual keyboa...

Page 51: ... Choose the device you want to use z Choose Close Caption Subtitle and Time Shifting from the list z Setting the Time Shifting feature to On enable you pausing live TV and watch recorded TV before the recording is complete This feature requires a high performance PC 51 ...

Page 52: ...at you saved before z Go to the folder that contains the channel list file you want to import for example My Favorite chl Click on the Up One Level button to go up one directory level z Check the channel list file chl you want to import z When you are ready click Import 52 ...

Page 53: ...rent channel list z Browse your computer and go to the folder that you want to save the channel list file z To rename a channel list file click on the A_ icon to bring up a virtual keyboard or type in your file name directly z When you are ready click Export 53 ...

Page 54: ...rt a slide show of the photos in the current location starting with one you selected z From the View section you can choose either Detail or Thumbnail view Both views show you thumbnails of the available photos and folders Detail view includes file folder names and dates z From the Sort section choose to arrange the photos according to name or date Edit The multitude of editing options is availabl...

Page 55: ...of the photo by switching to the pan tool 3 Auto Enhance Selecting this option presents you with three automatically enhanced versions of your photo plus your original one Simply choose the one you like best 4 Red Eye Removal This tool helps you remove red eye from photos In Move mode position the crosshairs over the redeye area Press enter then click Fix it to get rid of the red Click Restore to ...

Page 56: ... to which you want your photo cropped 8x6 7x5 4x6 etc Using the and buttons resize the crop box to your prefer Choose Move and then position the crop box over the area of the photo you want to keep To execute the crop command choose Crop It Choose Done to cancel 6 Previous Next Photo These buttons let you navigate to the previous next in the current location 56 ...

Page 57: ...back to the previous screen Print This feature enables you to print multiple photos across a number of pages 1 Go to the folder that contains the photos you want to print 2 Select the photos you want to print by clicking on the photos one by one or using the Select All option 57 ...

Page 58: ...Choose Next 4 Choose a Photo Print Size and select the Paper Size you are using A preview of your choice will appear to the right 5 Enter the number of Copies you want of each printed page 6 Click Print 58 ...

Page 59: ...9 slide changes to the next z Check the Loop Slide show box to have your slide show automatically loop once it completes z In the Music Soundtrack section choose On to play one or more songs during the slide show 3 2 3 Music This area enables you to listen and record music files You are also able to create custom music play lists The music files shown here belong to the folder listed at the top of...

Page 60: ...60 ...

Page 61: ...ists are compatible with Windows Media Player 9 and stored in the My Documents My Music My Playlists directory If you modify a playlist using Media Player the changes will be reflected in TotalMedia the next time you start the program pressing Refresh will also update the playlists 61 ...

Page 62: ...list Here you are able to make a custom playlist from the music on your computer z Go to any folder to find the music you want to add to your new playlist z Check each song that you want to add and then click Next 62 ...

Page 63: ...el Take your back to the main Music page 4 Edit Playlist Allows you to add remove rearrange songs within a playlist already created Check the Shuffle option to have the songs play in random order z Select a playlist and open it z Click on a song and play it and then you will see Edit playlist button as below z To move a song up or down in the playlist highlight the song then go to the Move Up Down...

Page 64: ...ck the Delete button trash can icon z To add more songs to your playlist click Add music navigate to the folder containing the songs you want to add and select the songs then click Next z Once your playlist is set click Save 64 ...

Page 65: ...3 2 3 2 Ripping Music CDs It s easy to rip convert your audio CDs into audio files you can play back on your computer Step 1Î Select the tracks you d like to rip 65 ...

Page 66: ...ipped files WMA the quality setting and the directory used for saving the ripped files z The Get CD Information from the Internet option will automatically search the Internet for CDDB information title artist album name etc for the songs contained on your CD If corresponding information is found it will be embedded into your ripped music To use this feature maker sure your system is connected to ...

Page 67: ...3 2 4 Video This area enables you play video files stored on your computer and capture video 67 ...

Page 68: ... the file click Trash Can icon z From the View options you can choose either Detail or Thumbnail Both options show you the thumbnails of the available video files Detail view includes file names dates and other information z User the Sort features to present your video files in order by file name file size and date 3 2 4 2 Capturing Video This device does NOT support Video Capture function When yo...

Page 69: ...3 2 5 Setup This area lets you configure the basic settings for each module of the program 69 ...

Page 70: ...3 2 5 1 General This screen enables you to view and edit basic program settings 1 Printer Choose your default printer 70 ...

Page 71: ... and file type for captured screenshots 3 Video Recording Storage Select the location on your computer where all of your recorded TV programs will be saved You can also set the quality HQ Î High Quality SP Standard Play LP Long Play EP Extended Play 71 ...

Page 72: ...on may vary 4 3 or 16 9 Set it to match your hardware or select Auto to let the program choose the aspect ratio automatically z When using a television as a display set Deinterlace to Off When using acomputer monitor set it to On z Choose between 3D or 2D for the interface Display Effect 2D means that there will only be a fade transition when switching between screens 3D mean there will be a zoom ...

Page 73: ... 5 About TotalMedia Get information about TotalMedia and access tools for registering your product and searching for program updates and patches 73 ...

Page 74: ... and edit the settings for TV signal Edit Channels View and edit channels for recording from TV TV Settings This section lets you view and edit TV settings Import Channel List This section lets you import the channel list that you saved before Export Channel List This section lets you export the current channel list 74 ...

Page 75: ...ideo Capture function please skip Video setting If you click Video on the Settings section the window below will be shown Click OK button to close the window and you will enter into Capture Settings window below Due to this device does not support Video Capture function you can 75 ...

Page 76: ...simply click Cancel to leave the window 3 2 5 4 Pictures Here you can set the transition effects timing and background music for your slide show 76 ...

Page 77: ...effect that you would like to see as one slide changes to the next z Check the Loop Slide show box to have your slide show automatically loop once it completes z In the Music Soundtrack section choose On to play one or more songs during the slide show 3 2 5 5 Music Here you can view and modify your music settings z Check the Shuffle option to have the songs play in random order z Check the Repeat ...

Page 78: ...pped music z The Get CD Information for the Internet option will automatically search from the Internet for CDDB information title artist album name etc for the songs contained on your CD If corresponding information is found it will be embedded into your ripped music To use this feature make sure your system is connected to the Internet 78 ...

Page 79: ... A1 2003 A2 2005 S1 Input immunity S2a Immunity from conducted voltages not applicable S2b Immunity from conducted currents S3 Immunity from radiated fields S4 Screening effectiveness not applicable IEC 61000 4 2 2001 ED 1 2 IEC 61000 4 3 2006 ED 3 0 EN 61000 4 4 2004 ED 2 0 not applicable Responsible for marking this declaration if the Manufacturer Authorized representative established within the...

Reviews: