INSTRUCTIONS
INSTRUCTIONS
05
14
14. 0-10+ Button
Press this button to choose desired song
、
section
、
preset stations.
Decimal numbers, for example the 19th
song, press 10+ and 9 button.
15. AMS / RPT Button
In radio mode, press this button to browse
stored stations.
In audio mode, press this button to play
repeatedly.
16. TITLE Button
In DVD mode, press this button to play
back to the top menu of disc.
17. AUDIO Button
In DVD mode, press this button to switch
language of dialogue.
In VCD mode, press this button to choose
left track
、
right track and stereo.
18. GO TO Button
In DVD mode, press this button, you can
define playing time.
19. SUBTITLE Button
In DVD mode, press this button to switch
language of subtitle.
20. PBC Button
In VCD mode, press this button to display
all song menus, work with number button
to choose songs.
21. UP
、
DOWN
、
LEFT
、
RIGHT
、
ENTER
Button
In DVD mode, press this button to move
cursor up, down, left, right to choose item
in menu, press the enter button to confirm
choice.
22. SLOW Button
In audio mode, press this button to slow
backward and slow forward.
23. ANGLE Button
In DVD mode, press this button to change
play angle.
24. SETUP Button
In audio mode, press this button to choose
different set items.
25. OSD Display
Press this button to display the title chapter
and the left time.
26. ZOOM Button
In DVD/VCD mode, press this button to
ZOOM in.
27. MENU Button
Press button to back to the main menu.
28. NAVI Button
Press the button to enter/exit the navigation
interface.
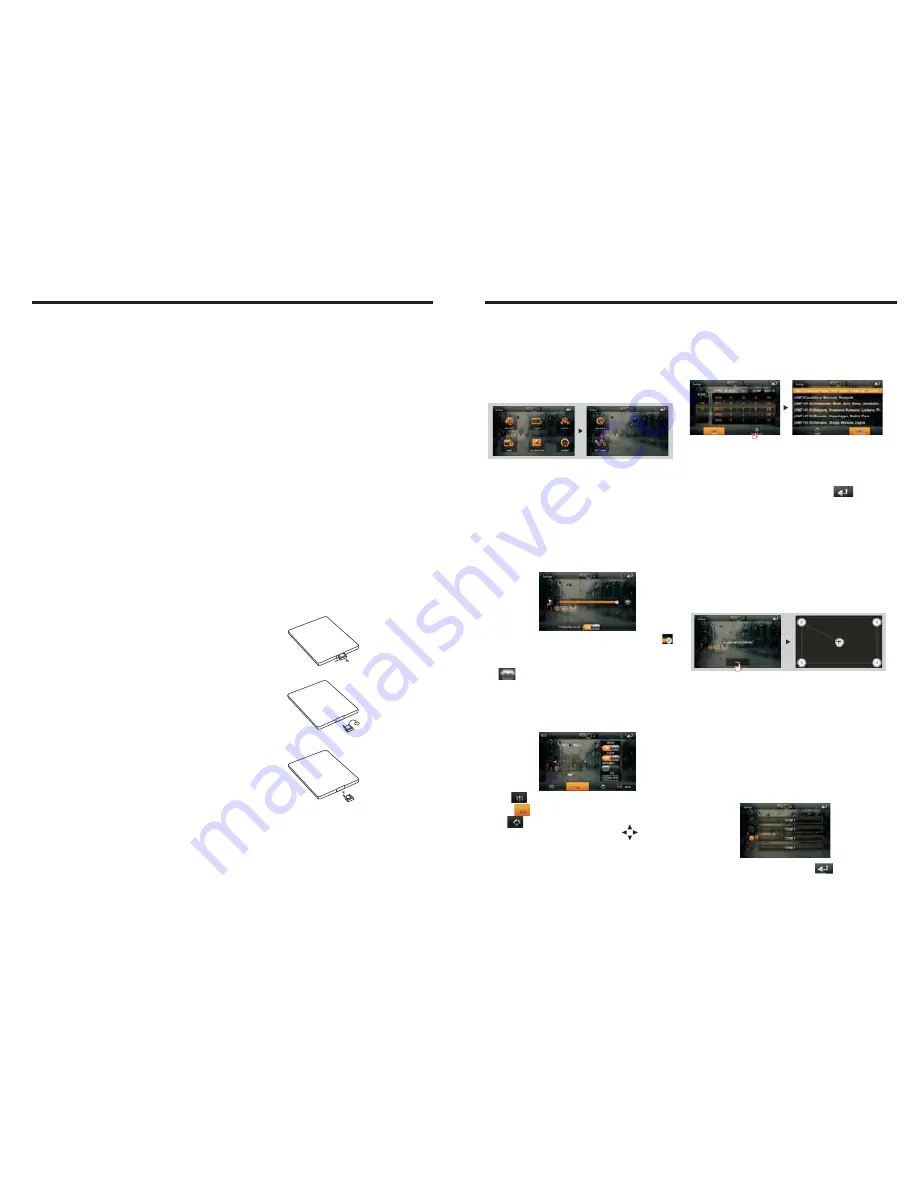
BATTERY CHANGE
When control distance of remote control
becomes shorter or no function, please
change battery. Please confirm polarity
before change.
One hand press stopper, then pull out
battery.
Put battery into controller.
Insert battery holder into controller.
Navigation setting
Navigation path has been set at the
factory, please do not enter the navigation
setup interface to change the path freely,
otherwise the procedure many lead to
abnormal navigation.
Audio setting
In the set interface click [AUDIO] icon,
into the Audio set interface.
Click into sound effect default interface.
Press into loudspeaker interface,
click to adjust the
channel of loudspeaker, touch to get
back to initial setting.
BEEP:
click that icon to switch on/off that.
LOUD:
click that icon to switch on/off that.
GPS. MIX:
click that icon to switch on/off that.
EQ:
click that icon to switch different mode.
Basic operation setup menu
Click on the main screen [Setup] icon,
enter the setting interface.
With a finger or touching pen to gently
sliding screen can be set about switching
interface.
Access setup interface
Video setting
In the set interface click [VIDEO] icon, into
the video set interface.
Brightness: Drag icon can adjust video
the screen brightness.
Forbid play on run: Driving ban and click
on play icon can open/close the
function.
Time setting
Click the Settings interface Time setting
icon, enter the Time settings screen,
12h/24h interchangeable, as shown below:
In the year, month, day, hour, sub-office
slide up and down to the relevant settings.
Zone is set to enter the time zone settings
interface when clicked.
Choose the time zone, click the icon
to save your settings and exit the time
setting interface.
SET COMM setting
In the set interface click [SET COMM] icon,
into the Serial port set interface.
Choose good then click the icon to
save your settings and exit the serial port
settings interface.
Touch calibration
If touch calibration error occurs, you can
adjust the touch coordinate by “Touch
calibration”. Click [CALIBRATION] icon on
setup interface, click OK to pop up a [Do
you want to calibration?] as shown below,
click OK to confirm to access touch
calibration interface:
Touching methods
Use touch pen to click the center of”+” icon,
and move along with center of “+” icon so
as to calibrate the screen, It shall
automatically save data and exit after
screen calibration. Please accurately click
all positions on screen, or the accuracy of
touch calibration shall be affected.


