


BASIC FUNCTION
03
1.
/OPEN Button
Press the button to open / close the screen.
Press this button for short moment to turn on power, and long press it to turn off power.
2.SEEK Knob /
In radio mode, press / rotate the knob to select station upward / backward.
Long press / rotate the knob to automatically scan station.
In playback mode, short press / rotate the knob to select song upward / backward,
long press / rotate it to achieve speed forward / backward function.
3.
Button
Press this button to release the panel.
4.MODE Button
When the unit is power on, Repeat press this button can switch to different function
mode as following picture.
Note: When the device without
connecting to USB
、
SD or DVD
no disc inside, the system will
automatically skip these related
working mode.
5.(VOL/SEL) Volume adjustment mode
Repeat pressing this button can select the VOL
、
BAS
、
TRE
、
BAL
、
FAD adjustment mode.
Then can rotate the button to adjust VOL
、
BAS
、
TRE
、
BAL
、
FAD as you like.
6.MUTE Button
Press this button to shut off sound output, repress this button to resume sound output;
Long press this button longer to turn on / off TFT LCD display.
7.Number Button 1 /
In radio mode, press this button to hear radio preset;
In disc playback mode, press this button for Play/Pause.
8. Number Button 2 / RPT (Repeat Playback)
In radio mode, press this button to hear radio preset;
In disc playback mode, press this button to repeat the current track indefinitely.
9. Number Button 3 / RDM (Random playback)
In radio mode, press this button to hear radio preset;
In disc playback mode, press this button to play frocks on the disc in random order.
10. Number Button 4 /
In radio mode, press this button to hear radio preset;
In disc playback mode, press this button for to stop playback.
11. Number Button 5 /
In playback mode, press the button to adjust the angle of screen.
RELEASE
BT
16
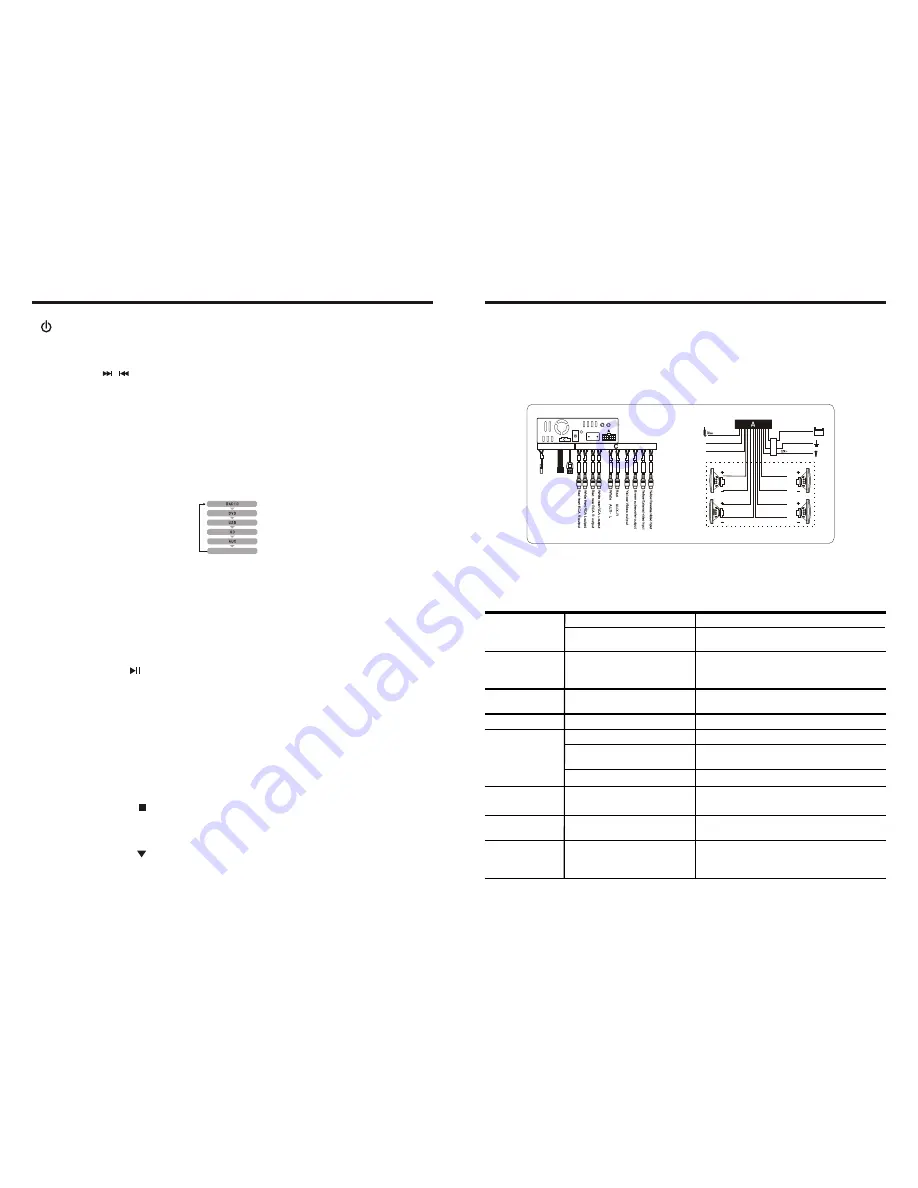
WIRING DIAGRAM
This player is equipped with ISO standard connector, please follow below instruction:
●
Yellow – 12 V Constant
●
Black – Ground wire
●
Blue - Power Antenna / Remote Amp Turn On
●
Violet/White-Reverse Gear Signal
●
Light Green-Parking Brake
●
White/White black - Left front speaker (+/-)
●
Purple/Purple black - Right rear speaker (+/-)
●
Green/Green black - Left rear speaker (+/-)
●
Red - ACC ON (+12V)
●
Grey/Grey black - Right front speaker (+/-)
TROUBLE SHOOTING
PROBLEM
CAUSE
SOLUTION
After ignition switch
off, setting
information all lose
Reset information and save
Change battery or fuse
Cannot power on
Change fuse same as the old one
Some factors cause MPU
wrong operation
Press RES button on the panel by penpoint,
then, power on
Poor performance
of radio station
Cannot load disk
There is a disk inside
Remove disc before inserting another one
Weak signal
Move the car to another place, then research
Cannot play disc
Disc is scratched
Change new disc
Put wrong side of disc into
the unit
Insert in the disk with sign side up
Clean lens by lens clean disc
Lens is dirty
Cannot switch
language/subtitle
There is only one language/
subtitle in disc
If disc is not with multi-language/subtitle, it
cannot switch language/subtitle
No image
Other factors cause MPU
wrong operation
Press RES button on the panel by penpoint,
then, power on
Cannot watch
image during
driving
It’s not allowed to watch image
during driving
Park the car in a safe place, put the car stall
in “ P ” postion, pull up the hand brake,
parking brake wire must be grounded
Check fuse
Right rear
PURPLE
GREEN
GREEN/BLACK
GREY/BLACK
Right front
Connect to ignition key switch
Connect to Power Antenna or
remote control for Amplifier
Yel l o w
Connect to battery or +12V of
Power Source that is always live
Ground -
Black
Connect to Ground terminal
Red
WHITE
WHITE/BLACK
Left front
GREY
Left rear
PURPLE/BLACK
FUSE
Orange
Black
Brown
L
ig
h
t g
re
y
Black
L
ig
h
t g
re
y
D
a
rk
g
re
y
D
a
rk
g
re
y
Black
S
W
C
w
ire
R
a
d
io
a
n
te
n
n
a
R
e
a
r
U
S
B
B
L
ig
h
t g
re
y
Rear View Camera OFF
Violet/White
Reverse
Gear Signal
Parking Brake
Light Green
Summary of Contents for P9759B
Page 1: ......


