background image

DC 12V IN

DC 12V OUT

REMOTE

DIGITAL

AUDIO

A/V OUT

L/R

VIDEO

DVD PLAYER

9

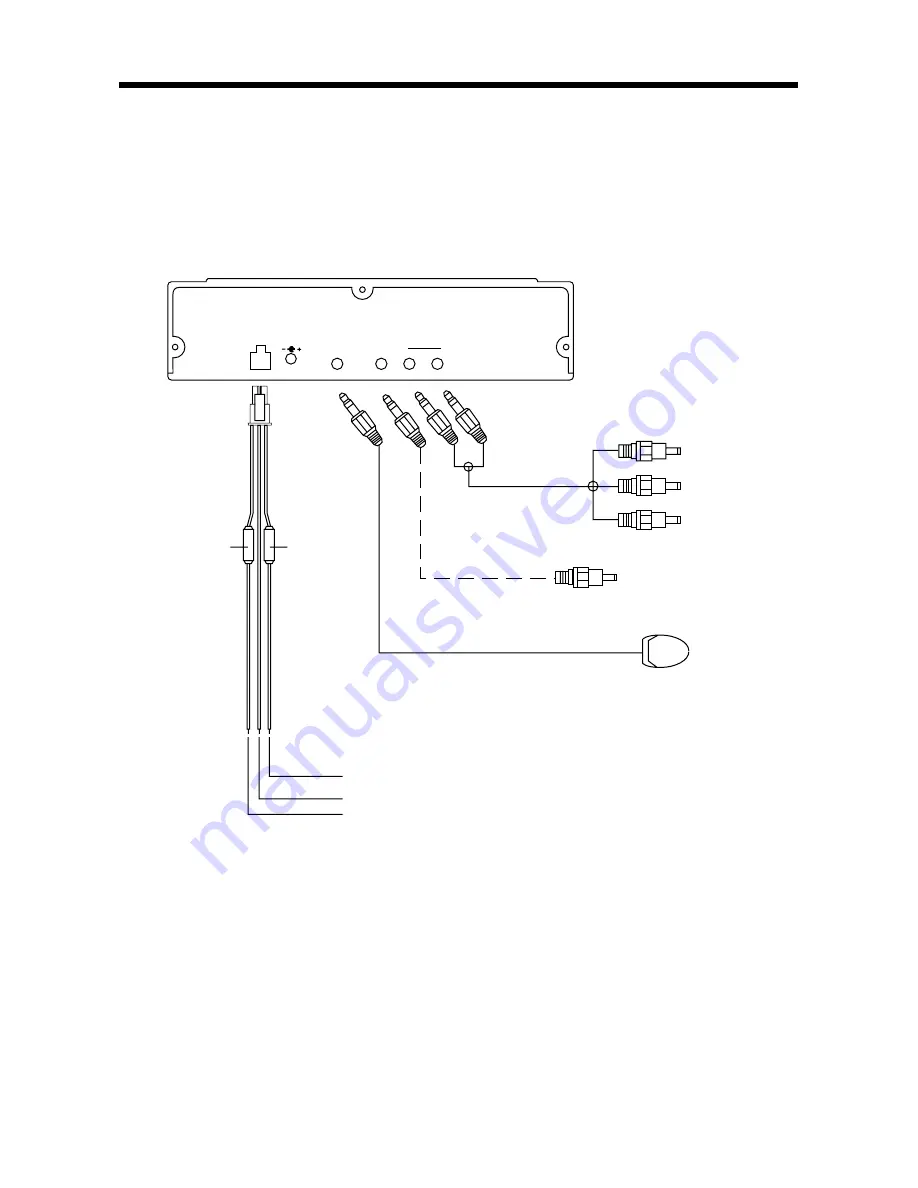
ELECTRIC CONNECTION

YELLOW

RED

WHITE

VIDEO OUT

AUDIO R OUT

AUDIO L OUT

DIGITAL AUDIO

(OPTIONAL)

REMOTE CONTROL RECEIVER

FUSE (3A)

FUSE (0.5A)

MEMORY/BATTERY (B+) (YELLOW)

GROUND (B-) (BLACK)

IGNITION SWITCH (ACC+) (RED)

METHOD B

According to the figure below, install the unit in the car and obtain DC 12V power
supply input.

Summary of Contents for P300DVD

Page 1: ......

Page 2: ...xcessive moisture This could cause electrical shorts fire or other damage When Parked Parking in direct sunlight can produce very high temperatures inside your vehicle Give the interior a chance to cool down before starting playback Use the Proper Power Supply This product is designed to operate with a 12 volt DC negative ground battery system the regular system in a North American car Protect the...

Page 3: ...sc 12 Loading a disc 12 Ejecting a disc 12 Operation 13 Basic Play 13 On Screen Display Function 14 Multi audio Language Function 15 Menu Function 15 Title Menu Function 15 Multi subtitle Language Function 15 Multi angle Function 15 MP3 Disc Play 16 Setup 17 Initial Setup 17 General Setup 17 Speaker Setup 19 Audio Setup 19 Preferences Setup 20 Defaults Table 22 Trouble Shooting 23 Specifications 2...

Page 4: ...R THAN THOSE SPECIFIED HERE MAY RESULT IN HAZARDOUS RADIATION EXPOSURE DO NOT OPEN COVERS AND DO NOT REPAIR YOURSELF REFER SERVICING TO QUALIFIED PERSONNEL WARNING TO REDUCE THE RISK OF FIRE OR ELECTRIC SHOCK DO NOT EXPOSE THIS EQUIPMENT TO RAIN OR MOISTURE TO REDUCE THE RISK OF FIRE OR ELECTRIC SHOCK AND ANNOYING INTERFERENCE USE ONLY THE RECOMMENDED ACCESSORIES THIS DEVICE IS INTENDED FOR CONTIN...

Page 5: ...player DVD 12 cm disc Single sided disc only Video CD 12 cm disc CD 12 cm disc MP3 12 cm disc Discs which cannot be played with this player DVD ROM DVD R DVD RAM CDV CD G Handling and Cleaning Dirt dust scratches and warping disc will cause misoperation Do not place stickers or make scratches on discs Do not warp discs A disc should always be kept in its case when not in use to prevent from damagi...

Page 6: ... BACK VIEW 1 POWER 2 EJECT 3 DISC SLOT 4 PLAY PAUSE 5 STOP 6 NEXT 7 PREVIOUS 8 IR 9 DC 12V IN Socket 10 DC 12V OUT Socket 11 REMOTE Socket 12 DIGITAL AUDIO 13 AUDIO OUTPUT L R 14 VIDEO OUTPUT 14 13 12 11 10 9 2 4 6 7 5 8 1 3 ...

Page 7: ... install the unit with screws M5x25 2 When installing the unit you can slide the screw M5x25 to left side or right side to meet your needed position In the figure above select two screw holes among the four screw holes that are marked 1 2 3 and 4 to secure the bracket SCREW M4x5 1 2 3 SCREW M5x25 SCREW M4x5 1 2 3 4 SCREWS LOCKED THE DVD MECHANISM ...

Page 8: ...UT L R VIDEO ELECTRIC CONNECTION YELLOW RED WHITE VIDEO OUT AUDIO R OUT AUDIO L OUT DIGITAL AUDIO OPTIONAL REMOTE CONTROL RECEIVER METHOD A Use the conversion cable to obtain DC 12V power supply input through the AC DC ADAPTER or the cigarette lighter according to the figure below DVD PLAYER ...

Page 9: ...CTION YELLOW RED WHITE VIDEO OUT AUDIO R OUT AUDIO L OUT DIGITAL AUDIO OPTIONAL REMOTE CONTROL RECEIVER FUSE 3A FUSE 0 5A MEMORY BATTERY B YELLOW GROUND B BLACK IGNITION SWITCH ACC RED METHOD B According to the figure below install the unit in the car and obtain DC 12V power supply input ...

Page 10: ...10 REMOTE CONTROL 6 1 3 7 11 4 8 10 5 9 12 13 14 16 15 17 20 18 19 24 21 28 22 32 23 25 29 27 26 31 30 2 ...

Page 11: ...ed with the numeric buttons or selected with the cursor buttons on TV screen 15 Changing for slow forward reverse playback motion 16 Press to play the disc 17 Press to start forward rapidly to reverse rapidly 18 Press to skip to the next track press to skip back one track 19 Press it to stop playback 20 Press it to pause playback 21 0 9 Numeric buttons 22 10 Digital selecting button cooperatively ...

Page 12: ... Using the Remote Control Face the remote control towards the front IR mark remote control signal reciver Operation angle About 30 degree in each the direction of the front of the IR mark 1 2 3 LOADING AND EJECTING A DISC Loading a Disc 1 Turn the ignition on the accessory position 2 Press the POWER button 1 3 Insert the disc with printed side facing up into the disc slot 2 4 The player starts pla...

Page 13: ...nd press MUTE again sound will resume 13 BASIC OPERATION Repeat FOR DVD Press the REPEAT button to select repeat mode as follow CHAPTER REPEAT ON TITLE REPEAT ON REPEAT OFF FOR VCD CD Press the REPEAT button to select repeat mode as follow REP ONE REP ALL REPEAT OFF 1 Continuously repeat at the current chapter track when selected REP ONE mode 2 Select REP ALL mode to continuously repeat all chapte...

Page 14: ...emote handset Turning the player on off Press the POWER button on front of panel or press POWER button on remote control to turn the player on or off On Screen Display Function Press the DISPLAY button during playback to display the contents of the current disc on the screen Example DVD 1 Press DISPLAY for the first time Title Number Total Title Number Chapter Number Total Chapter Number of this T...

Page 15: ...OTAL REMAIN 00 40 35 TRACK 01 TOTAL TRACK 14 4 Press DISPLAY for the fourth time 5 Press DISPLAY for the fifth time The message on the screen will be cleared MP3 When set to NO MENU in SMART NAV item 1 Press DISPLAY for the first time 2 Press DISPLAY for the second time 3 Press DISPLAY for the third time The message on the screen will be cleared Multi audio Language Function For DVD Press AUDIO du...

Page 16: ...le languages are recorded will be displayed on the top left corner of the screen Multi angle Function For DVD only Press ANGLE during playback Each time the button is pressed the angle changes in sequential order Notes The angle number is different according to the disc The function only works for discs having scenes recorded at different angles When no different angles are recorded will be displa...

Page 17: ...E ANGLE MARK OSD LANG CAPTIONS SCR SAVER MAIN PAGE NORMAL PS NORMAL LB WIDE INITIAL SETUP SETUP MENU MAIN PAGE 1 Press SETUP in the stop mode Press the stop button twice to ensure the player is under STOP mode 2 The initial SETUP menu is displayed 3 Select the preferred item by using the buttons 4 Press ENTER buttons a GENERAL SETUP This setup page includes all the items of TV display audio output...

Page 18: ...eferred OSD On Screen Display language by using the buttons GENERAL PAGE CAPTIONS setup When playing DVD disc activate the CAPTIONS feature by selecting ON and the captions such as the actor dialogue appears on the screen deactivate this feature by selecting OFF and the captions will not appear TV DISPLAY PIC MODE ANGLE MARK OSD LANG CAPTIONS SCR SAVER MAIN PAGE AUTO HI RES N FLICKER TV DISPLAY PI...

Page 19: ...AUDIO OUT OP MODE DYNAMIC LPCM OUTPUT MAIN PAGE ANALOG SPDIF RAW SPDIF PCM AUDIO OUT OP MODE DYNAMIC LPCM OUTPUT MAIN PAGE LINE OUT RF REMOD DOWNMIX MAIN PAGE LT RT STEREO AUDIO SETUP AUDIO SETUP AUDIO OUT Select ANALOG mode to activate analog audio output Select SPDIF RAW mode to activate raw digital audio output And the digital audio format depends on the disc record format Select SPDIF PCM mode...

Page 20: ...ng frequency is the better the output audio quality is It is recommended to select LPCM 96K PREFERENCES SETUP PREFERENCES PAGE TV type setup This player can play discs recorded in either PAL or NTSC format Select NTSC format when you connected to NTSC TV Select PAL format when you connected to PAL TV Select AUTO format the player TV output format will be according to the DVD disc format PREFERENCE...

Page 21: ...2 3 PG 4 PG 13 5 6 PG R 7 NC 17 8 ADULT NO_PARENTAL CHANGE TV TYPE AUDIO SUBTITLE DISC MENU PARENTAL PASSWORD DEFAULTS SMART NAV MAIN PAGE PREFERENCES PAGE SUBTITLE language setup Select the preferred SUBTITLE language by using the cursor buttons PREFERENCES PAGE DISC MENU language setup Select the preferred DISC MENU language by using the cursor buttons TV TYPE AUDIO SUBTITLE DISC MENU PARENTAL P...

Page 22: ... MENU PARENTAL PASSWORD DEFAULTS SMART NAV MAIN PAGE NO MENU WITH MENU TV TYPE AUDIO SUBTITLE DISC MENU PARENTAL PASSWORD DEFAULTS SMART NAV MAIN PAGE DEFAULTS TABLE PREFERENCES PAGE DEFAULTS Select RESET to revert to factory initial settings PREFERENCES PAGE SMART NAV If select WITH MENU mode when playing a MP3 disc the smart navigation menu will appear on the screen then the user can select a tr...

Page 23: ... format is not according to the TV set used PAL NTSC DISC DOES NOT PLAY Make sure the disc label is upwards Clean the disc Check if the disc is defective by trying another disc NO SOUND Check audio connections If using a HIFI amplifier try another sound source DISTORTED SOUND FROM HIFI AMPLIFIER Check to make sure that no audio connections are made to the amplifier phono input NO RETURN TO START U...

Page 24: ...n Corporation Reverse engineering or disassembly is prohibited Supply Voltage 12V DC 11V 15V test voltage 14 4V negative ground Current Consumption Less than 2A Signal System Compositive video 1 0Vp p 75Ω Discs Played 1 DVD VIDEO Disc 5 12 cm single sided single layer 5 12 cm single sided double layer 2 Compact Disc CD DA CD R CD RW MP3 3 5 12cm VIDEO CD Audio Output Level 10KΩ 2 ch 2 0 Vrms Audio...

Page 25: ......

Reviews: