background image

Mounting the WallNet for the LED Series, c50RP/c67RP, c50RX/c67RX and

37

4

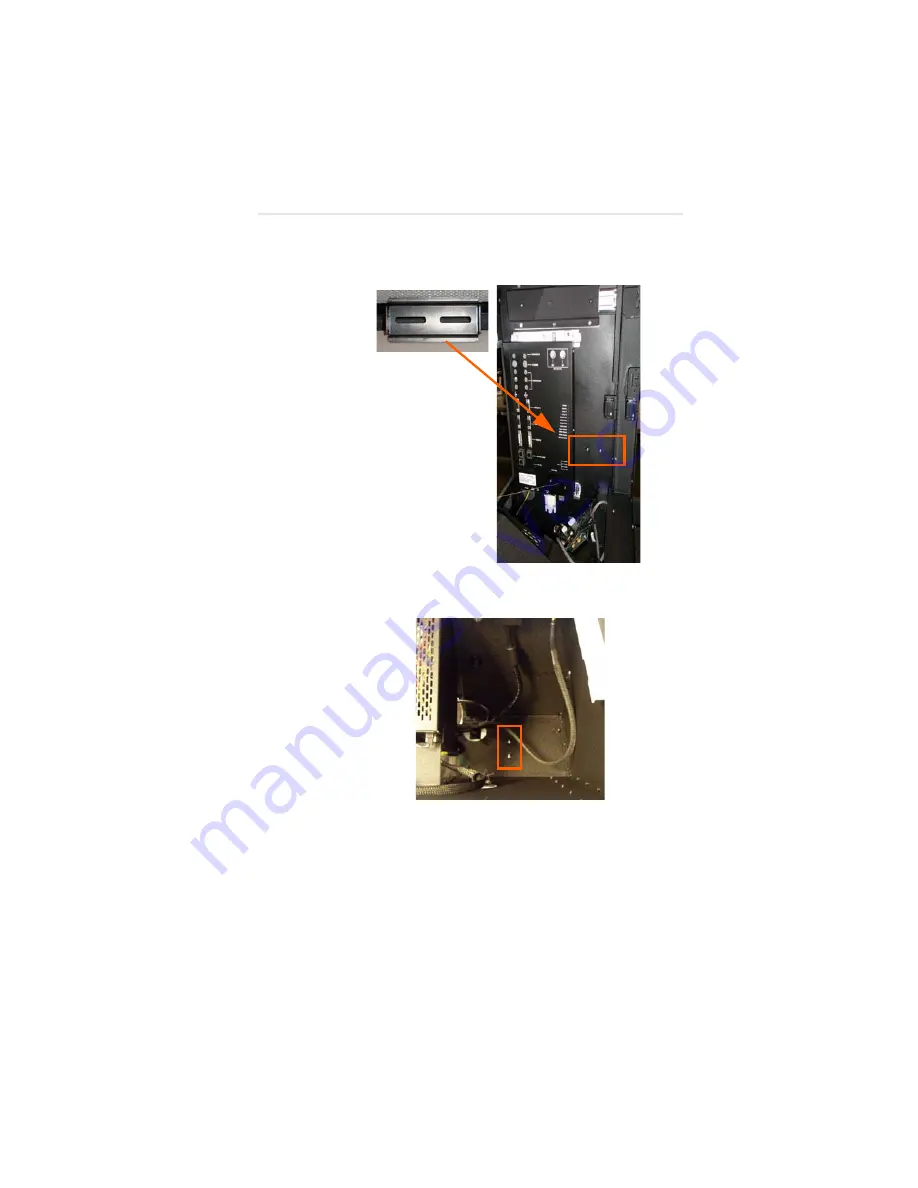
Remove the bracket from the WallNet 
accessory box and place it on top of the M4 
threads that are already in the chassis.

If you have a c70HD-LED, the M4 threads will 
be on the bottom of the chassis.

5

Remove the two nuts from the WallNet 
accessory box and use them to secure the 
bracket to the chassis.

Summary of Contents for Wallnet

Page 1: ...020 0567 05 19 Aug 2010 WallNet TM Setup Operation...

Page 2: ......

Page 3: ...Try it Locally First 5 What You Have in the WallNet Kit 6 What You Need to Know First 9 What You Will Do 9 Next Step 10 Connecting With DHCP 11 Using WallNet Assistant 12 Next Steps 14 Connecting With...

Page 4: ...30 Product ID Link 31 Advanced Settings 31 Saving the Configuration 31 Cable Connections to the WallNet Box 46 About the AUX RS232 Connector 47 Restrictions in Using the RS232 Inputs 48 Operating Wall...

Page 5: ...r Balance or Lamp Switch 64 Dual Lamp Status 64 Dual Lamp Control 64 Display Control 65 Power On Off 65 Schedule Automatic Power On Off 65 Power On Off Repeat and Delay Control 65 Network Remote Contr...

Page 6: ...al Reset to Factory Defaults 76 Default WallNet IP Address 77 Declaration of Conformity 79 Manufacturer s Declaration of Conformity 79 Electromagnetic Compatibility Directive 89 336 EEC and Amending D...

Page 7: ...and software that displays information about a wall of Planar displays via a web browser WallNet is used primarily for monitoring reporting and some control for example manually powering the displays...

Page 8: ...wall although you can use it to control displays at a distance What ACB Is Color balancing is a process that makes all the displays or cubes in a wall show the same color and brightness It compensate...

Page 9: ...can be done with each display type Software for Other Display Types WallNet is pre loaded with software for either all current rear projection products or Matrix and flat panel LCD products WallNet so...

Page 10: ...ngs such as network setup are preserved Therefore it is important during the first configuration to save the configuration before loading new software Software vs Firmware In this manual and on the Wa...

Page 11: ...a null modem adapter and a straight thru DB9 cable plus a PC with a free COM port that has a terminal program such as HyperTerm or Tera Term Pro Try it Locally First The best way to proceed is to set...

Page 12: ...f the items contained in the wall kit as they are packaged in the shipping box The contents of the box are also listed and individual parts shown as well CD with WallNet Assistant software and other f...

Page 13: ...ou Have in the WallNet Kit Power supply and power cord Power cable for displays with AUX power Plastic grommet This manual also on the CD as a PDF RS232 adapter DB9 female to RJ45 See next bullet for...

Page 14: ...What You Have in the WallNet Kit 8 Straight thru cable with RJ45 on both ends Mounting hardware DIN rail etc...

Page 15: ...ve DHCP or you do not want to use it you need to know the IP address to assign to the WallNet network mask DNS server and gateway If you are unsure what some of this information means contact your net...

Page 16: ...0 Next Step After you or your network administrator have decided whether to connect using DHCP or a static IP address turn to the appropriate section and begin DO NOT APPLY POWER to the WallNet device...

Page 17: ...ection and have a web browser displaying the WallNet home page you are ready to continue with the instructions See Configuring WallNet on page 19 DO NOT APPLY POWER to the WallNet device server yet 1...

Page 18: ...are program that finds WallNet hardware on a network 1 Install WallNet Assistant Installation is semi automatic when you insert the CD If it doesn t install automatically go to E Assistant Installer w...

Page 19: ...ith text such as WallNet at 10 10 0 102 date and time The date and time shown are from WallNet s own clock which you will set later At the top of the list is the product name and its version WallNet A...

Page 20: ...which opens your browser pointed at that WallNet 4 You should see the WallNet home page It will look something like this Next Steps You are now finished with connecting WallNet using DHCP See Configu...

Page 21: ...initial network connection to a WallNet that is in its factory default state After you have made this first connection and have a web browser displaying the WallNet home page you are ready to continue...

Page 22: ...address You won t need the mask or other information Keep the Command Prompt window open you will need it later Connecting to WallNet 1 DO NOT connect WallNet to the network 2 Apply power to WallNet w...

Page 23: ...over a correctly configured network 6 Do one of the following Using the WallNet Assistant program click the Route Add Cmd button to automatically run the route add command Type this on one line exactl...

Page 24: ...ee the WallNet home page that looks something like this Next Steps You are now finished with connecting WallNet using a static IP address To continue see Configuring WallNet on page 19 Host Name Menu...

Page 25: ...the time to read them 2 In the WallNet hostname box it now says WallNet Change this name to something more appropriate This will be the name for this particular WallNet device server The hostname is...

Page 26: ...page and click Confirm and apply new network settings to receive the Confirm Network Change page 8 Review the settings to make sure they are correct Click OK apply changes now to receive the Applying...

Page 27: ...ad the instructions in the Local Time Zone section Fill in the text box and click Set time zone Note The start and end of daylight saving time default to the first Sunday of April and the last Sunday...

Page 28: ...evel There are three security levels View Operator and Admin The following table shows the security levels that are needed to perform different functions Note Not every function is in all products Ope...

Page 29: ...Under the Web Access section set the passwords and confirm them Then click Set for each level To remove a password delete the contents of password and Confirm boxes and click Set 3 Under Network Acces...

Page 30: ...enu area select Network Setup 2 In the Email section enter the SMTP mail server name or address supplied by your network administrator WallNet uses the SMTP server to send email reports and alerts whi...

Page 31: ...f displays For example LED Series cXXRP RX SP and Margay II are combined into one WallNet software version while support for mXXL and Clarity Matrix is provided in a separate WallNet software version...

Page 32: ...r each display product Differences in WallNet Menus Several of the menus take on different appearances depending on the Planar display type For instance Margay does not support SiFi functions so there...

Page 33: ...g steps will work for most products except Clarity Matrix 1 Using the remote control press MENU to open the menu system on your display 2 Select ADVANCED OPTIONS and press ENTER 3 Select SERIAL PORT S...

Page 34: ...de the menu click Send Menu Key Note This is useful if you want to verify that all display IDs are set to a unique value and that the baud rate settings match 4 Under the Enter Display IDs section lis...

Page 35: ...the ID of the last display selected If your browser restricts cookies you may want to allow the WallNet cookie It s not particularly useful to do this until after the WallNet IP address is set Loading...

Page 36: ...90 seconds Miscellaneous Configuration The following sections refer to miscellaneous options that can be set up on the WallNet Software page Reset to Factory Default Use this to reset ALL settings to...

Page 37: ...d via IR remote checkbox When you are finished click Change Advanced Settings For products with SiFi WallNet uses Message In Picture MIP Banner 1 to display progress messages and to warn of impending...

Page 38: ...Saving the Configuration 32...

Page 39: ...w the control board 2 Connect cables to the WallNet device server a Connect the 9 pin adapter to device server b Connect the short network cable sup plied to the adapter c Connect the other end of the...

Page 40: ...twork cable from your network through this hole to the server 3 With the cables connected clip the device server onto the bracket a The server should be oriented so the adapter is toward the middle of...

Page 41: ...lNet for c50SP c67SP c70SPw Displays 35 To remove the server use a small screwdriver to pull release the latch 4 Go to Cable Connections to the WallNet Box on page 46 to continue Bottom of server show...

Page 42: ...the following For front access units remove the screen For rear access units loosen the screws on the back of the unit that hold the control board in place Swing the control board inside the chassis 3...

Page 43: ...acket from the WallNet accessory box and place it on top of the M4 threads that are already in the chassis If you have a c70HD LED the M4 threads will be on the bottom of the chassis 5 Remove the two...

Page 44: ...ap the back of the WallNet box on the bracket 7 On the back of the unit push out the hole plug near the air filter and replace it with the grommet provided with the WallNet kit This will be used to ro...

Page 45: ...one end of the power cable into the bottom of the WallNet box and the other end into the System Interface Board SIB 9 Plug the RS232 cable into the RS232 port on the WallNet box and route the other en...

Page 46: ...into the 10 100 base T port on the WallNet box and route the other end through the cable route to your control network To remove the server use a small screwdriver to pull release the latch 11 Go to...

Page 47: ...e the screen Loosen the screws that hold the control board in place and carefully lift it off of the tab holders on the bottom of the chassis For rear access units hold the tab on the control board an...

Page 48: ...d WARNING Always turn off power and remove the power cord when adding or removing an electronic part 4 Remove the bracket from the WallNet accessory box and place it on top of the M4 threads that are...

Page 49: ...e grommet provided with the WallNet kit This will be used to route the WallNet cables from inside this unit to the outside of the chassis 8 Remove the WallNet power cable from the accessory box Plug o...

Page 50: ...e RS232 port on the WallNet box and route the other end through the cable route to the AUX RS232 port on the outside of the chassis 10 Plug the Ethernet cable into the 10 100 base T port on the WallNe...

Page 51: ...ards the outside of the chassis and tighten the screws that secure the control board to the chassis Replace the screen For rear access units carefully place the tabs on the bottom of the control board...

Page 52: ...Cable Connections to the WallNet Box Cable connections should look like the following pictures Power connector To your network 9 pin adapter goes here Supplied cable goes from adapter to AUX RS232 IN...

Page 53: ...f the control board For RP RX this will connect to the SIB inside the chassis Do not connect it yet About the AUX RS232 Connector This connector is supplied on the control board of the SP RP RX and Ma...

Page 54: ...communication You cannot use the AUX RS232 connector on one display and the RS232 IN connector on another display Doing this can lead to confused communication and unpredictable results You cannot you...

Page 55: ...tallation Guide and maybe try the remote control Viewing a WallNet s Browser Page A quick easy way to connect to WallNet is to find it on the network with WallNet Assistant Starting this program avail...

Page 56: ...WallNet If you think some are missing add them in Display Control RS232 Setup 3 Click Get status for After a few moments the browser displays the report for that display 4 Look at the first few times...

Page 57: ...of the memories are used it can take several minutes to get it all If you do this with All you will have a long wait This selection only appears for display products that have the memory slot feature...

Page 58: ...ic ACB output and set an option to automatically email results after every color balance In addition this page allows the user to cancel a scheduled color balance or lamp switch within a five minute w...

Page 59: ...ker program and the MIP Guide from the Planar website for information about this feature In the Menu section click on an MIP type to write display or hide the message Reports and Alerts You need Opera...

Page 60: ...ent when any of the following events occur A lamp fails A fan fails A temperature exceeds a set threshold An interlock opens for supported displays with interlocks A display fails to respond for a set...

Page 61: ...full cycle of checking conditions on every display since those alerts include information for all the displays in the wall Only configured checked alerts are tested Alerts are sent only once for any c...

Page 62: ...One display has not responded for over the allotted time but it did respond at least once since the last WallNet reboot Two displays have not responded to the most recent ping s but their last respon...

Page 63: ...an Option Key coded for ACB in every cube in the wall that authorizes ACB operation ACB will not proceed if WallNet cannot confirm the ACB Option Key in every unit Some newer products don t require th...

Page 64: ...ave the current color balance view the last ACB result or recall the last saved color balance You can color balance to a specific color temperature Brightest Default or a Custom white point There are...

Page 65: ...oint is generally recommended This is because an optimal target white point is included in the display profile For lamp based systems the default setting is called Brightest because it balances to the...

Page 66: ...ch are useful for troubleshooting Scheduled Color Balance For the LED series ACB can be scheduled to run automatically every month two months three months four months or six months For lamp based syst...

Page 67: ...hange ACB Email Settings Before you exit this screen make sure to save the WallNet configuration to make any changes permanent CANCEL Pending Color Balance or Lamp Switch When there is a scheduled col...

Page 68: ...WallNet collects color and brightness data from each of the cubes as the test pattern changes from color to color 6 The sensors are retracted and the displays return to the source picture 7 WallNet c...

Page 69: ...al Lamp Control Note The information in this section only applies to lamp based products that have a dual lamp changer Dual Lamp control allows you to configure settings for automatic lamp switching a...

Page 70: ...r recovery from a failed lamp If a cube s dual lamp system recovers from a lamp failure by switching to the other lamp this option starts an Automatic Color Balance five minutes after the new lamp beg...

Page 71: ...on off Remember to use 24 hour time Two thirty in the afternoon is 1430 or 14 30 and not 230 or 2 30 Power On Off Repeat and Delay Control Sometimes when you send a Power On command to a large wall o...

Page 72: ...3 In ASCII Command s enter the ASCII commands to be sent when that button is clicked 4 If more than one command is required enter each command on a separate line in the box 5 Click Test button comman...

Page 73: ...be saved in the list Read the detailed instructions on the web page for more information or see Set Display IDs in the Displays on page 27 Asset Tag Asset Tag allows you to change text in the display...

Page 74: ...mory where it is permanently stored until you save it again 1 In the menu area select Save WallNet Config 2 Click Save configuration settings now This action copies everything in RAM to flash memory R...

Page 75: ...ce check the Enable ASCII command service checkbox on the Access Control page of the WallNet Admin section of WallNet s menus Be sure to save the WallNet configuration if you want to make this change...

Page 76: ...r which never starts a valid display ASCII command response This allows the client application to easily filter and ignore or process these information lines that come directly from the service See be...

Page 77: ...the connection Ctrl D is a traditional character used to signal that a client is finished using a telnet connection If the data received by WallNet on a TCP connection contains any non printable ASCI...

Page 78: ...DP r n The UDP method can have an advantage over TCP since there is no connection to maintain and multiple applications can interact with the wall instead of one application tying up the one TCP suppo...

Page 79: ...tings TCP 25 SMTP Client Send email reports alerts Opt 2 2 Recommended UDP 123 NTP Client Synchronize WallNet s system clock Opt 2 TCP 23 Telnet Server Manual WallNet maintenance Opt 3 4 3 Not recomme...

Page 80: ...Network Use Summary 74...

Page 81: ...00 8N1 no flow control 3 Remove power from WallNet 4 With the network cable still connected to WallNet apply power to WallNet Look for IP ADDR ____ MASK ____ in the serial program window There may be...

Page 82: ...rminal and open that serial port at 9600 8N1 no flow control 3 Remove power from the WallNet 4 Press and hold the recessed ADM button with a straightened paper clip or other small tool You will feel i...

Page 83: ...192 168 12 12 and this Mask 255 255 255 0 WallNet attempts to configure using DHCP for ten seconds If no DHCP server responds in ten seconds then the default static IP address above is configured You...

Page 84: ...Default WallNet IP Address 78...

Page 85: ...mpatibility Directive 89 336 EEC and Amending Directive 92 31 EEC EN55022 CISPR 22 Class A Radiated and Conducted Emissions from IT Equipment EN55024 Immunity Standard Including EN61000 4 2 Electrosta...

Page 86: ...quipment does cause harmful interference to radio or television reception which can be determined by turning the equipment off and on the user is encouraged to try to correct the interference by one o...

Page 87: ...Dual Lamp System or Switcher Products with DLS have a mechanical lamp changer that enables manual switching or automatic switching after a lamp failure DNS Domain Network Service Associates informatio...

Page 88: ...82 WallNet Assistant Software program that finds WallNet hardware on a network...

Reviews: