Installing the Display
Planar VM Series User Manual
020-1357-01D
Page | 22
8.6 Unpacking
Each Planar VM Series display ships in its own box. The number of display cartons will vary
depending on the video wall size. The LCD panel is extremely fragile due to its very thin bezel.
As a result,
it’s important that you unpack, handle and install each display with care. Powering
on the panel before mounting is recommended to evaluate for transit damage. Leave the display
in the box until you are ready to install to prevent damage from excess handling.
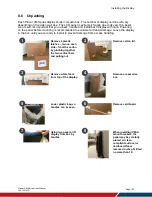
Remove 4 plastic
latches
– two on each
side
– from the carton
by pinching together
the two vertical bars
and pulling out.
Remove carton lid.
Remove white foam
from top of the display.
Remove accessories
box.
Lower plastic bag so
handles can be seen.
Remove cardboard.
Using two people, lift
display from box by
handles.
When installing VESA
mount brackets, the
panel may be carefully
placed on clean,
compliant surface (or
cardboard/foam
removed in step 6) tilted
no more than 10˚.
1
2
3
4
5
6
7
8
Summary of Contents for VM Series
Page 67: ...Specifications Planar VM Series User Manual 020 1357 01D Page 67 Dimensions VM49LX U ...
Page 68: ...Specifications Planar VM Series User Manual 020 1357 01D Page 68 VM49MX X ...
Page 69: ...Specifications Planar VM Series User Manual 020 1357 01D Page 69 VM55LX M and VM55MX M ...
Page 70: ...Specifications Planar VM Series User Manual 020 1357 01D Page 70 VM55LX U ...
Page 71: ...Specifications Planar VM Series User Manual 020 1357 01D Page 71 VM55LX X and VM55MX X ...

