background image

10

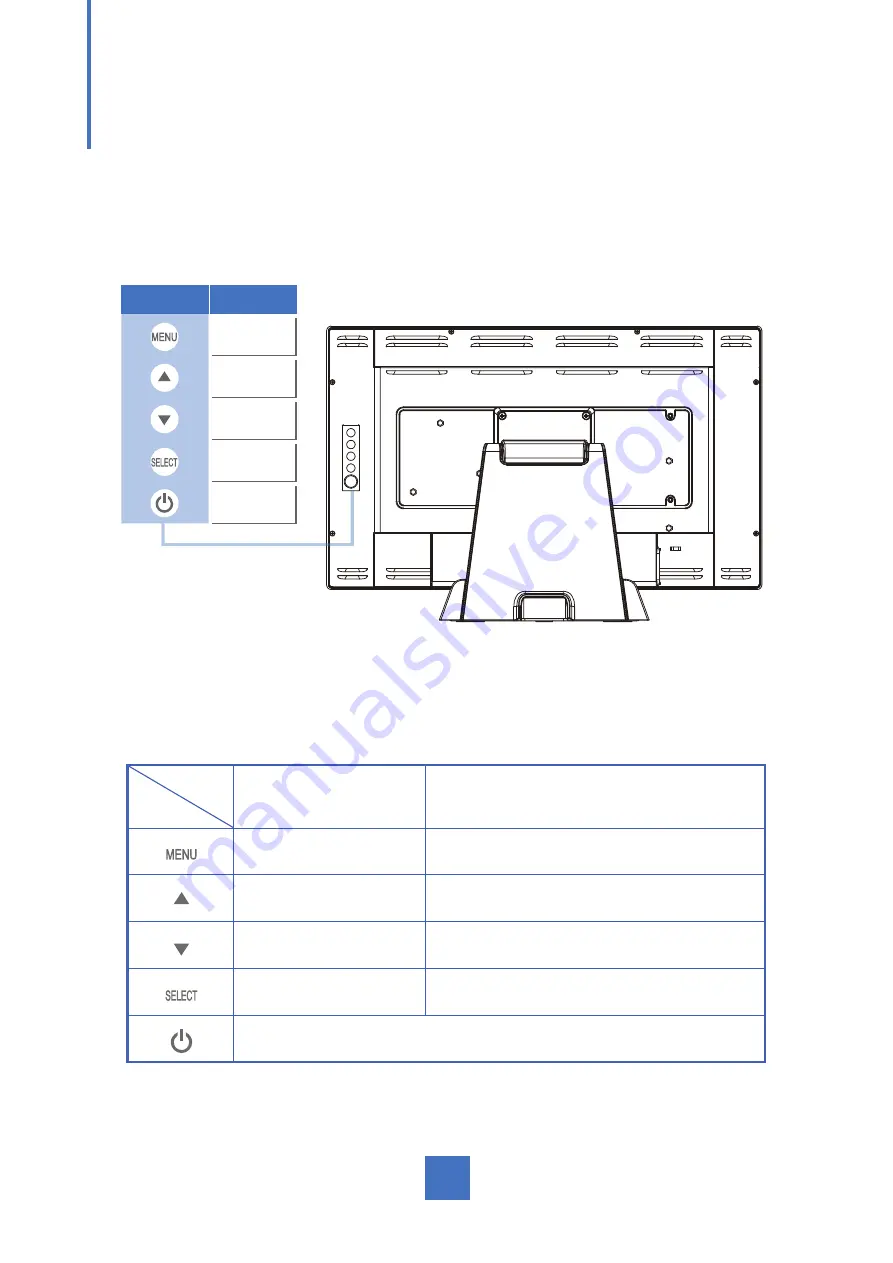
User Controls

Side Panel Controls

   OSD

   Key

Menu off status

Menu on status

Menu appear

Exit. Returns to previous menu or exits 
OSD.

Brightness 

Main item select up / Adjust up

Mute

Main item select down / Adjust down

Source

Select or Enter. Proceeds to next menu 

or confirms selection.

Power On / Off

Icon

Key Name

Menu

Up

Down

Select

Power

Summary of Contents for PT2245PW

Page 1: ...PT2245PW Touch Screen Monitor USER S GUIDE www planar com ...

Page 2: ...may be reproduced translated to another language or stored in a retrieval system or transmitted by any means electronic mechanical photocopying recording or otherwise without prior written permission Windows is a registered trademark of Microsoft Inc Other brand or product names are trademarks of their respective holders For more information on how to recycle your product please visit WWW PLANAR C...

Page 3: ... interference to radio or television reception resetting may correct it Moreover users are encouraged to reduce interference by doing one or more of the following Reorient or relocate the receiving antenna Move the LED LCD Monitor and the receiver further away from each other Connect the LED LCD Monitor into an outlet on a circuit different from that to which the receiver is connected Consult your...

Page 4: ...ption de signaux radios ou télévisées une possibilité est de réinitialiser le moniteur Les usagers sont aussi encouragés à corriger les interférences en appliquant une ou plusieurs des démarches suivantes Réorientez ou déplacez l antenne de réception Placez le moniteur et le récepteur plus loin l un de l autre Connectez le moniteur à une prise différente de celle à laquelle le récepteur est connec...

Page 5: ...Your Monitor 6 Start Your Installation 7 Connecting the Display Figure 9 1 8 Figure 9 1 9 User Controls Side Panel Controls 10 How to Use the OSD Menus 11 On Screen Display Menus 13 Appendix Troubleshooting 14 Warning Signal 15 No Signal 15 Going to Sleep 15 Out of Range 15 Product Dimensions 16 Compatibility Modes 18 Touch Screen Driver Installation 19 Calibration Instruction 20 Install Instructi...

Page 6: ...oft cloth moistened with mild detergent to clean the display housing Disconnect the power plug from AC outlet if the product is not going to be used for an extended period of time Don t Do not touch the LED display screen surface with sharp or hard objects Do not use abrasive cleaners waxes or solvents for your cleaning Do not operate the product under the following conditions Extremely hot cold o...

Page 7: ...é d un détergeant doux pour nettoyer le carter de l affichage Débranchez la fiche d alimentation de la prise de courant secteur si le produit ne doit pas être utilisé pendant une période prolongée A ne pas faire Ne touchez pas la surface de l écran LED avec des objets coupants ou durs N utilisez pas des produits de nettoyage abrasifs de la cire ou des solvants pour le nettoyage N utilisez pas le p...

Page 8: ... ratio 31 47 82 3 KHz horizontal scan 56 75 Hz high refresh rate 0 24795mm x 0 24795mm pixel pitch Auto adjustment function Multilingual OSD user control 100 mm VESA mount Removable base for flexible mounting solutions Touch screen with USB controller Built in audio 3Wx2 Touch Screen for PT2245PW Number of Touch Points 10 Projected Capacitive touch screen for finger input only Surface Glare treatm...

Page 9: ... Overview HDMI Cable LCD Display Power Cord VGA Signal Cable USB Cable A to B DC Power Supply Landing Strip User s Guide xxxxxxxxx xxxxxxxxx xxxxxxxxx USER S GUIDE www planar com Cable Cover Screw Audio in Cable ...

Page 10: ...Installation Product Overview Front View Bottom View Without Stand Warning RJ11 port connect to remote key only 5 DC JACK DP HDMI VGA AUDIO RJ11 USB ...

Page 11: ...e is located on the back of your monitor To mount the monitor on a UL certified swing arm or other mounting fixture follow the instructions included with the mounting fixture to be used Notice Please select the proper screws The distance between the back cover surface and the bottom of the screw hole is 8 mm Please use four M4 16 screws diameter with proper length to mount your monitor Please note...

Page 12: ...tion as seen in the step 1 diagram 3 Remove the cable cover as seen in the step 2 diagram 4 Connect the cables to the appropriate connectors as seen in the step 3 diagram 5 Re attach the cable cover Take the screw CBM M3x6 out of the accessory box and insert the screw into the cable cover and monitor as seen in the step 4 diagram 7 Step 2 Step 1 Step 2 Step 2 Step 4 AUDIO VGA USB HDMI ...

Page 13: ...to the audio out port of your computer 9 1 5 Connect the USB cable from the USB port of your display to the USB port 9 1 of your computer 6 Configure the touch screen Refer to the Touch Screen Driver Installation section on page 19 7 Once the touch screen is configured the monitor is ready for use Notice To ensure the display works well with your computer please configure the display mode of your ...

Page 14: ...9 Figure 9 1 Optional ...

Page 15: ...u on status Menu appear Exit Returns to previous menu or exits OSD Brightness Main item select up Adjust up Mute Main item select down Adjust down Source Select or Enter Proceeds to next menu or confirms selection Power On Off Icon Key Name Menu Up Down Select Power ...

Page 16: ... pre set time Lock Unlock OSD Power buttons 1 To Lock or Unlock the OSD Power buttons press Menu and Down at the same time This will activate an OSD window as follows 2 Choose to activate OSD or Power Key lock Choose Yes or No to lock or unlock Note When the OSD Key function is locked all the buttons except power button are now disabled When the Power Lock function is locked the power key is disab...

Page 17: ... window will pop up Please press the power button again 3 Press the power key one last time to turn off 4 If you do not press the power key in five seconds the OSD window will be gone and return to the normal status instead Source Select During On mode Pressing Select key for 3 seconds will pop up source select OSD During Sleep Mode Pressing Select key for 1 seconds will pop up source select OSD F...

Page 18: ...lection 9300K 6500K 5500K 7500K User Sharpness Adjust the screen sharpness OSD Timeout OSD auto disappear time selection OSD Positon Moving OSD menu position OSD H Positon Moving OSD menu horizontal position to left or right OSD V Positon Moving OSD menu vertical position to up or down Reset Factory default value restored OSD Language OSD menu language selection English French Deutsch Italian Span...

Page 19: ... the resolution of your computer to make it less than or equal to 1920 x 1080 Problem Image has vertical flickering line bars Use Horizontal size to make an adjustment Check and reconfigure the display mode of the vertical refresh rate of your graphic card to make it compatible with the display Problem Image is unstable and flickering Use Fine to make an adjustment Problem Image is scrolling Check...

Page 20: ...omputer graphics card Check all the power switches power cables and VGA DVI signal cable Going to Sleep The display is under the power saving mode In addition the display will enter power saving mode when experiencing a sudden signal disconnecting problem The monitor can be activated by pressing any keyboard triggering the mouse or touching the screen Out of Range This message means that the signa...

Page 21: ...Product Dimensions Side View Front View Top View 517 4 mm 313 3 mm 351 7 mm 249 6 mm 219 0 mm 212 0 mm 46 0 mm 16 ...

Page 22: ...Rotate 17 Side View Front View Top View 313 3 mm 517 4 mm 553 7 mm 212 0 mm 46 0 mm 219 0 mm 249 6 mm ...

Page 23: ...7 88 60 VESA SVGA 800X600 48 08 72 VESA SVGA 800X600 46 88 75 Apple Mac 832X624 49 72 75 VESA XGA 1024X768 48 36 60 VESA XGA 1024X768 56 48 70 VESA XGA 1024X768 60 02 75 VESA SXGA 1280X1024 64 00 60 VESA SXGA 1280X1024 80 00 75 VESA SXGA 1152X864 67 50 75 VESA SXGA 1280X960 60 00 60 WXGA 1440X900 56 00 60 WXGA 1440X900 70 60 75 WSXGA 1680X1050 65 20 60 WSXGA 1680X1050 VGA only 82 30 75 VESA WXGA 1...

Page 24: ...ndows HID Human Interface Device compatible if you use the USB touch screen interface No additional software driver is required for general operation of the touch screen A calibration tool can be installed for improved touch position accuracy See Optional Calibration Tool Install section for more information 2 For PT2245PW the system requires 15 seconds for Windows 7 8 to process the touch program...

Page 25: ... button Control Panel and then Hardware and Sound 2 Under Tablet PC Settings tap Calibrate the screen for pen or touch input 3 On the Display tab under Display options tap Calibrate and then Yes to allow the program to make changes 4 Follow the on screen instructions to calibrate the touch screen ...

Page 26: ...21 ...

Page 27: ...our EWF is disabled If your EWF is enabled please disable the EWF by using the EWF Manager command 4 Once the EWF is disabled click on the XP driver at www planar com support and follow the step by step instructions as shown on the pop up windows Custom 1 Power on the computer 2 Make sure that the USB cable is connected to the computer 3 Follow the step by step instructions found in the zipped fil...

Page 28: ...manuals touchscreen drivers warranty information and access to Planar s Technical Library for online trouble shooting To speak with Planar Customer Support please have you model and serial number available and dial Planar Support Tel 1 866 PLANAR1 866 752 6271 or 1 503 748 5799 outside the US Hours 24 hours a day 7 days a week Toll or long distance charges may apply European Product Database for E...

Page 29: ... USA Tel 1 866 PLANAR1 866 752 6271 or 1 503 748 5799 outside the United States Hours 24 hours a day 7 days a week 06 2021 Planar Systems Inc Planar is a registered trademark of Planar Systems Inc Other brands and names are the property of their respective owners Technical information in this document is subject to change without notice 8204221A0601 ...

Reviews: