background image

11


|

OPERATING INSTRUCTIONS

GENERAL INSTRUCTIONS

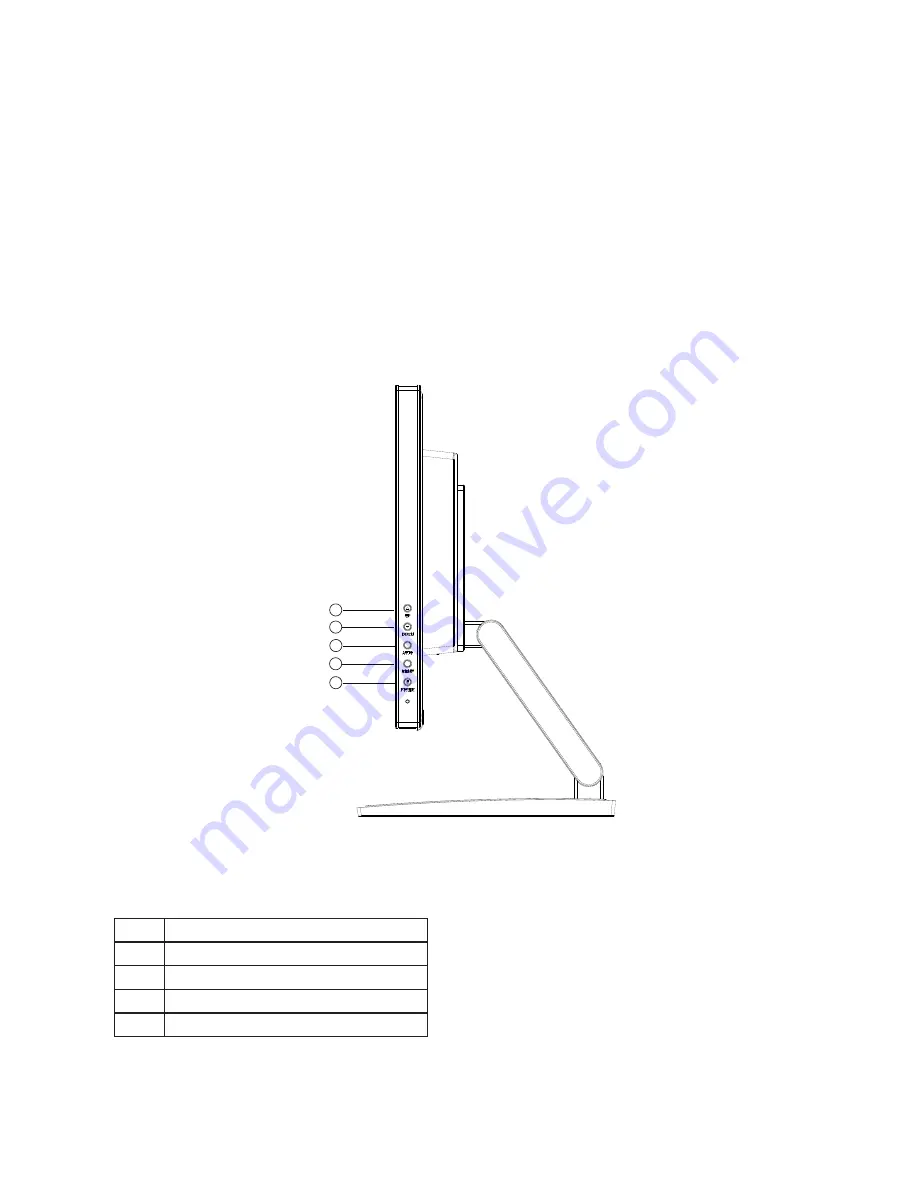
Press the power button to turn the monitor on or off. The other control buttons are located 
at front panel of the monitor (See Figure 4). By changing these settings, the picture can be 
adjusted to your personal preferences. 

 • The power cord should be connected. 
 • Connect the video cable from the monitor to the video card. 
 • Press the power button to turn on the monitor. The power indicator will light up. 

Figure 4      External  Control  Button 

1.

UP

2.

DOWN

3.

AUTO

4.

Menu

5.

Power button

1

2
3
4
5

Summary of Contents for PCT2265

Page 1: ...PCT2265 Touch LED LCD Monitor ...

Page 2: ...ights are reserved No part of this document may be reproduced translated to another language or stored in a retrieval system or transmitted by any means electronic mechanical photocopying recording or otherwise without prior written permission Windows is a registered trademark of Microsoft Inc Other brand or product names are trademarks of their respective holders ...

Page 3: ...IEWING ANGLE 10 OPERATING INSTRUCTIONS 11 GENERAL INSTRUCTIONS 11 FRONT PANEL CONTROL 12 HOW TO ADJUST A SETTING 13 ADJUSTING THE PICTURE 14 PLUG AND PLAY 16 TECHNICAL SUPPORT FAQ 18 TECHNICAL SUPPORT FAQ 19 ERROR MESSAGE POSSIBLE SOLUTION 19 APPENDIX 20 SPECIFICATIONS 20 FACTORY PRESET TIMING TABLE 21 CONNECTOR PIN ASSIGNMENT 22 WALL MOUNTING OPTIONAL 24 PLANAR SUPPORT 25 CALIBRATION RESET INSTRU...

Page 4: ...he equipment off and on the user is encouraged to try to correct the interference by one or more of the following measures 1 Reorient or relocate the receiving antenna 2 Increase the separation between the equipment and receiver 3 Connect the equipment into an outlet on a circuit different from that to which the receiver is connected 4 Consult the dealer or an experienced radio TV technician for h...

Page 5: ...erson and cause serious damage to the appliance Use only a cart or stand recommended by the manufacturer or sold with the monitor If you mount the monitor on a wall or shelf use a mounting kit approved by the manufacturer and follow the kit instructions Slots and openings in the back and bottom of the cabinet are provided for ventilation To ensure reliable operation of the monitor and to protect i...

Page 6: ...d short circuit parts causing a fire or electric shock Never spill liquids on the monitor Do not attempt to service the monitor by yourself opening or removing covers can expose you to dangerous voltages and other hazards Please refer all servicing to qualified service personnel To ensure satisfactory operation use the monitor only with UL listed computers which have appropriate configured recepta...

Page 7: ... pixel lit all of the time Due to the nature of the LCD screen an after image of the previous screen may remain after switching the image when the same image is displayed for hours In this case the screen is recovered slowly by changing the image or turning off the Power Switch for hours When the screen becomes black or flashing or cannot illuminate any more contact your dealer or service center t...

Page 8: ...7 PACKAGE LIST The product package should include the following items Monitor User s Guide Power Cable VGA Cable HDMI Cable Audio Cable USB Cable DVI Cable ...

Page 9: ...8 ADJUSTING THE HEIGHT The monitor s height may be adjusted from 4 8in to 15 2in 122mm to 385mm 122mm ...

Page 10: ...onnected to either a wall power outlet or the power outlet socket on your PC depending on the type of power cord supplied with your monitor SIGNAL CABLE Caution If the AC outlet is not grounded with three holes install the proper grounding adapter not supplied Figure 2 Connecting Cables 1 Power Cable 2 HDMI Cable 3 DVI Cable 4 D SUB Cable 5 Audio cable 6 USB Cable 2 downstream 7 USB Cable upstream...

Page 11: ...own preference Hold the stand so you do not topple the monitor when you change the monitor s angle You are able to adjust the monitor s angle from 5 to 90 Figure 3 NOTES Do not touch the screen when you change the angle It may cause damage or break the screen Careful attention is required not to catch your fingers or hands when you change the angle ...

Page 12: ...monitor See Figure 4 By changing these settings the picture can be adjusted to your personal preferences The power cord should be connected Connect the video cable from the monitor to the video card Press the power button to turn on the monitor The power indicator will light up Figure 4 External Control Button 1 UP 2 DOWN 3 AUTO 4 Menu 5 Power button 1 2 3 4 5 ...

Page 13: ...ns are locked except POWER button To lock the OSD press and hold the MENU button while the monitor is off and then Press power button to turn the monitor on To un lock the OSD press and hold the MENU button while the monitor is off and then press power button to turn the monitor on NOTES Do not install the monitor in a location near heat sources such as radiators or air ducts or in a place subject...

Page 14: ...ighted press the MENU button to activate it If the function selected has a sub menu press or again to navigate through the sub menu functions Once the desired function is highlighted press MENU button to activate it 3 Press or to change the settings of the selected function 4 If you want to adjust any other function repeat steps 2 3 Figure 5 The OSD Message ...

Page 15: ... 40 Contrast 50 Brightne ss Contrast Grayed Nonadjustable Game Brightness 60 Contrast 50 Brightness Contrast Grayed Nonadjustable Movie Brightness 80 Contrast 50 Brightness Contrast Grayed Nonadjustable Sports Brightness 100 Contrast 50 Brightness Contrast Grayed Nonadjustable DCR Dynamic contrast ratio Image Setup Clock Adjust picture Clock to reduce Vertical Line noise Phase Adjust Picture Phase...

Page 16: ...put signal Demo Demonstrates Color Boost Enhancements in the left half of screen Picture Boost Frame Size Adjust the Size of the Frame Contrast Contrast Adjustment for Enhance Area Brightness Brightness Adjustment for Enhance Area H Position Adjust the horizontal position of the Bright Frame V Position Adjust the vertical position of the Bright Frame Bright Frame Enhance Area function OSD Setup H ...

Page 17: ...ing a time out period will automatically switch to an OFF mode This reduces the monitor s internal power supply consumption After the video input signal is restored full power is restored and the display is automatically redrawn The appearance is similar to a Screen Saver feature except the display is completely off The display is restored by pressing a key on the keyboard or clicking the mouse US...

Page 18: ... interface No additional software driver is required Calibration is a simple process and can be invoked by running Tablet PC Settings from Control Panel and clicking the Calibrate button Click the Reset button to reset the touchscreen to the factory calibration settings To reset the existing calibration data click Reset in the Tablet PC Settings window CALIBRATION RESET INSTRUCTIONS ...

Page 19: ... computer Inspect monitor s video cable and make sure none of the pins are bent Make sure computer is operational by hitting the CAPS LOCK key on the keyboard while observing the CAPS LOCK LED The LED should either turn ON or OFF after hitting the CAPS LOCK key Missing one of the primary colors RED GREEN or BLUE Inspect the monitor s video cable and make sure that none of the pins are bent Screen ...

Page 20: ...the picture has horizontal disturbances in light picture For FOCUS and CLOCK adjustment use dot pattern or win 95 98 2000 ME XP Win 7 shut down mode pattern ERROR MESSAGE POSSIBLE SOLUTION NO SIGNAL 1 Check that the signal cable is properly connected if the connector is loose tighten the connector s screws 2 Check the signal cable s connection pins for damage INPUT NOT SUPPORT Your computer has be...

Page 21: ...ution 1920X1080 60Hz Plug Play VESA DDC2BTM Power Consumption ON Mode 28W TYP OFF Mode 0 5W Input Connector D Sub mini 15 pin HDMI DVI D Input Video Signal Analog 0 7Vp p Standard 75Ω Positive Digital HDMI Power Source 100 240VAC 50 60Hz Environmental Considerations Operating Temp 0 C to 40 C Storage Temp 25 C to 55 C Operating Humidity 10 to 85 Dimensions W x H X D 20 59 x 15 66 x 9 39 522mm x 39...

Page 22: ... 31 469 70 087 800 x 600 35 156 56 25 800 x 600 37 879 60 317 800 x 600 48 077 72 188 SVGA 800 x 600 46 875 75 Mac SVGA 832 x 624 49 726 74 551 1024 x 768 48 363 60 004 1024 x 768 56 476 70 069 1024 x 768 57 5 72 074 XGA 1024 x 768 60 023 75 029 1280 x 1024 67 981 60 02 SXGA 1280 x 1024 79 976 75 025 1440 x 900 55 935 59 887 WXGA 1440 x 900 70 635 74 984 WSXGA 1680 x1050 65 29 59 954 HDTV 1920 X10...

Page 23: ...11 15 15 Pin Color Display Signal Cable PIN NO DESCRIPTION PIN NO DESCRIPTION 1 Red 9 5V 2 Green 10 Detect Cable 3 Blue 11 Ground 4 Ground 12 DDC Serial Data 5 Ground 13 H Sync 6 R Ground 14 V Sync 7 G Ground 15 DDC Serial Clock 8 B Ground ...

Page 24: ... Data 2 11 TMDS Clock Shield 2 TMDS Data 2 Shield 12 TMDS Clock 3 TMDS Data 2 13 CEC 4 TMDS Data 1 14 N C 5 TMDS Data 1 Shield 15 DDC SCL 6 TMDS Data 1 16 DDC CLK 7 TMDS Data 0 17 DDC CEC Ground 8 TMDS Data 0 Shield 18 5V Power max 50mA 9 TMDS Data 0 19 Hot Plug Detect 10 TMDS Clock ...

Page 25: ... 12mm 4 Attach the mounting bracket from the VESA compatible wall mounting kit 100 mm x 100 mm distance 5 Attach the display to the wall following the instructions in the wall mounting kit NOTE For use only with wall mount bracket with minimum weight load 26 5lb 12kg 100 0mm Refer to the instructions that come with the base mounting kit To convert your display from a desk mounted to a wall mounted...

Page 26: ...at http www planar com support for operations manuals touch screen drivers warranty information and access to Planar s Technical Library for online troubleshooting To speak with Planar Customer Support please have you model and serial number available and dial Planar Support Tel 1 866 PLANAR1 866 752 6271 or 1 503 748 5799 outside the US Hours 24 hours a day 7 days a week Toll or long distance cha...

Page 27: ...PN 020 1236 00A ...

Reviews: