background image


42 


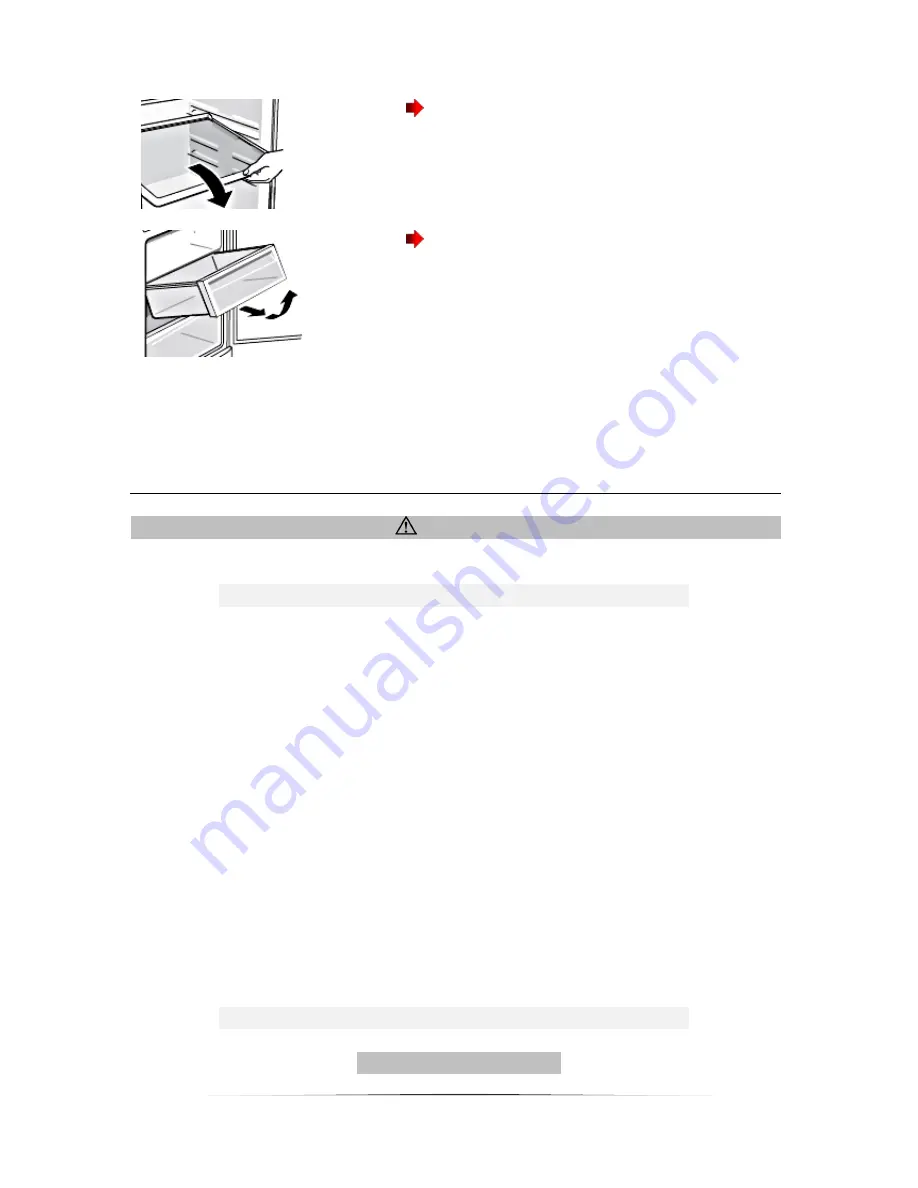
You can remove the 

freezer shelves

 easily. 

Pull  them  forwards,  lower  slightly  and 

remove to the side. 


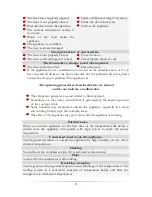
The  freezer  drawers  are  suitable  to  store 
fish, meat, poultry etc. Wrap the food with 

thin  foil.  The  food  should  be  as  dry  as 
possible before freezing. 


The  appliance  you  have  purchased  may  be  an  enhanced  version  of  the  unit  this 

manual was printed for. Nevertheless, the functions and operating conditions are 
identical. This manual is therefore still valid. 


7. THERMOSTAT AND OPERATION 


WARNING! 

You must unplug the appliance to disconnect it from the mains.


Before the first use


1.


Remove  all  transport  safety  devices  including  the  bottom  cushion,  foam 

protectors und and rubber belts inside the appliance. 

2.


Level the appliance with the adjustable feet and clean it inside and outside with 
a soft cloth. 

3.


The  transparent  film  protects  the  appliance  from  scratches.  Remove  the  film 

carefully before you operate the appliance. 

4.


Do not operate the appliance for 4-6 hours before you operate it for the first 
time to ensure its proper operation. 

5.


Check the technical data and the proper condition of  the energy supply and the 

power cord before you operate the appliance for the first time. 

6.


Let the appliance operate for 2-3 hours (normal temperature setting) before you 
store any food for the first time. If  operation was interrupted, wait 5 minutes 

before you restart the appliance. 


Operation and setting


Starting of the appliance 

Summary of Contents for SBS 571A+

Page 1: ...Bedienungsanleitung Instruction Manual Kühl Gefrierkombination Freezer Fridge SBS 571A www pkm online de ...

Page 2: ...r bleiben vorbehalten Bitte lesen Sie diese Bedienungsanleitung aufmerksam durch bevor Sie das Gerät aufbauen und benutzen EG Konformitätserklärung Die in dieser Bedienungsanleitung beschriebenen Produkte entsprechen sämtlichen harmonisierten Anforderungen Die relevanten Unterlagen können durch die zuständigen Behörden über den Produktverkäufer angefordert werden Titelblattabbildung Abbildung ähnl...

Page 3: ...en Sie das Gerät ausschließlich im Sinne seiner bestimmungsgemäßen Verwendung 6 Erlauben Sie niemandem der mit der Bedienungsanleitung nicht vertraut ist das Gerät zu benutzen 7 Verwahren Sie diese Bedienungsanleitung zur zukünftigen Nutzung an einem sicheren Ort 8 Falls Sie das Gerät weitergeben müssen Sie diese Bedienungsanleitung ebenfalls mit übergeben Lesen Sie bitte diese Bedienungsanleitung...

Page 4: ... STROMSCHLAGGEFAHR zeigt an dass bei Nichtbeachtung der betreffenden Anweisungen und oder Informationen die Gefahr eines Stromschlags besteht BRANDGEFAHR zeigt an dass bei Nichtbeachtung der betreffenden Anweisungen und oder Informationen ein Brandrisiko besteht 3 KLIMAKLASSEN HINWEIS Welcher Klimaklasse Ihr Gerät unterliegt entnehmen Sie dem Kapitel Technische Daten Die Angaben dort gewähren eine...

Page 5: ...ber sowie von Personen mit verringerten physischen sensorischen oder mentalen Fähigkeiten oder Mangel an Erfahrung und Wissen benutzt werden wenn sie beaufsichtigt oder bezüglich des sicheren Gebrauchs des Gerätes unterwiesen wurden und die daraus resultierenden Gefahren verstehen Kinder dürfen nicht mit dem Gerät spielen Reinigung und Benutzer Wartung dürfen nicht von Kindern ohne Beaufsichtigung...

Page 6: ...ernsthaften Verletzungen und Schäden führen Nehmen Sie stattdessen immer Verbindung zu Ihrem Kundendienst auf Benutzen Sie ausschließlich Original Ersatzteile 8 Benutzen Sie keine elektrischen Geräte im Inneren des Geräts es sei denn diese werden vom Hersteller Ihres Kühlgeräts empfohlenen 9 Stellen oder legen Sie keine Wärme abstrahlende elektrische Geräte auf Ihr Gerät 10 Stellen Sie keinen Wass...

Page 7: ... nicht die Ventilatoren im Gerät Abschließende Sicherheitsanweisungen 1 Dieses Gerät wurde ausschließlich zur Benutzung durch Erwachsene entwickelt 2 Die Belüftungsöffnungen des Geräts oder dessen Einbauvorrichtung falls Ihr Gerät für einen Einbau geeignet ist müssen immer frei und unbedeckt sein 3 An der Rückseite des Geräts befinden sich der Kondensator und der Kompressor Diese Bestandteile könn...

Page 8: ...tsicherungen zu entfernen 3 Bauen Sie das Gerät an einer geeigneten Stelle mit einem angemessenen Abstand zu extremen Hitze oder Kältequellen auf 4 Überprüfen Sie vor dem Anschluss des Geräts ob das Netzanschlusskabel oder das Gerät selbst keine Beschädigungen aufweisen 5 Wählen Sie für den Aufbau einen trockenen und gut belüfteten Raum 6 Schützen Sie das Gerät vor direkter Sonneneinstrahlung 7 St...

Page 9: ...9 Seiten min 10 cm Oben min 30 cm Hinten min 10 cm Abmessungen Gerät ...

Page 10: ... Falls Sie das Gerät bewegen ziehen Sie die Füße wieder gegen den Uhrzeigersinn fest so dass sie nicht den Boden berühren Anbringen des Türgriffs 1 Um den Griff anzubringen drücken Sie ihn in die dafür vorgesehenen Löcher in Richtung 1 2 Ziehen Sie den Griff danach vertikal in Richtung 2 3 Gehen Sie zum Entfernen des Griffs in umgekehrter Reihenfolge vor also ziehen Sie den Griff zuerst nach oben ...

Page 11: ... Sie nur eine entsprechende Sicherheitssteckdose um die Gefahr eines Stromschlags zu minimieren 4 Die technischen Daten Ihrer elektrischen Versorgung müssen den auf dem Typenschild angegebenen Werten entsprechen 5 Der Netzstecker muss nach dem Aufbau des Geräts jederzeit ungehindert zugänglich sein 6 BESCHREIBUNG DES GERÄTS Geräteabbildung Die Abbildung bezieht sich auf verschiedene Modelle Das Au...

Page 12: ... Ihre Lebensmittel frisch gehalten LED Display und Berührungstasten Touch Control Das Bedienfeld ausgestattet mit benutzerfreundlichen Berührungstasten zeigt die Temperaturen des Kühl bzw Gefrierbereichs sowie deren Funktionsstatus an Tür Alarm Der Tür Alarm ertönt wenn eine Gerätetür länger als 1 Minute geöffnet ist oder unbeabsichtigt nicht geschlossen wurde Kompressor Verdichtungseinheit Die Ko...

Page 13: ...enschaften sind abhängig vom Modell 1 Eier Butter Käse etc 2 Blechdosen Konserven Gewürze etc 3 Getränke Lebensmittel in Flaschen etc 4 Konserven haltbare Lebensmittel etc 5 Fleischwaren etc 6 Milch Tofu etc 7 Gekochte Lebensmittel Würste etc 8 Früchte Gemüse Salat etc Die Schubladen sind mit einer feuchtigkeitszuführenden Abdeckung versehen Geben Sie Früchte und Gemüse immer in die Schubladen dam...

Page 14: ...entnehmen Sie es seitwärts Die Gefrierbereich Schubladen sind hervorragen zur Einlagerung von Fleisch Fisch Geflügel etc geeignet Wickeln Sie die Lebensmittel in dünne Folie ein Die Lebensmittel sollten vor dem Einfrieren so trocken wie möglich sein Das von Ihnen gekaufte Gerät wurde möglicherweise inzwischen verbessert und weist somit vielleicht Unterschiede zur Bedienungsanleitung auf Dennoch si...

Page 15: ... 5 Minuten bevor Sie das Gerät erneut starten Betrieb und Einstellen der Funktionen Starten 1 Schließen Sie das Gerät an der Stromversorgung an 2 Wenn Sie das Gerät zum ersten Mal anschließen zeigt das LED Display die vom Hersteller voreingestellten Temperaturen an vom Hersteller empfohlene Kühltemperaturen Kühlbereich 50 C Gefrierbereich 180 C Einstellen des LED Anzeigemodus 1 Die LED Anzeige ver...

Page 16: ...hltemperatur von 150 C bis 230 C einstellen Die letzte Einstellung wird vom System gespeichert und angezeigt Temperatureinstellung Kühlbereich 1 Die Voreinstellung der Kühltemperatur des Kühlbereichs beträgt 50 C 2 Sie können mittels der KÜHLBEREICH Taste eine Kühltemperatur von 00 C bis 60 C einstellen Die letzte Einstellung wird vom System gespeichert und angezeigt ...

Page 17: ...erfür angemessen Nach 3 Stunden wird dieser Modus automatisch gestoppt Wenn Sie die Taste ein weiteres Mal betätigen wird der Modus ebenfalls gestoppt Sperren Entsperren Diese Taste sperrt verschieden Tasten Berühren Sie die Taste für 3 Sekunden leuchtet Bei aktivem Sperrmodus lässt sich keine andere Taste bedienen Drücken Sie die Taste erneut für 3 Sekunden um die Sperrfunktion aufzuheben Spezial...

Page 18: ...pps Energiesparen Bereits gekochtes Essen kann im Gerät frisch gehalten werden Lassen Sie es dazu vorher auf Zimmertemperatur abkühlen Verwenden Sie zum Verpacken farblose geruchslose luftundurchlässige und widerstandsfähige Materialien Nutzen Sie die Eiereinsätze die Türablagen sowie das Stellfach für Flaschen2 Hier lassen sich auch Dinge wie Butter Milch etc lagern Andere Lebensmittel wie Fleisc...

Page 19: ...nenfalls auf Zimmertemperatur abkühlen Eisablagerungen führen zu einem höheren Stromverbrauch Tauen sie Eisablagerungen ab wenn diese größer als 3 mm sind Legen Sie Gefriergut zum Auftauen in den Kühlbereich Ihres Geräts und nutzen Sie dadurch dessen Kälteabstrahlung 8 REINIGUNG UND PFLEGE WARNUNG Trennen Sie das Gerät vor allen Wartungs und Reinigungsarbeiten von der Stromversorgung Halten Sie Ih...

Page 20: ...ren des Geräts Türdichtungen Waschen Sie diese mit warmem Wasser und einem milden Reinigungsmittel ab Ablaufrinne Ablauföffnung Reinigen Sie die Ablaufrinne und Ablauföffnung regelmäßig ansonsten kann Wasser in das Gerät gelangen und oder aus dem Gerät herauslaufen Benutzen Sie keine Scheuermittel Benutzen Sie keine organischen Reinigungsmittel 5 Benutzen Sie keine ätherischen Öle Abtauen WARNUNG ...

Page 21: ...chern ab und sorgfältig trocken 8 Nach der Reinigung muss die Tür eine Zeitlang offen bleiben damit das Gerät durchlüftet Austausch des Leuchtmittels 1 WARNUNG Schalten Sie das Gerät vor dem Austausch ab und ziehen Sie den Netzstecker aus der Steckdose 2 Lösen Sie die Schraube 3 Drücken Sie die Abdeckung und ziehen Sie diese nach hinten ab 4 Ersetzen Sie das Leuchtmittel durch ein Neues der gleich...

Page 22: ...erät ausschließlich in einer aufrechten Position In jeder anderen Position kann der Kompressor beschädigt werden 3 Beschädigen Sie die Standfüße nicht Außerbetriebnahme endgültige 1 Ziehen Sie den Netzstecker aus der Steckdose 2 Schneiden Sie das Netzanschlusskabel am Gerät ab 3 Entfernen Sie alle Türen des Geräts 4 Lassen Sie alle Regale des Geräts an ihrem Platz damit Kinder nicht leicht in das ...

Page 23: ...r ist locker Die Steckdose wird nicht mit Strom versorgt Die entsprechende Sicherung ist ausgeschaltet Die Spannung ist zu niedrig Überprüfen Sie die fragliche Steckdose indem Sie ein anderes Gerät ebenda anschließen Überprüfen Sie die Haussicherung Vergleichen Sie die Angaben auf dem Typenschild mit den Angaben Ihres Stromanbieters Ineffiziente Kühlleistung Tür wurde zu häufig geöffnet Tür ist ni...

Page 24: ...ch ähnlich fließenden Wassers Gelegentlich sind Geräusche zu hören die durch den Einspritzvorgang in das Kühlsystem verursacht werden Es ist normal dass die Seitenwände des Geräts aufgrund des Betriebs des Kühlkreislaufs warm werden Ausgeprägte Geräuschbildung Bei Erstinbetriebnahme oder warmen Innentemperaturen Der Kompressor arbeitet mit hoher Leistung um schnell die Kühltemperatur zu erreichen ...

Page 25: ...iswürfelform 1 Abmessungen Gerät H B T in cm 175 10 92 00 68 10 Abmessungen Verpackung H B T in cm 184 50 98 00 75 00 Gewicht Netto Brutto in kg 94 00 106 00 Basierend auf Standartresultaten für 24 h Der tatsächliche Energieverbrauch hängt von der Art der Nutzung sowie dem Aufstellungsort des Geräts ab 12 ENTSORGUNG Bitte entsorgen Sie das Gerät unter Beachtung der jeweiligen Gesetzgebung hinsicht...

Page 26: ...t in die Reichweite von Kindern gelangen ERSTICKUNGSGEFAHR Das bedeutet dass diese Materialien bei einer fachgerechten Entsorgung wiederverwendet werden können wenn sie in einem entsprechend gekennzeichneten Sammelbehälter entsorgt werden Gerät Entsorgen Sie das Gerät keinesfalls mit dem gewöhnlichen Hausmüll Eine Mülltrennung ist hierbei notwendig damit die einzelnen Bestandteile des Geräts einer...

Page 27: ...n Kühlgerät nicht die Kühlrippen und Rohre Bei Austritt von Kältemittel besteht Brandgefahr Nähere Informationen erhalten Sie von Ihrem Fachhändler oder bei Ihren entsprechenden regionalen Entsorgungseinrichtungen 13 GARANTIEBEDINGUNGEN Garantiebedingungen für Elektro Großgeräte der PKM GmbH Co KG Neuer Wall 2 47441 Moers Dieses Gerät wurde nach den modernsten Methoden hergestellt und geprüft Der ...

Page 28: ...ellt wird ist PKM berechtigt ein ähnliches Gerät zu liefern Der Geräteaustausch erfolgt grundsätzlich in dem Geschäft in dem der erste Verbraucher das Gerät gekauft hat es sei denn dass dem Verbraucher der Transport aufgrund der Größe des Geräts dorthin nicht zuzumuten ist Die Garantie begründet keine Ansprüche auf Rücktritt vom Kaufvertrag oder Minderung Herabsetzung des Kaufpreises Ersetzte Teil...

Page 29: ...nd über die voraussichtlich entstehenden Kosten der Instandsetzung die Ausführung der Instandsetzung gewünscht wird hat der Garantienehmer die Kosten für die Ersatzteil und Arbeitslohnkosten zu tragen Der räumliche Geltungsbereich der Garantie erstreckt sich auf in Deutschland Österreich Belgien Luxemburg und in den Niederlanden gekaufte und verwendete Geräte August 2012 INDEX CHAPTER SUBJECT PAGE...

Page 30: ...ause you any problems Before your appliance was allowed to leave manufacturer s works it was carefully checked according to our safety and operating standards If your appliance is visibly damaged do not connect it to the power supply Contact the shop you purchased the appliance at 1 Read this manual before you operate the appliance for the first time 2 The appliance is intended for private use onl...

Page 31: ...al words this instruction manual contains DANGER indicates a hazardous situation which if ignored will result in death or serious injury WARNING indicates a hazardous situation which if ignored could result in death or serious injury CAUTION indicates a hazardous situation which if not avoided may result in minor or moderate injury NOTICE indicates possible damage to the appliance Pictograms RISK ...

Page 32: ...ions to the appliance work properly Or may they be time worn and do not match the efficiency of the appliance A check up of existing and newly made connections must be done by an authorized professional All connections and energy leading components also wires inside a wall must be checked by an authorized professional This appliance may be operated by children aged from 8 years and above as well a...

Page 33: ...s damaged it must be replaced by the manufacturer or its service agent or a similar qualified person in order to avoid any kind of hazard 7 Do not attempt to repair the appliance alone Repairs carried out by unauthorized persons can cause serious damage Always contact the nearest service centre and use original spare parts only 8 Do not use any electric appliances inside the food storage compartme...

Page 34: ...s only 2 The air vents of the appliance or its built in structure if the appliance is suitable for being built in must be completely open unblocked and free of any kind of dirt 3 The condenser and the compressor located at the rear of the appliance can reach high temperatures during ordinary operation Carry out the installation according to this manual An insufficient ventilation of the appliance ...
Page 35: ...h an adequate distance from sources of heat and cold 4 Check that the appliance and the power cord are not damaged 5 Install the appliance in a dry and well ventilated place 6 Protect the appliance from direct sunlight 7 Do not install the appliance in a place where it may come in contact with water rain otherwise the insulation of the electrical system will be damaged 8 The doors must open comple...
Page 36: ...shows the dimensions of the biggest appliance of this product line which may differ from your appliance For current dimensions look at chap Technical Data Dimensions periphery Sides min 10 cm Top min 30 cm Back min 10 cm Levelling ...

Page 37: ...e vertically down direction 2 3 Remove the handle in reverse order so lift the handle upwards first and then pull it off the door Electrical connection WARNING Do not connect the appliance to the mains unless you have removed the complete packaging 1 An electrical supply of 220 240V AC 50 Hz is required 2 Connect the appliance to a suitable and dedicated socket only 3 For your personal safety the ...

Page 38: ...ure fluctuation of the appliance so your food is kept fresh LED Display and Touch Control The touch control equipped control panel displays the temperatures of the cooling and freezer compartment as well as their functional status separately Door alert The alert is activated when a door is opened more than 1 minute or when it has been left open accidentally Compressor condensing unit The compresso...

Page 39: ...visible hinges These solid hinges underline the pleasant appearance of your appliance and grant easy access Removable door seals The door seals are removable for easy cleaning so the service time of the seals will be longer Appliance The figure below refers to different types so the actual design of your appliance may differ from the figure Please note the packing list included in delivery ...

Page 40: ...ent 1 Door tray I 6 Internal light 2 Door tray II 7 Glass shelves 3 Internal light 8 Flip shelf 4 Glass shelves 9 Drawers 5 Drawers 10 Flip door tray 11 Door tray Details cooling compartment 1 Eggs butter cheese etc 2 Tin cans canned food spices etc ...

Page 41: ...ey will be kept fresh there for a longer period of time You can remove the glass shelves easily Pull them forwards lower slightly and remove to the side You can store different kinds of food in the door trays To remove a door tray hold it with both hands lift the front part carefully and pull out the tray NOTICE Never let any food contact with the interior surfaces of the appliance Components of t...

Page 42: ...es including the bottom cushion foam protectors und and rubber belts inside the appliance 2 Level the appliance with the adjustable feet and clean it inside and outside with a soft cloth 3 The transparent film protects the appliance from scratches Remove the film carefully before you operate the appliance 4 Do not operate the appliance for 4 6 hours before you operate it for the first time to ensu...

Page 43: ...d and energy saving 2 The manufactures setting is the energy saving mode The displays of the temperatures go off after 30 seconds 3 To enter the standard mode touch the SUPER FREEZE button for 5 seconds now all LED displays are on LED display and light Touch both the FREEZER and SUPER FREEZE button for 5 seconds to illuminate the entire LED display so you can check the LED elements Temperature con...

Page 44: ...nt 1 Manufacturers setting is 50 C 2 You can set the temperature with the COOLER button from von 00 C to 60 C The last value is saved by the system and displayed Super freeze 1 Quick and solid freezing of food Vitamins nutrients appearance and taste are conserved 2 When you touch the SUPER FREEZE button lights and the appliance starts operating in super freeze mode ...

Page 45: ...t cooling of your food This mode affects the cooling compartment only The freezer compartment will still work in its adjusted parameters Special function door alert If a door is opened more than 1 minute or if it is not closed properly the open door alert acoustic is activated As soon as you have closed the door the alert is deactivated Operation parameters 1 The appliance can only reach the relev...

Page 46: ... increase and encrusted ice will be generated If you buy frozen food the packaging must not be damaged and the product must be properly stored sales container 180 C or lower How to defrost frozen food depends on your kitchen equipment and the purpose you want to use the frozen food for room temperature in the cooling compartment of your appliance in an electrical oven9 in a microwave10 Try opening...

Page 47: ...ergents Do not use any solvents These instructions are valid for all surfaces of your appliance External cleaning 1 Use a moist cloth and a mild non acidic detergent Use a suitable detergent for stubborn stains 2 Use clear water to rinse 3 Dry the cleaned surfaces with a cloth Internal cleaning 1 Clean the shelves and the inside with warm water and a mild detergent 2 Use clear water to rinse 3 Dry...

Page 48: ...hermostat to position 0 AUS OFF and disconnect it from the mains 4 When the encrusted ice melts put some dry cloths into the freezer compartment to hold the water back 5 Remove the big pieces of ice first 6 Afterwards remove the small pieces of ice 7 Wipe and dry the appliance and door seals with dry and soft cloths 8 After cleaning leave the door open for some time to ventilate the appliance Fina...

Page 49: ...cation holiday 14 21 days 1 Do the same as described above or 2 let the appliance operate a remove all perishable food from the cooling compartment b clean the cooling compartment c freeze all food which is suitable to be frozen If you want to move the appliance 1 Secure all removable parts and the contents of the appliance Pack them separately if necessary 2 Transport the appliance in an upright ...

Page 50: ...nce has been switched off for a while Too much or too hot food in the appliance Doors opened too often or too long The appliance needs some time to reach the preset temperature Remove any hot food Do not open the door too often too long Noise caused by vibrations Unsuitable place of installation Items on the appliance are vibrating The appliance contacts a wall or kitchen furniture Choose a suitab...

Page 51: ...t indicate a malfunction The refrigerant generates a sound similar to flowing water Sometimes you may hear a sound which is generated by the injection process of the cooling circuit Some humidity may accumulate outside the appliance especially in a moist surrounding Simply wipe this humidity away The sides of the appliance may get warm while the appliance is running Distinct noise When you run the...

Page 52: ...tat Compressor 1 Adjustable feet rollers 2 front 2 rollers back Defrost mode cooling freezing comp automatically automatically Control lights operation 2 LED display cooling freezer comp Interior lights LED Glass shelves 8 Crisper 2 Door trays egg trays 10 1 Drawers flaps freezing compartment 4 2 Ice cube trays 1 Dimensions appliance H W D in cm 175 10 92 00 68 10 Dimensions packaging H W D in cm ...

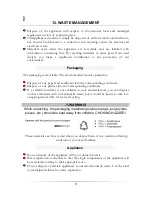
Page 53: ...responding containers Dispose of any plastics into the corresponding containers If a suitable container is not available in your residential area you can dispose of these materials with your domestic waste but it would be better to take it to an appropriate facility for waste recycling WARNING While unpacking the packaging materials polythene bags polystyrene pieces etc should be kept away from ch...

Page 54: ...nagement Old appliances are not unusable waste A lot of valuable resources can be gained by serious waste management Before you dispose of an old appliance render it inoperative 1 Always remove the plug from the socket Afterwards cut off the power cord directly at the appliance Dispose of the power cord with the plug immediately 2 Remove the door completely so that children are not able to get int...

Page 55: ...sales service in the Federal Republic of Germany This report has to be made immediately after the detection and within 24 months after the delivery to the first ultimate vendee The guarantee for our appliances is valid under the following conditions Defects of the appliance which are verifiably caused by material or fabrication deficiency will be rectified free of charge by our after sales When th...

Page 56: ...onal 3 the appliance is damaged by the vendor the installer or a third party 4 the installation or the start up is performed inappropriately 5 the maintenance is inadequately or incorrectly performed 6 the appliance is not used for its intended purpose 7 the appliance is damaged by force majeur or natural disasters including but with not being limited to fires or explosions The guarantee claims ne...

Page 57: ... finden alle Informationen zum Kundendienst auf der Einlage in dieser Bedienungsanleitung Aftersales service information on the leaflet inside this instruction manual Änderungen vorbehalten Stand Oktober 2013 ...

Page 58: ...58 Subject to alterations Updated October 2013 PKM GmbH Co KG Neuer Wall 2 47441 Moers ...

Reviews: