


30
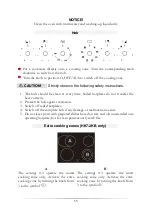
5.
Do not put any cookware or backing trays directly on the base inside the oven.
Do not cover the base inside the oven with aluminium foil.
6.
This appliance complies with the current European safety legislation. We do
wish to emphasize that this compliance does not negate the fact that the
surfaces of
the appliance will become hot
while operating and
will retain
and emit heat even if it has stopped operating.
The figures in this instruction manual may differ in some details from the
current design of your appliance.
Nevertheless follow the instructions in such a case.
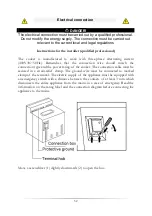
4. INSTALLATION
WARNING!
All electrical connections which may be damaged must be repaired by a
qualified professional.
All repairs should be performed by your
authorized after sales service.
Unpacking and positioning
1.
Unpack the appliance carefully. Dispose of the packaging as described in
chapter waste management.
2.
Completely remove the transport-protection. Be very careful and do not use any
aggressive or abrasive detergents to remove residuals of the transport-
protection.
3.
Check that the appliance and the power cord are not visible damaged.
4.
Do not install the appliance in a place where it may come in contact with water
or rain; otherwise the insulation of the electrical system will be damaged.
5.
Install the appliance on a
level, dry and solid floor
. Check the correct
installation with a bubble level.
6.
The nameplate is situated inside the appliance or at the back.
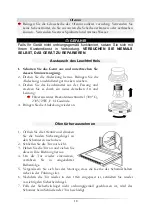
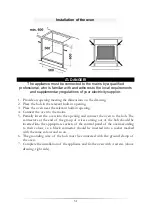
Installation of the hob
1.
Fix the supplied sealing tape on the corresponding place of the hob.
2.
Check the seal for perfect fit and overall cover. Insert the electric hob in the
opening and align it correctly.
3.
Using a standard screwdriver, tighten the tension clamps evenly starting at the
centre and moving diagonal, until the built-in rim is tight on the worktop.