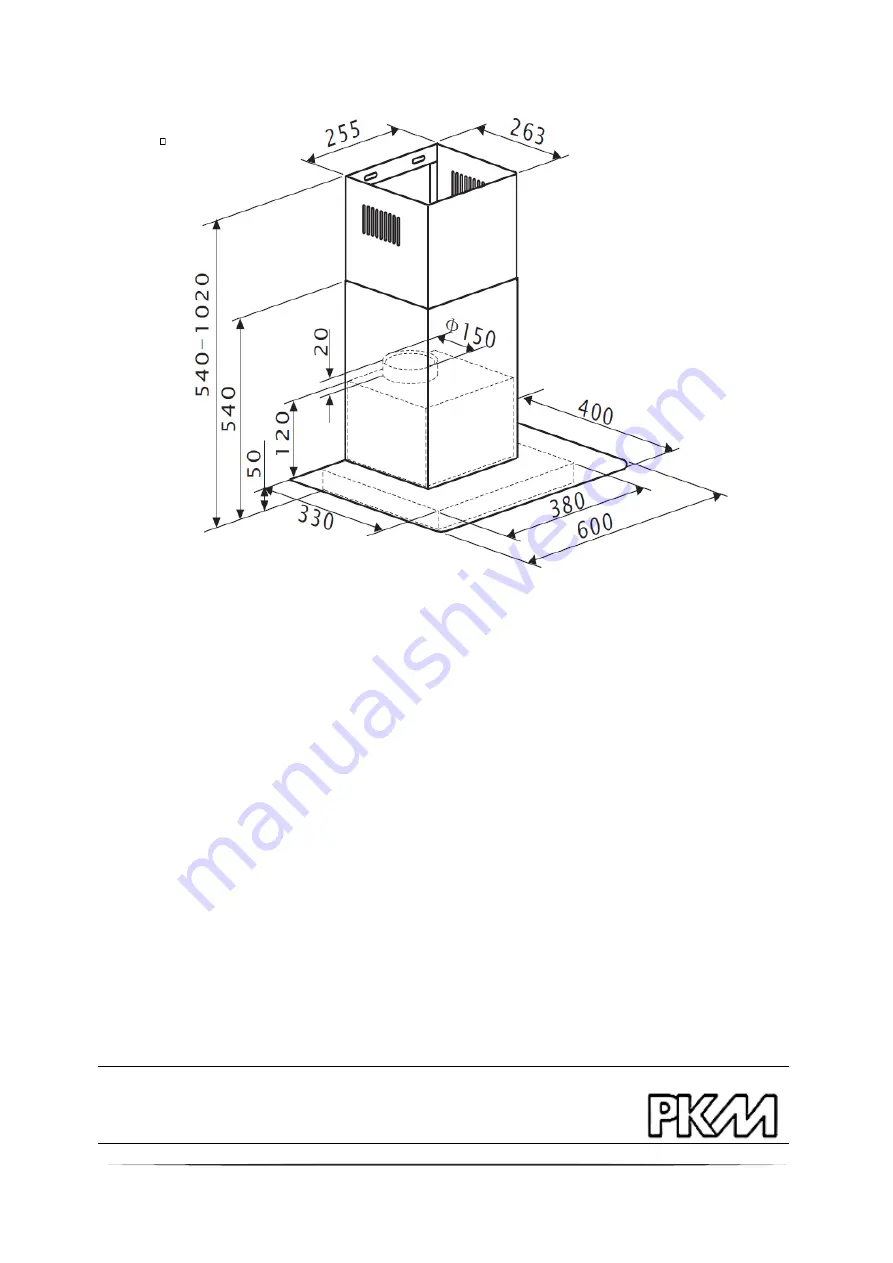
41
Abmessungen in mm.
Dimensions in mm.
TECHNOLOGIE FÜR DEN HAUSHALT
SERVICE INFORMATION
Page 1: ...TECHNOLOGIE F R DEN HAUSHALT TECHNOLOGY FOR DOMESTIC USE Bedienungsanleitung Instruction Manual Dunstabzugshaube Extractor Hood GS1 60CIXPH Deutsch Seite 2 English Page 22...
Page 2: ...des Ger ts 11 2 4 Kohlefilter 12 3 Bedienung 14 3 1 Bedienfeld 14 3 2 Ma nahmen zur Verringerung der Umweltauswirkungen beim Kochen 14 4 Reinigung Pflege 15 5 Problembehandlung 17 6 Technische Daten 1...
Page 3: ...n sie nicht abgewendet wird eine unmittelbare Gef hrdung f r Leben und Gesundheit zur Folge hat WARNUNG verweist auf eine Gefahrensituation die wenn sie nicht abgewendet wird eine m gliche bevorstehen...
Page 4: ...s Ger t alleine zu reparieren 4 Achten Sie vor dem Einschalten des Ger ts darauf dass kein offenes Kaminfeuer brennt Andernfalls k nnen giftige Verbrennungsgase aus dem Kamin oder Abzugsschacht der Fe...
Page 5: ...m Kohle l Holzfeuerung 85 cm 7 Bereiten Sie niemals flambierte Gerichte unter der Dunstabzugshaube zu Die offenen Flammen k nnen das Ger t zerst ren und einen Brand verursachen 8 Benutzen Sie die Bren...
Page 6: ...zwei Personen durch weil Sie ansonsten das Ger t besch digen oder der Person die an dem Ger t arbeitet Schaden zuf gen HINWEIS 1 Das Ger t muss von mindestens zwei Personen transportiert und angeschlo...
Page 7: ...uf den Radius zu erhalten wenn sie B gen verwenden oder formen da ansonsten die Leistung des Ger ts vermindert wird Die maximal zul ssige Biegung nach au en betr gt 1200 7 Verwenden Sie nur glatte Roh...
Page 8: ...elektrischen Leitungen in den W nden HINWEIS Sie ben tigen zwei weitere Personen zur Installation des Ger ts 1 Bestimmen Sie an der Wand eine geeignete Position f r die Haube Bohren Sie unter Zuhilfe...
Page 9: ...k nnen die Abluftf hrung wie folgt verlegen Verbinden Sie den Abluftschlauch mit dem Abluftauslass Vertikal Der Abluftschlauch wird zu einer Auslasskappe im Dach gef hrt Horizontal Der Abluftschlauch...
Page 10: ...en Sie die Kaminteile entsprechend der Abmessungen des Halteb gels aus 7 Befestigen Sie den Halteb gel an der entsprechenden Stelle an der Wand 8 Befestigen Sie den oberen Kamin mit 4 10 Schrauben am...
Page 11: ...Netzanschlussdose oder trennen Sie das Ger t mittels der Sicherung von der Stromversorgung entsprechende Sicherung im Haussicherungskasten 2 Entfernen Sie die Aluminium Metall Fettfilter sowie die Ko...
Page 12: ...irekt an der Wand angeschraubt ist l sen Sie vorsichtig alle Befestigungsschrauben und nehmen Sie dann das Ger t von der Wand ab 2 4 Kohlefilter WARNUNG Ziehen Sie vor der Montage den Netzanschlussste...
Page 13: ...Filter bis er einrastet Vorderseite R ckseite Haltevorrichtung am Kohlefilter 4 Befestigen Sie den die Fettfilter wieder HINWEIS Wechseln Sie die Kohlefilter je nach Benutzung der Haube alle drei bis...
Page 14: ...eleuchtungseinheiten nur wenn das Ger t in Betrieb ist Benutzen Sie die Beleuchtungseinheiten nicht zur Raumbeleuchtung VORSICHT Ber hren Sie die Beleuchtung f r 30 Minuten nach Betrieb des Ger ts nic...
Page 15: ...f die Hinweise des Herstellers der Kohlefilter 4 Reinigung Pflege WARNUNG Bei Nichtbeachtung der Reinigungsanweisungen besteht BRANDGEFAHR WARNUNG Trennen Sie das Ger t vor allen Wartungs und Reinigun...
Page 16: ...nigungsmittel Benutzen Sie keine Scheuermittel Benutzen Sie keine alkalischen Sp lmaschinenreiniger ph gr er 7 Filter nicht zusammen mit verschmutztem Geschirr in den Geschirsp ler stellen Von Essensr...
Page 17: ...en vom Hersteller dazu finden Sie auf der Verpackung der Filter 5 Problembehandlung FEHLER M GLICHE URSACHE MASSNAHMEN Ger t arbeitet berhaupt nicht Das Ger t ist mit dem Stromstecker nicht an der Ste...
Page 18: ...e 120 150 mm betragen siehe TECHNISCHE DATEN da ansonsten die Leistung des Motors beeintr chtigt werden kann falls Sie am Mauerkasten ein Fliegengitter angebracht haben kann dadurch der Luftstrom beei...
Page 19: ...BEP Pa Anschlusswert 70 W Leistungsaufnahme Lichtsystem WL 5 0 W Beleuchtungseffizienz LEhood 33 8 lux Watt Beleuchtungseffizienzklasse A Leistungsaufnahme im Bereitschaftszustand Ps 0 00 W Leistungsa...
Page 20: ...r die Bestimmung der Luftschallemission Besondere Anforderungen an Dunstabzugshauben EN 61591 Haushalts Dunstabzugshauben und andere Absauger f r Kochd nste Verfahren zur Messung der Gebrauchseigensc...
Page 21: ...ichen Beh rden 8 Garantiebedingungen f r Elektro Gro ger te der PKM GmbH Co KG Neuer Wall 2 47441 Moers Der Hersteller leistet dem Verbraucher f r die Dauer von 24 Monaten gerechnet vom Tag des Kaufes...
Page 22: ...atastrophen insbesondere aber nicht abschlie end bei Brand oder Explosion Garantieleistungen bewirken weder eine Verl ngerung der Garantiefrist noch setzen sie eine neue Garantiefrist in Lauf Der r um...
Page 23: ...the appliance shall remain reserved by the manufacturer Please dispose of the packing with respect to your current local and municipal regulations The appliance you have purchased may be an enhanced v...
Page 24: ...y The appliance is not intended to be operated for commercial purposes during camping and in public transport Operate the appliance in accordance with its intended use only Do not allow anybody who is...
Page 25: ...re The flames may damage your appliance and or cause fire 9 If you fry permanently keep an eye on the oil as it can catch fire The risk of auto ignition rises when using the oil many times 10 Do not c...
Page 26: ...eck that the power cord and the appliance are not damaged before electrical connection 2 Installation 2 1 General information 1 WARNING Do not lead the exhaust air into a chimney which is used for ext...
Page 27: ...ding on the model the hood is equipped with one top or two top back outlets 12 The idle outlet is covered by a plastic cap You can remove this cap by turning it anticlockwise Use the cap to cover the...
Page 28: ...en tighten the lower ones 4 You can lay the exhaust hose as follows Connect the exhaust hose to the air duct Vertically Lay the exhaust hose to a roof cap Horizontally Lay the exhaust hose to an exhau...
Page 29: ...on the appliance 6 Adjust the two chimneys relevant to the dimensions of the fixing bracket 7 Install the fixing bracket on the corresponding position on the wall 8 Fix the upper chimney using 4 10 sc...
Page 30: ...ug the appliance or disconnect it from the mains use the relevant fuse in your household fuse box 2 Remove the grease filter s Remove the carbon filter s if installed 3 Observe the following steps a d...
Page 31: ...f the appliance is bolted to the wall loosen the screws carefully to remove the hood 2 4 Carbon filter WARNING Unplug the appliance or disconnect it from the mains use the relevant fuse in your househ...
Page 32: ...ss carefully until the filter locks Front Back Brackets carbon filter 4 Install the grease filter s NOTICE Depending on frequency of use replace the carbon filters every three to six months Clean the...
Page 33: ...uring cooking Switch off the appliance after cooking or use the delayed switch off function equipment depends on model Switch off the illuminant s of the appliance after cooking The diameter of the po...
Page 34: ...lters or the carbon filters also clean all visible components on the bottom of the appliance with a mild non acrid and fat dissolving detergent 6 Do not damage the grid of metal made grease filters Th...
Page 35: ...ing its holder in anticlockwise direction 4 Turn out the illuminant and replace it by a new one of the same kind and power max power 1W 5 Turn in the holder in clockwise direction Required minimum dis...
Page 36: ...roperly fix hood properly Insufficient extracting capacity too much distance hood hob too much draught because of open doors and or windows lower position of hood close the doors windows Appliance is...
Page 37: ...EEIhood B Time extension factor f Fluid dynamical efficiency FDEhood 14 1 Fluid dynamical efficiency index D Grease separation 78 0 Grease separation index C Air flow at minimum speed standard operat...
Page 38: ...09 125 EC REGULATION NO 66 2014 EN 50564 Electrical and electronic household and office equipment Measurement of low power consumption EN 60704 2 13 Household and similar electrical appliances Test co...
Page 39: ...rd and the plug immediately 4 Dispose of any paper and cardboard into the corresponding containers 5 Dispose of any plastics into the corresponding containers 6 If suitable containers are not availabl...
Page 40: ...of the product 3 damage caused by handling errors or false operation 4 damage caused by aggressive environmental conditions chemicals detergents 5 damage caused by non professional installation and ha...
Page 41: ...41 Abmessungen in mm Dimensions in mm TECHNOLOGIE F R DEN HAUSHALT SERVICE INFORMATION...
Page 42: ...zum Kundendienst auf der Einlage in dieser Bedienungsanleitung Aftersales service information on the leaflet inside this instruction manual nderungen vorbehalten Subject to alterations Stand Updated 1...