background image

19 

1. Safety instructions

Read the 

safety instructions

 carefully before you operate the appliance for the 

first  time.  All  information  included  in  those  pages  serve  for  the protection of 

the operator. If you ignore the safety instructions, you will endanger your health 

and life. 

  DANGER!

  indicates  a  hazardous 

situation which, if ignored, will result in 

death or serious injury. 


WARNING!

 indicates a hazardous 

situation which, if ignored, could result 

in death or serious injury. 

  CAUTION!

  indicates  a  hazardous 

situation  which,  if  not  avoided,  may 

result in minor or moderate injury. 

NOTICE!

 indicates possible damage to 

the appliance. 

Store this manual in a safe place so you can use it whenever it is needed. Strictly 
observe the instructions to avoid damage to persons and property. 

Check the technical periphery of  the appliance! Do all wires and connections to 

the  appliance  work  properly?  Or  are  they  time-worn  and  do  not  match  the 

technical  requirements  of   the  appliance?  A  check-up  of   existing  and  newly-
made connections must be done by an authorized professional. All connections 

and energy-leading components (incl. wires inside a wall) must be checked by a 

qualified  professional.  All  modifications  to  the  electrical  mains  to  enable  the 

installation of  the appliance must be performed by a qualified professional. 
The appliance is intended for private use only. 

The  appliance  is  intended  for  extracting/recirculating  cooking  vapours  in  a 

private household only. 

The appliance is intended for indoor-use only. 
The appliance is not intended to be operated for commercial purposes, during 

camping and in public transport. 

Operate the appliance in accordance with its intended use only. 

Do  not  allow  anybody  who  is  not  familiar  with  this  instruction  manual  to 
operate the appliance. 


DANGER 

1. Do  not  operate  the  appliance  when  it  does  not  work  properly,  is  visibly

damaged, has dropped down or the power cord/plug are damaged.

2. The power cord must be replaced by a qualified professional only.

3. Never repair the appliance yourself.

4. Do  not  operate  any  room-air  dependent  fireplaces  while  operating  the

appliance; otherwise harmful gases will get from the fireplace into your home.

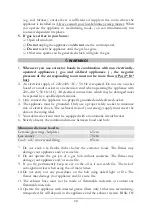
Whenever the hood is operated together with chimney-vented fireplaces

Summary of Contents for 8090GZ

Page 1: ...TECHNOLOGIE FÜR DEN HAUSHALT TECHNOLOGY FOR DOMESTIC USE Bedienungsanleitung Instruction Manual Dunstabzugshaube Extractor Hood 8090GZ Deutsch Seite 2 English Page 18 www pkm online de ...

Page 2: ... von dem tatsächlichen Design Ihres Geräts abweichen Folgen Sie in einem solchen Fall dennoch den beschriebenen Sachverhalten Der Hersteller behält sich das Recht vor solche Änderungen vorzunehmen die keinen Einfluss auf die Funktionsweise des Geräts haben Entsorgen Sie das Verpackungsmaterial entsprechend den örtlichen Vorschriften Ihres Wohnorts Das von Ihnen gekaufte Gerät wurde möglicherweise ...

Page 3: ...rf jederzeit griffbereit ist Befolgen Sie sorgfältig alle Hinweise um Unfälle oder eine Beschädigung des Geräts zu vermeiden Prüfen Sie auf jeden Fall auch das technische Umfeld des Geräts Sind alle Kabel oder Leitungen die zu ihrem Gerät führen in Ordnung Oder sind sie veraltet und halten der Geräteleistung nicht mehr Stand Daher muss durch eine qualifizierte Fachkraft Elektrotechniker in eine Üb...

Page 4: ...ommen sollte Öffnen Sie alle Fenster zur Belüftung Ziehen Sie nicht den Stecker aus der Steckdose und benutzen Sie nicht das Bedienfeld bzw die Schalter Berühren Sie nicht das Gerät bis sämtliches Gas abgezogen ist Bei Missachtung dieser Anweisungen können Funken entstehen die das Gas entflammen WARNUNG 1 Wenn Sie die Abzugshaube zusammen mit anderen nicht durch elektrische Energie versorgten Gerä...

Page 5: ... keine brennbaren Materialien enthalten 12 Das Gerät darf ausschließlich mit eingesetzten Fettfiltern betrieben werden da sich ansonsten durch den Dunst transportiertes Fett in der Haube und im Abluftsystem ablagert BRANDGEFAHR Reinigen oder ersetzen Sie die Filter regelmäßig 13 Trennen Sie das Gerät vor allen Wartungs und Reinigungsarbeiten von der Stromversorgung 14 Achten Sie beim Entpacken unb...

Page 6: ...ts ob das Netzkabel oder das Gerät selbst keine Beschädigungen aufweisen 2 Installation 1 WARNUNG Die Abluft darf nicht in einen Schornstein geleitet werden der für Abgase von Geräten die mit Gas oder anderen Brennstoffen betrieben werden genutzt wird 2 Beachten Sie bei der Ableitung der Umluft immer alle geltenden gesetzlichen und behördlichen Bestimmungen 3 Der Durchmesser des Abluftschlauchs mu...

Page 7: ...Abluftleitung neben der Isolierung gegebenenfalls auch mit einer Kondenswassersperre aus 11 Je nach Modell kann Ihre Abzugshaube mit einer oben oder zwei oben und hinten Abzugsöffnungen ausgestattet sein 12 Die nicht benötigte Öffnung ist mit einem Kunststoffdeckel versehen der durch Drehen gegen den Uhrzeigersinn entfernt und auf die nicht benötigte Öffnung gesetzt werden kann Installationsschrit...

Page 8: ...elieferten Schrauben und Dübeln an der Wand fest 1 Bohrlöcher 2 Dübel 3 Wandbefestigung 4 Schrauben 4 30 mm 2 Hängen Sie die Haube auf die Wandbefestigung 3 Setzen Sie den oberen Kamin in den unteren Kamin ein Ziehen Sie den oberen Kamin nach oben aus Richten Sie den Kamin entsprechend seiner gewünschten Höhe aus ...

Page 9: ...dargestellt 1 Oberer Kamin 2 Unterer Kamin 5 Verwenden Sie zwei 4 8 mm Schrauben um die Kaminteile zu verbinden Ziehen Sie die Schrauben zu fest damit der obere Kamin nach Montage ausziehbar bleibt 3 Unterer Kamin 4 Oberer Kamin 5 Untere Kaminklammer 6 Fixieren Sie den oberen Kamin mit der oberen Kaminklammer an der Wand ...

Page 10: ...en Sie den Kohlefilter unter www pkm online de 3 Bedienfeld An Aus Geschwindigkeit erhöhen Geschwindigkeit vermindern Licht Display 1 für langsam 2 für mittel 3 für schnell Automatische Schnelleinstellung Drücken Sie für eine Sekunde und Das Display blinkt und der 5 Minuten Countdown beginnt Nach 5 Minuten werden der Motor und das Licht automatisch abgeschaltet ein akustisches Signal ertönt für ei...

Page 11: ...äuse mit einem weichen Tuch und einem geeigneten Reinigungsmittel 2 Reinigen Sie das Bedienfeld die Bedienelemente niemals mit einem Reinigungsmittel Verwenden Sie statt dessen ein leicht feuchtes Tuch da ansonsten Wasser in das Bedienfeld eindringt und die Elektronik beschädigt 3 Verwenden Sie bei mattschwarz lackierten Geräten niemals alkoholhaltige Reinigungsmittel weil diese Verfärbungen verur...

Page 12: ...icht unter die Garantie Lassen Sie den Filter gründlich trocknen bevor Sie ihn wieder vorsichtig einsetzen Austausch des Leuchtmittels Berühren Sie das neue Leuchtmittel nicht mit bloßen Händen Der Fingerschweiß reduziert dir Haltbarkeit des Leuchtmittels Verwenden Sie ein dünnes Tuch oder dünne Stoffhandschuhe 1 WARNUNG Trennen Sie das Gerät von der Stromversorgung 2 Trennen Sie die Licht Verdrah...

Page 13: ...CHE MASSNAHMEN Gerät arbeitet überhaupt nicht Das Gerät ist mit dem Stromstecker nicht an der Steckdose angeschlossen Der Stromstecker ist locker Die Steckdose wird nicht mit Strom versorgt Die entsprechende Sicherung ist ausgeschaltet Überprüfen Sie die fragliche Steckdose indem Sie ein anderes Gerät ebenda anschließen Überprüfen Sie die Sicherung Die Stromspannung ist zu niedrig Vergleichen Sie ...

Page 14: ...n kann falls Sie am Mauerkasten ein Fliegengitter angebracht haben kann dadurch der Luftstrom beeinträchtigt werden Entfernen Sie zum Überprüfen das Gitter falls an der Abdeckplatte des Mauerkasten feste und sehr schräg stehende Lamellen sind kann dadurch der Luftstrom beeinträchtigt werden Entfernen Sie zum Überprüfen die Abdeckplatte Bringen Sie eine Abdeckplatte mit beweglichen Lamellen an die ...

Page 15: ...emission 63 dB 68 dB Leistungsaufnahme ausgeschaltet Po Leistungsaufnahme Bereitschaft Ps Leistungsaufnahme Lichtsystem Wl Anschlusswert 0 44 W 3 W 2 1 5 W LED 168 W Stromspannung Frequenz AC 220 240V 50Hz Fettfilter Material spülmaschinenfest 3 Aluminium Kohlefilter CF 110 Abluftschlauch Befestigungsmaterial Bedienungsanleitung Teleskopkamin ausziehbar von bis Abmessungen Gerät H B T in cm Gewich...

Page 16: ...d danach das Stromanschlusskabel am Gerät abschneiden und direkt mit dem Netzstecker entfernen und entsorgen 4 Entsorgen Sie Papier und Kartonagen in den dafür vorgesehenen Behältern 5 Entsorgen Sie Kunststoffe in den dafür vorgesehenen Behältern 6 Falls es in Ihrem Wohnumfeld keine geeigneten Entsorgungsbehälter gibt bringen Sie diese Materialien zu einer geeigneten kommunalen Sammelstelle 7 Nähe...

Page 17: ...Beschaffenheit die auf den Gebrauchswert des Produkts keinen Einfluss haben 3 Schäden infolge Betriebs und Bedienungsfehler 4 Schäden durch aggressive Umgebungseinflüsse Chemikalien Reinigungsmittel 5 Schäden am Produkt die durch nicht fachgerechte Installation oder Transport verursacht wurden 6 Schäden infolge nicht haushaltsüblicher Nutzung 7 Schäden die außerhalb des Geräts durch ein PKM Produk...

Page 18: ...h are described in this instruction manual comply with the harmonized regulations The relevant documents can be requested from the final retailer by the competent authorities The figures in this instruction manual may differ in some details from the current design of your appliance Nevertheless follow the instructions in such a case Any modifications which do not influence the functions of the app...

Page 19: ...st be done by an authorized professional All connections and energy leading components incl wires inside a wall must be checked by a qualified professional All modifications to the electrical mains to enable the installation of the appliance must be performed by a qualified professional The appliance is intended for private use only The appliance is intended for extracting recirculating cooking va...

Page 20: ...operly grounded and dedicated socket 4 The appliance must be grounded Only use a proper safety socket to minimize risk of electric shock The technical data of your energy supply must meet the data on the rating label 5 Your domestic circuit must be equipped with an automatic circuit breaker 6 Strictly observe the minimum distance between hood and hob Minimum distance hood to Ceramic glass rings ho...

Page 21: ...en so they will not play with the appliance CAUTION 1 Accessible parts of the hood may become hot while cooking 2 Carry out the installation of the appliance with at least two persons Risk of damage RISK OF INJURY NOTICE 1 The appliance must be transported and installed by at least two persons 2 Unpack the parts of the chimney very carefully otherwise you will damage the chimney 3 Remove the compl...

Page 22: ...st duct is connected horizontally a minimum falling gradient of 1 cm m or an inclination of 20 is required Otherwise condensate will get into the motor of the hood 9 When an exhaust duct is used the ending of the exhaust hose must be adjusted into the direction of flow 10 If the exhaust duct passes through cool areas e g an attic a temperature gradient may occur in the different parts of the exhau...

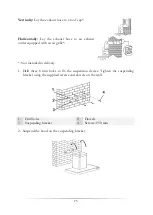
Page 23: ...outlet equipped with an air grille Not included in delivery 1 Drill three 8 mm holes to fix the suspension device Tighten the suspending bracket using the supplied screws and dowels on the wall 1 Drill holes 2 Dowels 3 Suspending bracket 4 Screws 4 30 mm 2 Suspend the hood on the suspending bracket ...

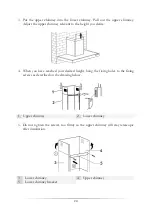
Page 24: ...ght you desire 4 When you have reached your desired height hang the fixing holes to the fixing screws as described on the drawing below 1 Upper chimney 2 Lower chimney 5 Do not tighten the screws too firmly so the upper chimney will stay telescopic after installation 3 Lower chimney 4 Upper chimney 5 Lower chimney bracket ...

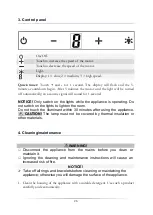
Page 25: ...tion of the hood from front and side perspective Otherwise the appliance will not work properly Carbon filter Unplug the appliance before installing the carbon filter For recirculating mode only 1 open 2 close You can order the carbon filter at www pkm online de 3 If the socket is covered by the chimney you must plug in the appliance at an earlier point in time ...

Page 26: ...t switch on the lights to lighten the room Do not touch the illuminant within 30 minutes after using the appliance CAUTION The lamp must not be covered by thermal insulation or other materials 4 Cleaning maintenance WARNING Disconnect the appliance from the mains before you clean or maintain it Ignoring the cleaning and maintenance instructions will cause an increased risk of fire NOTICE Take off ...

Page 27: ...t cleaning as well as the use of aggressive detergents 7 Such changes do not influence the capacity of the appliance and are no reason for complaint 8 Do not use a steam cleaner RISK OF ELECTRIC SHOCK 9 Do not use any abrasive detergents Grease filter Aluminium filter You do not need to replace aluminium filters Clean them once a month by hand or in a dishwasher 300 Do not use any acrid or corrosi...

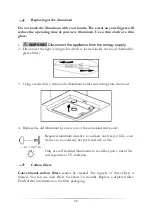
Page 28: ... remove the illuminant holder and wiring from the hood 4 Replace the old illuminant by a new one of the same kind and power Required minimum distance to surfaces such as pot lids oven cloths etc to avoid any hot parts and risk of fire m 0 45 m Only use self shielded illuminants to avoid hot parts risk of fire and exposure to UV radiation Carbon filters Conventional carbon filters cannot be cleaned...

Page 29: ...ky seal the valve seal the connection with a suitable material Appliance vibrates motor not properly fixed hood not properly fixed fix motor properly fix hood properly Insufficient extracting capacity too much distance hood hob too much draught because of open doors and or windows lower position of hood close the doors windows Appliance is unstable mounting rail is not firmly fixed screws are not ...

Page 30: ...lease contact the aftersales service 6 Technical data Type Cooker hood Material Stainless steel glass Installation width in cm 90 00 Touch control 3 Recirculation extraction mode Annual energy consumption AEChood 40 8 kW h Energy efficiency category A Fluid dynamical efficiency FDEhood 26 6 Fluid dynamical efficiency category B Lighting efficiency LEhood 34 lux W Lighting efficiency category A Gre...

Page 31: ...ust be send for disposal to the responsible recycling centre Never expose to open flames 3 Before you dispose of an old appliance render it inoperative Unplug the appliance and cut off the entire power cord Dispose of the power cord and the plug immediately 4 Dispose of any paper and cardboard into the corresponding containers 5 Dispose of any plastics into the corresponding containers 6 If suitab...

Page 32: ...eir authorized condition if they do not influence the utility value of the product 3 damage caused by handling errors or false operation 4 damage caused by aggressive environmental conditions chemicals detergents 5 damage caused by non professional installation and haulage 6 damage caused by non common household use 7 damages which have been caused outside the appliance by a PKM product unless a l...

Page 33: ...33 A Technische Zeichnung technical drawing Abmessungen in mm Dimensions in mm ...

Page 34: ...inden alle Informationen zum Kundendienst auf der Einlage in dieser Bedienungsanleitung Aftersales service information on the leaflet inside this instruction manual Änderungen vorbehalten Subject to alterations Stand Updated 08 05 2015 05 08 2015 PKM GmbH Co KG Neuer Wall 2 47441 Moers ...

Reviews: