background image

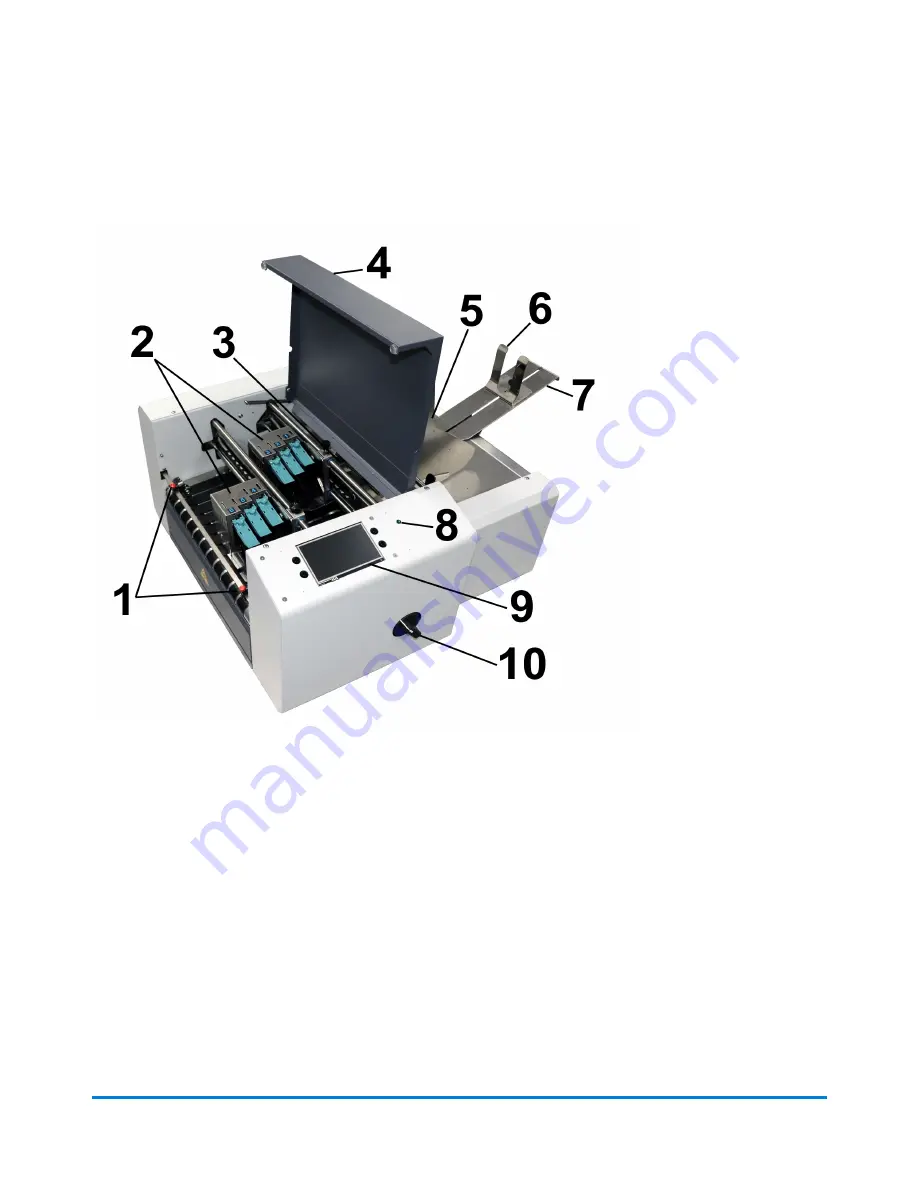
Front View

 1. 

Exit Guides:

 Help media to exit printer

 2. 

Printhead Assembly:

 Has 6 printheads arranged on two rails and can print an image up to 3" 

wide

 3. 

Media Sensor:

 Senses media as it enters the printhead area. Located behind printhead 

assembly.

 4. 

Top Safety Cover:

 Encloses the printheads

 5. 

Media Side Guides:

 Position media in printer

 6. 

Rear Media Guide:

 Holds media against front plate

 7. 

Rear Media Support:

 Supports media while it is being fed

 8. 

Power Indicator Light:

 Shows that the main power is on

Getting Started

Pitney Bowes

User Guide

November 2019

5

Summary of Contents for Address Right 200

Page 1: ...Shipping Mailing Printing AddressRight 200 Address Printer User Guide US English Edition SV63324 Rev A November 25 2019 ...

Page 2: ...itute an infringement of intellectual property rights of Pitney Bowes and Pitney Bowes assumes no responsibility for any such use of the information We have made every reasonable effort to ensure the accuracy and usefulness of this manual However we cannot assume responsibility for errors or omissions or liability for the misuse or misapplication of our products Except as provided in writing duly ...

Page 3: ...29 Info Menu 30 Print Data Menu 31 Print Image Screen 32 Printer Preferences Menu 34 Printer Setup Menu 36 Tools Menu 37 Time Server Date and Time 38 Wireless Status 39 4 Maintenance Calibrating the Touchscreen 41 Cleaning the Printer 41 Cleaning the Printhead 43 Inkjet Cartridges 44 Purging the Nozzles 46 Replacing the Inkjet Cartridges 46 Replacing the Metering Segments Sheet Separators 47 Resto...

Page 4: ...1 Getting Started In this section Front View 5 Rear View 6 Control Panel 7 Power Button 8 Using the Touchscreen 9 Entering the Network Settings 11 Connecting the Printer to a Wi Fi Network 11 ...

Page 5: ... as it enters the printhead area Located behind printhead assembly 4 Top Safety Cover Encloses the printheads 5 Media Side Guides Position media in printer 6 Rear Media Guide Holds media against front plate 7 Rear Media Support Supports media while it is being fed 8 Power Indicator Light Shows that the main power is on Getting Started Pitney Bowes User Guide November 2019 5 ...

Page 6: ...ifferent media thicknesses 2 Power Indicator Light Shows that the main power is on 3 Control Panel Touchscreen Touchscreen to access printer menus for printer setup and operation and buttons to access Quick Menu Power Off Reset Online Offline and Pause Print 4 Media Side Guides Position media in the printer 5 Sheet Separators Adjustable to ensure proper tension with the feed rollers for different ...

Page 7: ...hould only be replaced by qualified service personnel 12 Separator Locking Lever Unlocks locks Sheet Separators to adjust separators for different types of media Control Panel 1 Quick Menu button Quick access to the following frequently used printer functions Test Feed Reprint Horizontal and Vertical Alignment Printer Preferences Purge Print and Ink Status Press to open Press the Quick Menu button...

Page 8: ...rinter settings and functions Also check printer status and error messages Related topics l Quick Menu on page 28 l Power Button below l Using the Touchscreen on the next page Power Button Press the Power Off Restart button on the Control Panel to open the Shutdown Printer screen The following functions are found on this screen Restart Stops and restarts the printer s software and electronics Shut...

Page 9: ...en the printhead cartridges and the printer Using the Touchscreen The Control Panel touchscreen turns on when the printer is turned on Use the touchscreen and printer Control Panel buttons to access various functions that help you control or customize printer operation Basic Touchscreen Information Tap the Green Arrow to return to the previous screen Tap the Help Life Preserver icon to open a shor...

Page 10: ...st character entered l Tap the Enter Arrow in the lower right to save your entry l Tap the Up Arrow to toggle between upper and lower case letters l Tap SP space bar to type a space l Tap 123 to open the numeric keyboard l Tap on the numeric screen to open the symbols keyboard Getting Started Pitney Bowes User Guide November 2019 10 ...

Page 11: ...tment may be needed to help with this step 4 Tap Refresh to refresh update the network connection Related topics l Connecting the Printer to a Wi Fi Network below l Wireless Status on page 39 l Time Server Date and Time on page 38 Connecting the Printer to a Wi Fi Network 1 Connect the Wi Fi antenna included to the printer s Wi Fi port 2 Tap Network on the Tools screen to open the Network Settings...

Page 12: ...l show if you are connected to the network If the connection fails try again Verify that you are connecting to the correct network and using the correct ID and password 7 Tap Disconnect to end the connection Getting Started Pitney Bowes User Guide November 2019 12 ...

Page 13: ...In this section Adjusting the Horizontal Alignment 14 Adjusting the Vertical Alignment 14 Adjusting the Print Job Properties 15 Checking Ink Status 21 Estimating Ink Usage 22 Selecting the Ink Type 24 Selecting the Language 25 ...

Page 14: ...e the bar in the desired direction You can align individual printheads up to 100 0 microns in 5 0 micron increments 5 Tap Reset to reset the horizontal alignment to 00 0 default 6 Tap Test Print to print a test page using the current adjustments and print parameters to check printing quality and printhead alignment Adjusting the Vertical Alignment Vertical alignment disables the top nozzles in ind...

Page 15: ...st Print to print a test page using the current adjustments and print parameters to check printing quality and printhead alignment Adjusting the Print Job Properties The printer driver describes to the printer how to print your job It controls printer operation and allows you to send fixed and variable text and graphics to the printer Use the properties to control and customize the printer s outpu...

Page 16: ...To use special features built into the printer driver click Preferences orPrinter Properties to open the Document Properties window Operating the Printer Pitney Bowes User Guide November 2019 16 ...

Page 17: ...ngor Invert Printing Inverting Printing In normal operation printing is read from the operator side of the printer It is sometimes necessary to turn the printing direction 180 degrees from the normal direction This occurs when due to layout or method of binding media must be fed in reverse direction To invert printing reverse the printing direction 180 degrees Operating the Printer Pitney Bowes Us...

Page 18: ...e Advanced Options window Paper Output From the Paper Size menu select the size of media to be used Printer Features In Printer Features you can set the resolution of the printer printer speed and language the printer operates in and add a delay to the feed to provide separation between pieces Operating the Printer Pitney Bowes User Guide November 2019 18 ...

Page 19: ...DPI increases image quality Note Higher resolutions reduce print speed options AddressRight 200 Resolution Speeds Available 600 x 150 DPI Low Medium Medium High High 600 x 200 DPI Low Medium and Medium High 600 x 300 DPI Low and Medium 600 x 600 DPI Low Operating the Printer Pitney Bowes User Guide November 2019 19 ...

Page 20: ...on to each other Adjustment is used to precisely align printheads when printing graphics or type that extends beyond width of one printhead Each head can be moved 0 048 in 0 001 increments l To move the printhead toward the lead edge of the layout use the down arrow l To move the printhead away from the lead edge of the layout use the up arrow When the printer is turned off any changes made here r...

Page 21: ...efore the next piece is printed Adjustments are made in 0 1 second increments Checking Ink Status Ink Status shows the percentage of ink remaining in each ink cartridge and the estimated number of prints remaining at a selected resolution The estimation is based on the last page printed Operating the Printer Pitney Bowes User Guide November 2019 21 ...

Page 22: ...ge vs all cartridges of a certain type 1 Tap the screen for the particular cartridge you wish to change 2 Enter a new voltage value From this point forward the printer will remember that the voltage has been boosted for that particular cartridge even if the cartridge is removed and reinstalled in this printer later Caution Boosting the voltage above the maximum shown will damage the ink cartridge ...

Page 23: ...ges 2 Tap the Number of Pages entry box and enter the total number of pages for the entire print job planned 3 Tap Start Estimation Mode to start the Ink Estimator 4 Send a sample job of up to 49 pages to the printer Generally the higher the number of pages sent the more accurate the estimate 5 Estimated Ink Cost displays the estimated ink cost for the entire planned print job Operating the Printe...

Page 24: ...med but not recognized by this printer displays as To select or change the ink type 1 Tap Printer Setup on the Main Menu 2 Tap Ink Type The Select Ink Type screen opens showing the recognized ink cartridge installed in each cartridge holder 3 To select a particular ink cartridge tap on it 4 To change the name of the ink cartridge a Tap the Edit paper pencil icon next to the cartridge The Edit Ink ...

Page 25: ...ge 1 Tap the Edit paper pencil icon next to the cartridge The Edit Ink Type screen opens 2 Tap the Boost entry box to open the numeric keyboard to increase the voltage on a particular ink cartridge DO NOT increase the voltage more than the maximum listed on the touchscreen Once entered the printer memory will recall this information even if the cartridge is removed and reinstalled in this printer ...

Page 26: ...1 Tap Printer Setup on the Main Menu 2 Tap Language 3 Tap the desired language Operating the Printer Pitney Bowes User Guide November 2019 26 ...

Page 27: ...ptions In this section Quick Menu 28 Main Menu 29 Info Menu 30 Print Data Menu 31 Print Image Screen 32 Printer Preferences Menu 34 Printer Setup Menu 36 Tools Menu 37 Time Server Date and Time 38 Wireless Status 39 ...

Page 28: ...nting Purge Print Prints an ink pattern at 600 dpi to clear all of the ink nozzles in all of the ink cartridges Horizontal Alignment Heads 1 6 Adjust offset of individual printheads side to side up to 100 0 microns in 5 0 micron increments Vertical Alignment Heads 2 6 Disables the top nozzles in individual printheads to reduce nozzle overlap Adjust up to 1 0 microns in 0 1 micron increments Printe...

Page 29: ...gnostic tests Network settings and Screen Calibration Print Data Displays information about the job that is currently printing Test Print Prints a test page using current settings to check printing quality and printhead alignment Information Displays information about the printer Related topics l Print Image Screen on page 32 l Printer Setup Menu on page 36 l Tools Menu on page 37 l Print Data Men...

Page 30: ...or problem Firmware Notice Firmware status Cartridges used Total number of ink cartridges emptied by the printer Pieces Lifetime Total number of prints that have passed through the printer cannot be reset Jobs Total number of jobs run during the printer lifetime Session Total number of jobs run on the printer since it was last turned off Port s in Use Displays which printer ports are being used Me...

Page 31: ... pieces are printing per hour the Speed ips and Print Quality dpi set for the print job Counter Shows the number of pieces run for a particular job Reset Button inside Counter box Resets the Counter to 0 Speed Shows print speeds 1 4 available for a print job Cancel Cancels a running or paused print job Pause Print Prints a job pauses a running job or restarts a paused job You can also perform thes...

Page 32: ... through and select images from the printer image library Tap the white button in the lower left to display up to four current images simultaneously For a full screen preview tap the image The image will fill the touchscreen for easier viewing Tap the image again to return to the normal screen view Import Select Import to prepare the printer to accept a single mail piece template that can be used ...

Page 33: ...Print Quality Shows the Speed in inches per second ips and Print Quality dpi set for the print job Print Quality is determined by the Print Resolution set in the image or print job Speed Shows the speeds available 1 Slowest 4 Fastest for a particular job Speeds available are determined by the Print Resolution Print Quality set in the image or print job Merge Merge the image with a database and ope...

Page 34: ... printer will come online and start feeding and printing automatically Turn this feature off to use the Print button on the touchscreen or Feeder ON OFF on the Control Panel to start printing Turning the printer on or off does not affect your selection Keep Nozzles Alive Prevents unused printhead nozzles from becoming dehydrated during a printing job l Checked Nozzles spit to stay hydrated l Unche...

Page 35: ...ature is activated the printer responds to the break mark by sending a signal to the conveyor to speed up momentarily This creates an obvious gap between the end of one set of pieces and beginning of the next Select and set the gap on a conveyor between predesignated breaks during a print run Enter the distance between the media sensor and the conveyor The printer sends a delayed signal to an exte...

Page 36: ...ection when due to the layout or binding method the media must be fed in the reverse direction l Unchecked Prints the job normally l Checked Prints the job inverted turned 180 degrees This feature applies only to internal print jobs for example Test Print Purge Print and images stored in the printer image library Printer Setup Menu The Printer Setup screen allows you to set the printer parameters ...

Page 37: ...factory default settings Related topics l Selecting the Ink Type on page 24 l Printer Preferences Menu on page 34 l Selecting the Language on page 25 l Adjusting the Horizontal Alignment on page 14 l Adjusting the Vertical Alignment on page 14 l Restoring Factory Defaults on page 48 Tools Menu Tap Tools on the Main Menu to open the Tools screen Ink Estimator Estimates the cost of ink for a particu...

Page 38: ...net connected network Screen Calibration Sets the touch pressure sensitivity needed to activate the touchscreen Related topics l Estimating Ink Usage on page 22 l Checking Ink Status on page 21 l Running Diagnostics on page 48 l Entering the Network Settings on page 11 l Calibrating the Touchscreen on page 41 Time Server Date and Time The Time Server option on the Network Settings screen displays ...

Page 39: ...Wireless Status The Wireless Status option on the Network Settings screen displays information about the wireless network connection Menus and Options Pitney Bowes User Guide November 2019 39 ...

Page 40: ...Touchscreen 41 Cleaning the Printer 41 Cleaning the Printhead 43 Inkjet Cartridges 44 Purging the Nozzles 46 Replacing the Inkjet Cartridges 46 Replacing the Metering Segments Sheet Separators 47 Restoring Factory Defaults 48 Running Diagnostics 48 ...

Page 41: ...s down the 15 seconds given to complete each step A screen message informs you if the calibration succeeded or failed Cleaning the Printer Warning Printer is a precision machine that should be cleaned regularly to insure many years of service Before performing any maintenance disconnect printer from its power source The printer must be cleaned regularly of accumulated paper dust and ink Depending ...

Page 42: ...media Clean regularly with a mild abrasive household cleaner on a damp cloth Avoid using solvents on rubber rollers Cleaning the Media Sensor Periodically check the media sensor located under the media hold down wheel assembly for dust and debris 1 Use the media thickness knob to raise the printhead carriage assembly to its highest setting 2 Use canned or compressed air into the media sensor port ...

Page 43: ... printheads This buildup eventually degrades print quality If you notice problems with print quality or to prevent a buildup from occurring wipe the printhead with a wet fiberless lint free cloth Cloth should be Cloth should not be a Soft a Fiberless lint free a Moistened with water Distilled is best but tap water works r Abrasive r Made of small fibers r Dry or contain chemical additives Wipe slo...

Page 44: ... addresses 150 x 600 DPI 200 000 addresses Note These figures can vary depending on font selected Caution Never shake drop or hit cartridges against the palm of your hand or any other hard surface Shaking the print cartridge does not mix ink and hitting cartridges against a hard surface does not clear nozzles These actions hurt print quality because they allow bubbles to form near the ink firing c...

Page 45: ...less than 1 day in a hot and dry environment l Leave cartridge in printer for short periods of time 1 day or less l Next time that the printer is used printhead may have to be cleaned and purged Long term Storage more than 2 days or more than 1 day in a hot and dry environment l Place the plastic nozzle cover on the cartridge Place cartridges in a sealable plastic container with a damp sponge or t...

Page 46: ...der press the Quick Menu button on the Control Panel then tap Purge Print 3 Tap Print to activate the purge Purge prints an ink pattern at 600 DPI to clear all of the nozzles in all of the ink cartridges Repeat if necessary 4 Wipe the printhead again with a moist cloth Replacing the Inkjet Cartridges 1 Open the latch lever to remove the used cartridge from the cartridge holder Pull the cartridge u...

Page 47: ...t quality because they allow bubbles to form near the ink firing chambers These bubbles prevent the nozzles from firing causing white streaks in print image Replacing the Metering Segments Sheet Separators Metering Segments sheet separators ensure separation of pieces as they are fed They wear and must be replaced periodically If you experience double sheet feeding and cannot adjust the separators...

Page 48: ...the separator support and screw Restoring Factory Defaults The Factory Default menu restores all operator initiated adjustments and settings to the factory settings Running Diagnostics Diagnostics runs tests on the printer components and systems listed on the screen at variable speed Maintenance Pitney Bowes User Guide November 2019 48 ...

Page 49: ...this test turn off the printer and clean the media sensor l If the piece measured longer that the actual piece length the piece is probably slipping or hesitating as it feeds In this case check or adjust the sheet separators and check and adjust the media thickness setting 5 Check or uncheck the Clutch w Sensor box as needed l Unchecked Tests clutch function on off using an automated routine l Che...

Page 50: ...5 Specifications In this section Printer Specifications 51 ...

Page 51: ...nts graphics logos and barcodes MATERIAL SIZE Minimum to Maximum Length 5 to 15 127 mm x 381 mm Width 2 75 to 10 69 9 mm x 254 mm MATERIAL THICKNESS Minimum 0 008 0 2 mm Maximum 0 375 9 mm FEEDER CAPACITY Up to 750 10 envelopes PROCESSOR 600 Mhz Dual core ARM Cortex A9 MP Core MEMORY 1 GB of DDR3 1600Mhz SDRAM 8 GB default microSD Not externally accessible PRINT COLORS Proprietary water based inks...

Page 52: ... Session Counter Jobs Counter DUTY CYCLE 60 million addresses total or 1 000 000 per month over a 5 year life cycle DIMENSIONS 21 25 H x 28 75 L x 23 W 54 cm H x 73 cm L x 58 4 cm W WEIGHT 80 lbs 36 3 kg ELECTRICAL Switchable 115VAC or 240VAC 50 60 Hz OPTIONS Conveyor and Drop Tray All Specifications Subject To Change Without Notice Specifications Pitney Bowes User Guide November 2019 52 ...

Page 53: ...6 Contacting Pitney Bowes In this section Contacting Pitney Bowes 54 ...

Page 54: ...acting Pitney Bowes For service and support Visit our website at pitneybowes com For parts and supplies Visit our website at pitneybowes com Contacting Pitney Bowes Pitney Bowes User Guide November 2019 54 ...

Page 55: ...7 Safety In this section Product Documentation 56 Safety Information 56 ...

Page 56: ...C power cord directly into a properly grounded wall outlet located near the equipment and easily accessible Failure to properly ground the machine can result in severe personal injury and or fire l The AC power cord is the primary means to disconnect this device from the AC power supply l DO NOT use an adapter plug on the line cord or wall outlet l DO NOT use a wall outlet controlled by a wall swi...

Page 57: ...e that it has been properly prepared and that any other personnel in the area are standing clear of the machine l Immediately report to service any damaged or non functioning components that renders the unit unsafe l DO NOT remove covers Covers enclose hazardous parts that should only be accessed by properly trained service personnel l DO NOT run printer with top cover open l Running the printer w...

Page 58: ...spill leaking ink or excessive ink accumulation immediately disconnect the power cord from the wall plug and contact Pitney Bowes In the USA please visit pitneybowes com support Safety Pitney Bowes User Guide November 2019 58 ...

Page 59: ...For Service or Supplies SV63324 Rev A 2019 Pitney Bowes Inc All Rights Reserved 3001 Summer Street Stamford Connecticut 06926 www pitneybowes com ...

Reviews: