En
4
1
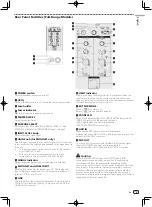
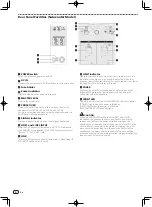
POWER switch
Turns this speaker’s power on and off.
2
AC IN
Connect the power cord to AC IN and then to the power outlet.
3
Fuse holder
4
Power indicator
Lights in blue when the power is turned on.
5
MASTER LEVEL
Adjusts the output level.
6
CROSS OVER
Selects the cut-off frequency of the low pass filter for the
subwoofer from 80 Hz, 100 Hz, 120 Hz, and 150 Hz.
100 Hz is recommended when using the subwoofer with the
XPRS Series full-range speakers.
7
SIGNAL indicator
A green indicator lights when an input signal is detected.
8
LINE1 and LINE2 INPUT
Both the XLR connector (balanced) and 1/4” TRS (balanced
type PHONO) are supported. The XLR connector consists of 1
“ground,” 2 “hot,” and 3 “cold.”
9
LINK
This is the XLR output connector (balanced). A signal input to
XLR INPUT will be output directly.
a
LIMIT indicator
Lights in red when the built-in limiter is activated or when the
input level is too high and the sound is distorted. When that
happens, lower the output level of the connected device or lower
the input level or master level of this unit.
b
PHASE
Switches the polarity for the subwoofer. Select the one that
improves the playback of low frequencies when using the
subwoofer with other speakers.
c
FRONT LED
Selects the display setting of the FRONT LED indicator (white).
[POWER] Lights when the power is turned on.
[LIMIT] Lights when the limiter is activated.
[OFF] The FRONT LED does not light.
CAUTION
When the FRONT LED setting is set to [OFF] and [LIMIT],
the speaker may appear the same as when the power plug
is disconnected from the power outlet depending on the
specification of the product, but the power is not shut off. If you
wish to shut off the power to the woofer completely, you must
disconnect the power plug from the power outlet. Install the
speaker near a power outlet so the power plug can easily be
accessed. Leaving the power plug inserted in a power outlet for a
long period of time may cause fire.
Rear Panel Facilities (Subwoofer Model)
1
2
3
5
4
6
a
c
b
9
8
7
9
8
7

