Pioneer VSX-609RDS Operating Instructions Manual Download Page 51

51

En

Operation

Making a Recording

Making an Audio or a Video Recording

The following steps show you how to make an audio or a video recording from the built in tuner, or from an
audio or a video source connected to the receiver (such as a CD player or TV). Recordings can be made to a CD-
Recorder, cassette deck,  MD, VCR, or DVR deck connected to the CD-R/TAPE/MD, VCR or DVR in/out
connectors.

The receiver’s volume, balance tone (bass, treble, loudness), and surround effects (Dolby Pro Logic/
Dolby Digital and DSP settings) have no effect on the recorded signal.
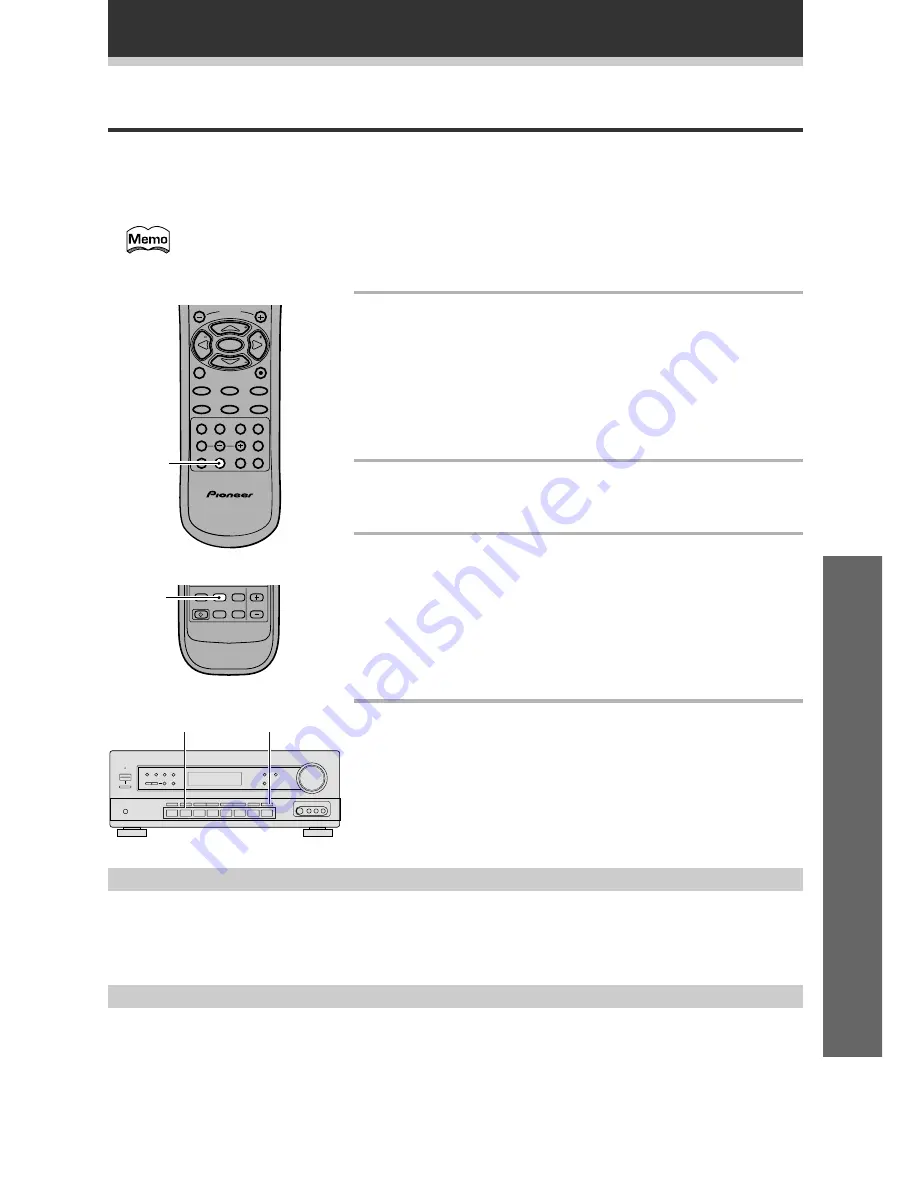
Record MONITOR

You can listen to (monitor) the recording as it’s being made using the 

MONITOR

 button on the the front panel (a

cassette deck would have to have a record monitor function).

Press the 

MONITOR

 button to switch between the recorded signal and the original source signal.

1

Press the FUNCTION button to select a
source to record (you can also use the MULTI
CONTROL buttons if the Direct function is
on).

All functions except


MONITOR are accessible from the remote

control.
On the receiver, select the source directly using the front panel
buttons.

2

Prepare the program source.

Tune to the radio station, load the CD, etc. For a video recording
load the video, DVD etc.

3

Insert a blank tape, MD, video etc. into the
recording device connected to either CD-R/
MD/TAPE or VCR/DVR and set the recording
levels.

Refer to the instructions that came with the recorder if you are
unsure how to do this. Most video recorders set the audio
recording level automatically—check your video’s instruction
manual if you are unsure whether yours has manual controls.

4

Start recording, then start playback of the
source component.

1

Making a digital recording (VSX-709RDS only)

The VSX-709RDS has one digital output jack. If you want to make a digital recording from this receiver hook up
this optical output to the optical input on the digital component you want to record into. The source component
(like MD, CD, DVD, etc) must be digital also, of course. Make sure the analog/digital switch is set to digital (see
p. 36). The recording procedure is the same as described above (except you don‘t need to set the recording
levels).

VSX-709RDS

VSX-609RDS

MONITOR

Î

ENTER

D.ACCESS

BAND

CLASS

CH SELECT

CH LEVEL

AV PRE-PROGRAMMED AND LEARNING

REMOTE CONTROL UNIT

DSP

TEST TONE

FL DIMMER

LOUDNESS FUNCTION

SETUP

MUTING

MPX

DISPLAY

RF ATT

FQ

FQ

ST

ST

CHANNEL

7


4


¢

1


¡

8

2

LOUDNESS   FUNCTION     MUTING

RECEIVER

FL

DIMMER

REMOTE

SETUP

MASTER

VOLUME

AUDIO/VIDEO PRE-PROGRAMMED

REMOTE CONTROL UNIT

1

1

Summary of Contents for VSX-609RDS

Page 1: ...Operating Instructions AUDIO VIDEO MULTI CHANNEL RECEIVER VSX 709RDS VSX 609RDS ...

Page 2: ...coloured in accordance with the following code Blue Neutral Brown Live If the plug provided is unsuitable for your socket outlets the plug must be cut off and a suitable plug fitted Thank you for buying this Pioneer product Please read through these operating instructions so you will know how to operate your model prop erly After you have finished reading the instruc tions put them away in a safe ...

Page 3: ...Displays Controls 28 Front Panel 28 Remote Control VSX 709RDS 30 Remote Control VSX 609RDS 32 Display 34 Sound Modes 35 Learning About the Sound Modes 35 Switching ANALOG DIGITAL Signal Input 36 Playing a Source 37 Playing Sources with Dolby Digital or DTS Sound 38 Selecting a Sound Mode 39 Using in MIDNIGHT Listening Mode 41 Using the Tuner 42 Finding a Station 42 Tuning Directly to a Station 43 ...

Page 4: ...y broadcast such as news sports or music This unit receives three types of RDS information Radio Text RT Programme Service Name PS and Programme Type PTY When EON is turned on and a function other than the tuner is set the function will switch to the FM station automatically when Traffic Information or News begins Advanced Theater Modes Four sound modes that enhance DTS and Dolby Surround performa...

Page 5: ...u ve received the following supplied accessories VSX 609RDS VSX 709RDS When Making Cable Connections Be careful not to arrange cables in a manner that bends the cables over the top of this unit as shown in the illustration If the cables are brought over this unit the magnetic field produced by the transformers in this unit may cause a humming noise to come from the speakers SOURCE MIDNIGHT SIGNAL ...

Page 6: ...ting the receiver s remote control directly at the component This type of operation does not require control cords By connecting a control cord optional you can control other Pioneer equipment using this remote control Point the remote control towards the remote sensor of this unit even when operating other equipment The remote control signals are received by the remote sensor of this unit and sen...

Page 7: ...l analog connections and your analog audio components cassette deck etc use these jacks Remember that for components you want to record with you need to hook up four plugs a set of stereo ins and a set of stereo outs but for components that only play you only need to hook up one set of stereo plugs two plugs To use Digital sources features you must hook up your digital components to the digital in...

Page 8: ...ector as VIDEO 7 Audio Video cords Use audio video cords not supplied to connect the video components and a video cord to connect the monitor TV Connect red plugs to R right white plugs to L left and the yellow plugs to VIDEO Be sure to insert completely VSX 709RDS only If your video components have S video jacks you could use S video cords not supplied to the S video connector on the front and re...

Page 9: ...nect your digital components as shown below There is one digital out jack VSX 709RDS only If you connect this to the optical input on a digital recorder currently these include MD DAT and CD R you can make direct digital recordings with this receiver 7 Digital audio cords Optical cables Commercially available digital audio coaxial cords standard video cords can also be used or optical cables not s...

Page 10: ... changes the digital signal to a form which can be processed by the VSX 709RDS VSX 609RDS models through their digital input jacks For more details refer to the instruction manual supplied with the RFD 1 Make sure the RF demodulator digital in switch is set correctly optical or coaxial depending on the connection RF OUT AC 3 LD DIGITAL OUT 1 2 3 PCM OPT OUTPUT VIDEO L R DIGITAL IN COAXIAL OPTICAL ...

Page 11: ... decoder to play special DVD discs and the like If you find you need an external decoder hook one up as shown below For most people this component is unnecessary See p 40 Components equipped with 5 1 channel analog output jacks VSX 709RDS The 5 1 channel input can only be used when DVD 5 1 CH is selected ...

Page 12: ...ch to a wall etc if desired and face toward the direction providing the best reception Assemble the antenna 10mm FM wire antenna AM loop antenna Connect the FM wire antenna and fully extend vertically along a window frame etc Twist exposed wire strands together and insert into the hole then snap the connector shut 7 Speaker terminals 1 Twist exposed wire strands together 2 Loosen speaker terminal ...

Page 13: ...e the positive and negative terminals on the receiver match those on the speakers The receiver has two speaker systems A B A is the main system supporting the full complement of surround sound speakers If you switch on both A B speaker systems only the front speakers and the sub woofer will be audible No sound will come from the center or surround speakers but multi channel sources will be down mi...

Page 14: ... interference such as distortion in the color of the TV screen If you do not have magnetically shielded speakers and notice discoloration of the TV screen place the speakers farther away from the TV Install the center speaker above or below the TV so that the sound of the center channel is localized at the TV screen CAUTION When installing the center speaker on top of the TV be sure to secure it w...

Page 15: ...ng if you want to isolate one channel or listen in this specialized mono mode Coaxial digital input setting page 19 Use to specify the input to be assigned to the coaxial digital input Optical digital input setting page 20 Use to specify the input to be assigned to the optical digital input 4 Press or fi to select the setting you want The setting is entered automatically 5 Repeat steps 3 and 4 to ...

Page 16: ...and set them to Large In the display F C and S refer to front center and surround speakers respectively Speaker size is denoted as L for large speakers S for small speakers and asterisk if no speaker is connected If the cone size diameter of the speaker is larger than 12 cm please set to Large Switch the speakers setting mode according to the speakers you hooked up Use the or fi buttons The config...

Page 17: ... the frequency routed to the sub woofer or Large speakers We recommend setting this to 200 Hz if smaller bookshelf type speakers are used for your Small speakers Initial setting is 100 Hz If all speakers front center and surround are set to Large in Speakers setting mode crossover frequency cannot be set because there are no Small speakers ap pears in the display Press or fi to specify the crossov...

Page 18: ... set the distance of the CENTER speaker from the main listening position up to 30 steps SURROUND speakers distance setting mode Adding the proper delay to the surround speakers is necessary to achieve a surround effect The surround speakers are placed at various distances from the listening position So to compensate for this set the surround speakers distance setting Adjust the speaker distance in...

Page 19: ...fi to cycle through the possible Dual mono settings Dual mono setting mode The dual mono setting can only be used when listening to Dolby Digital discs that contain a dual mono soundtrack With this setting you can choose which channel is the dual mono setting you want to listen to Thus it is useful for soundtracks that have one language on one channel and a different language on the other Remember...

Page 20: ...ge to the digital input setting You can see this in the DIGITAL ANALOG indicator on the front of the receiver Optical digital input setting 1 Sets the input component to be assigned to the OPT 1 optical input jack Initial setting is CD Press or fi to select the optical digital input 1 DVD TV CD CD R VCR or OFF After you assign the component to the OPT 1 digital jack when you select that component ...

Page 21: ...speaker volume balance can be adjusted without outputting the test tone by pressing CH CHANNEL SELECT and CH CHANNEL LEVEL 1 Press CH CHANNEL SELECT to select the channel you want to adjust 2 Press CH CHANNEL LEVEL or to adjust the volume Î SOURCE DISC MIDNIGHT SIGNAL SELECT TV CONTROL TV VOL TVFUNC TV MENU ENTER D ACCESS BAND CLASS CH SELECT CH LEVEL AV PRE PROGRAMMED AND LEARNING REMOTE CONTROL ...

Page 22: ...ton See page 27 for information on how to program a different type of component than speci fied on the button If you recall a preset code for the tuner TUN MULTI CON TROL you will not be able to control the built in tuner of this receiver using the remote control To reset the remote control to the built in tuner input the preset code 0080 Setting Up the Remote Control In addition to controlling th...

Page 23: ...eat steps 2 through 3 to recall preset codes for as many components as necessary 4 Press REMOTE SETUP to exit the preset mode The remote control returns to the previous operation mode When operating a Pioneer DVD LD player set the preset code to 111 in the preset mode TUNER cannot be preset Preparations Recalling preset codes VSX 609RDS The following steps show you how to recall preset codes for e...

Page 24: ...e indicating the operation has been learned To program additional operations for the current component Repeat steps 3 and 4 To program operations for another component Repeat steps 2 through 4 5 Press SETUP to exit the Learning setup mode After ten seconds of inactivity the remote control will automatically leave the Learning mode and revert to its previous mode 2 2 1 5 2 2 Preparations LED 2 5 cm...

Page 25: ... button to be cleared 3 Press 9 7 6 4 Press the button to be cleared 5 Press the button to be cleared once more The LED blinks twice to indicate the button has been cleared 3 3 2 3 1 Preparations REMOTE SETUP Clearing All the Remote Control Settings 3 3 2 3 1 Î CH SELECT CH LEVEL DSP TEST TONE FL DIMMER LOUDNESS FUNCTION SETUP MUTING 7 4 2 SOURCE DISC TV CONTROL MULTI CONTROL DVD TV VCR CD R RCV C...

Page 26: ...which you want to set to ON 3 Press 9 8 2 The LED blinks twice to indicate the button has been set TVC doesn t have this feature and thus can t use the Direct func tion VSX 609RDS 1 To turn the Direct funtion OFF the default setting is ON press REMOTE SETUP and number button 3 at the same time 2 To turn the the Direct function ON if you have turned it off press REMOTE SETUP and number button 2 at ...

Page 27: ...1 Press SETUP and hold for three seconds The LED on the remote control will blink twice 2 Press the MULTI CONTROL button you want to check the preset code for 3 Press 9 9 0 Each preset code consists of four digits for example 1329 Each digit will be represented by a series of blinks on the remote control s LED 4 Press 1 to check to see the left most digit In above example the LED blinks once to se...

Page 28: ...memory and frequency select modes STATION buttons Selects station memories when using the tuner FREQUENCY buttons Selects the frequency when using the tuner 5 CLASS button see pages 44 46 Switches between the three banks classes of station memories 6 MEMORY button see page 45 Press to memorize a station for recall using the STATION buttons 7 RF ATT button see p 42 Use to lower the input level of a...

Page 29: ...the various Dolby DTS surround modes SIGNAL SELECT button see page 36 Use to select between an analog or digital signal MASTER VOLUME Use to set the overall listening volume PHONES jack Use to connect headphones but this does not switch the speakers off EON MODE button see p 50 Use to search for different programs that are transmitting traffic or news information this search method is called EON S...

Page 30: ...signal analog digital for the source you are inputting To use first press the RCV button then operate this button EFFECT buttons Use to adjust the amount of effect in different DSP sound modes or advanced listening modes To use first press the RCV button then operate this button 5 TV CONTROL buttons The following five sets of buttons are dedicated TV controls TV VOL buttons Use to adjust the volum...

Page 31: ...nt from the remote control to the receiver It also flashes at other times for example when teaching the receiver preset codes RECEIVER button This switches the receiver between STANDBY mode and power ON DISC button Only used when controlling other components MASTER VOLUME buttons Use to set the overall listening volume button Use to record with other components button CLASS Use to fast forward sea...

Page 32: ...a speaker when setting up the surround sound of the receiver To use first press the RECEIVER button then operate this button TEST TONE see page 21 Use to sound the TEST TONE when setting up the surround sound of the receiver To use first press the RECEIVER button then operate this button ATT Use to attenunate lower the level of an analog input signal and prevent distortion refer to p 34 To use fir...

Page 33: ...r between STANDBY mode and power ON FL DIMMER button Use this button to make the fluorescent display FL dimmer or brighter There are three brightness settings as well as an off setting LED display see pages 23 25 This display flashes when a command is sent from the remote control to the receiver It also flashes at other times for example when teaching the receiver preset codes EFFECT buttons see p...

Page 34: ...pe of input signal assigned for the current component see Front Panel SIGNAL SELECT ANALOG Lights when an analog signal is selected DIGITAL Lights when a digital audio signal is selected 2 DIGITAL Lights when a Dolby Digital signal is played DTS Lights when a source with DTS audio signals is played 2 DIGITAL indicator When the 2 Dolby DTS mode of the receiver is on this lights to indicate playback...

Page 35: ... is especially designed to give sound depth to stereo sources The overall effect builds a dynamic and broad sound space allowing two channel stereo signals to faithfully imitate a five speaker sound Use with Dolby Pro Logic for a stereo surround effect You can also use with Dolby Digital sources for a wider stereo field than STANDARD mode DSP modes The DSP Digital Signal Processing modes allow you...

Page 36: ...mats other than these set SIGNAL SELECT to ANALOG When an LD or CD player compatible with DTS is played back with SIGNAL SELECT set in ANALOG digital noise is output caused by playing back the DTS directly no decoding To prevent noise you need to make digital connections Refer to page 9 and set SIGNAL SELECT to DIGITAL Some DVD players don t output DTS signals For more details refer to the instruc...

Page 37: ...wer button on the front panel to turn the power ON _ Î SOURCE DISC MIDNIGHT SIGNAL SELECT TV CONTROL TV VOL TVFUNC TV MENU ENTER D ACCESS BAND CLASS CH SELECT CH LEVEL AV PRE PROGRAMMED AND LEARNING REMOTE CONTROL UNIT DSP TEST TONE FL DIMMER LOUDNESS FUNCTION SETUP MUTING MPX DISPLAY RF ATT FQ FQ ST ST CHANNEL EFFECT MASTERVOLUME 10 5 1CH MULTI CONTROL ATT DVD TV VCR CD R RCV CD TUN TVC RECEIVER ...

Page 38: ...to DIGITAL 4 5 8 2 When playing LD recorded in Dolby Digital When connecting a DVD LD player or LD player using the 2 RF output a commercially available RF demodulator RFD 1 is required The RF demodulator changes the RF signal to a digital signal which is then processed by the receiver at the digital input jacks For more details refer to the instruction manual supplied with the RFD 1 2 3 8 6 5 VSX...

Page 39: ...e Switch on the Dolby DTS mode by pressing the 2 surround button When Dolby DTS mode is ON Dolby Pro Logic Dolby Digital and DTS and signal processing is performed automatically corresponding to the input signal Use this button to cycle through the various modes For all modes other than STANDARD DSP is switched on and will appear in the display 1 2 2 1 Press RCV VSX 709RDS or RECEIVER VSX 609RDS T...

Page 40: ...NEL LEVEL EFFECT ENTER FQ FQ ST ST TV CONTROL FUNC 10 DISC SIGNAL SELECT TEST TONE RECEIVER TUNER TVCONT Î 1 2 3 4 5 6 7 8 9 0 dB DVD 5 1 CH input playback VSX 709RDS Connect a component with 5 1 channel output to use the surround sound created by 5 1 channel playback There are two ways to switch on DVD 5 1 CH mode With the remote control press the DVD MULTI CONTROL button Then press the RCV butto...

Page 41: ...e MIDNIGHT listening mode on to enjoy the effects of quality surround sound even at low volumes This mode allows you to hear effective surround sound of movies at low volume levels Press MIDNIGHT Each press switches MIDNIGHT listening mode on or off The effect automatically adjusts according to the volume level Sound Modes dB MIDNIGHT ...

Page 42: ...g the button once the desired frequency is reached MPX mode If the TUNED or STEREO indicator doesn t light when tuning to an FM station because the signal is weak press the MPX button to switch the receiver into mono reception mode This should improve the sound quality and allow you to enjoy the broadcast RF ATT mode If the radio signal is too strong and or the sound is distorting press the RF ATT...

Page 43: ...ncel the frequency and start again SP A STEREO TUNED Î SOURCE TV CONTROL TV VOL TVFUNC TV MENU ENTER D ACCESS BAND CLASS CH SELECT CH LEVEL AV PRE PROGRAMMED AND LEARNING REMOTE CONTROL UNIT DSP TEST TONE FL DIMMER LOUDNESS FUNCTION SETUP MUTING MPX DISPLAY RF ATT FQ FQ ST ST CHANNEL MASTERVOLUME MULTI CONTROL DVD TV VCR CD R RCV CD TUN TVC RECEIVER 7 4 3 1 8 2 DISC MIDNIGHT SIGNAL SELECT EFFECT 1...

Page 44: ...ation and Tuning Directly to a Station on pages 42 and 43 for more on how to do this 2 Press MEMORY The display shows a blinking memory class 3 Press CLASS to select one of the three classes Repeatedly pressing this button cycles through the three available classes A B and C 4 Press STATION to choose the preset memory number Pressing these buttons repeatedly cycles through the 10 available preset ...

Page 45: ...RCH to select the character input mode 5 Press STATION to choose the first character The STATION buttons scroll through the letters numbers and symbols you can input Refer to Character display used station name input on page 44 6 Press MEMORY to input the first of the four characters That character appears in the display and the cursor automatically moves to the next space After four characters ha...

Page 46: ...r outlet for a lengthy period the station memories will be lost and will have to be reprogrammed 1 3 2 VSX 709RDS VSX 609RDS Î SOURCE DISC MIDNIGHT SIGNAL SELECT TV CONTROL TV VOL TVFUNC TV MENU ENTER D ACCESS BAND CLASS CH SELECT CH LEVEL AV PRE PROGRAMMED AND LEARNING REMOTE CONTROL UNIT DSP TEST TONE FL DIMMER LOUDNESS FUNCTION SETUP MUTING MPX DISPLAY RF ATT FQ FQ ST ST CHANNEL EFFECT MASTERVO...

Page 47: ...eing broadcast The receiver can search for and display the following programme types Using the Tuner News Accounts of facts events and reportage Affairs Current affairs Info General information Sport Any aspect of sports Educate Educational material Drama Radio plays or serials Culture National or regional culture theatre etc Science Science and technology Varied Usually talk based material such a...

Page 48: ...TA NEWS broadcasts When EON is turned on the receiver will automatically jump to those EON linked broadcasts Even if a receiver function other than the tuner is being used the receiver function will switch to the FM station automatically when an EON linked Traffic Information or News programme begins When the programme ends the original function will be restored The EON function will not operate h...

Page 49: ... tuner searches through the FM stations stored in the station memories If the tuner finds a matching programme type the tuner plays 5 seconds of the station To listen to that station press the MEMORY button The tuner stops searching If you don t press the MEMORY button during the above mentioned 5 seconds the tuner resumes the search When the tuner finds a programme type you searched for the frequ...

Page 50: ...ER mode to pick up the EON broadcast When the programme ends the receiver will return to the original mode When the EON mode is set the EON indicator with a box around it ligh s but during actual reception of an EON linked broadcast the EON indicator will flash An empty box in the EON indicator spot means it is possible to pick up an EON linked broadcast but the receiver has not been set to do so ...

Page 51: ...station load the CD etc For a video recording load the video DVD etc 3 Insert a blank tape MD video etc into the recording device connected to either CD R MD TAPE or VCR DVR and set the recording levels Refer to the instructions that came with the recorder if you are unsure how to do this Most video recorders set the audio recording level automatically check your video s instruction manual if you ...

Page 52: ... of following tracks TOP MENU VSX 609RDS only Press to return to the start of the current track Repeated presses skips to the start of previous tracks 2 3 5 ENTER buttons VSX 609RDS only These buttons can be used play or stop etc many components and also to navigate DVD menus options Specifically 2 to rewind or reverse program source 3 to fast forward program source 5 to pause program source to st...

Page 53: ...e controls can be used for deck one of a dual tape deck 5 Press to pause the tape Press to stop the tape ENTER Press to start playback 2 Press to rewind the tape 3 Press fast forward the tape For deck two or any deck that can recorded 5 Pressed together to start recording Use MULTI CONTROL buttons to put the remote control in the stated mode VSX 709RDS VSX 609RDS Î SOURCE DISC MIDNIGHT SIGNAL SELE...

Page 54: ... you are using Use these buttons to navigate DVD menus 5 up down ENTER enter the command selected 2 left 3 right 5 pressed together starts recording VSX 609RDS only Recording button VSX 709RDS only Use to start recording To prevent accidental recording this button must be pressed twice to take effect the second press must be within 10 seconds of the first TOP MENU VSX 609RDS only Use to display th...

Page 55: ...m assign it to the TVC TV CONT MULTI CONTROL but ton If you have two TVs assign the main TV to the TVC TV CONT button If you hook up your system this way the first four TV controls will always be accessible Use MULTI CONTROL buttons to put the remote control in the stated mode Cable TV Satellite TV TV Controls This remote control can control this component after entering the proper codes or teachi...

Page 56: ...t again Make sure the component is connected correctly refer to pages 7 to 14 Press MUTING on the remote control Adjust MASTER VOLUME Press the MONITOR button Press SPEAKERS to select the speakers you connected Make sure the component is connected correctly refer to page 8 Press the correct function button Tune in the correct frequency Connect the antenna refer to page 12 Route 2 RF and digital ca...

Page 57: ...eiver and the remote control Strong light such as fluorescent light is shining onto the unit s remote con trol sensor The FL DIMMER button is pushed Remedy Connect an outdoor antenna refer to page 12 Refer to Speakers setting mode on page 16 to check the speaker set tings Refer to Setting the Volume Level of Each Channel on page 21 to check the speaker levels Connect the speakers refer to page 13 ...

Page 58: ... Quasar 0029 Revox 0157 Rotel 0157 Sansui 0202 Sanyo 0179 Schneider 0134 Sharp 0037 0861 Sherwood 0114 0196 Sony 0000 0490 Technics 0029 0207 Thorens 0157 Universum 0157 Yamaha 0036 0187 CASSETTE DECK Manufacture Code Aiwa 1197 1200 Akai 1188 1189 Arcam 1076 Denon 1076 1412 Grundig 1029 Harman Kardon 1182 JVC 1244 1273 1274 Kenwood 1070 1071 1205 1233 1234 Marantz 1029 Memorex 1099 1101 Mitsubishi...

Page 59: ...362 Orbitech 1501 Oxford 1344 Pace 1067 1183 1241 1336 1455 1791 1847 Palladium 1571 Palsat 1501 Panda 1455 Philips 1133 1200 1292 1455 1571 1853 Phonotrend 1288 1592 Pioneer 1329 1853 Planet 1871 Promax 1455 Prosat 1288 Quadral 1362 1519 RFT 1200 1220 1288 Radiola 1200 Radix 1396 1882 SAT 1351 1461 SEG 1369 1421 Saba 1336 1520 Sabre 1455 Sagem 1820 Salora 1108 SatPartner 1332 1421 1502 1520 Satco...

Page 60: ...37 0068 0102 0217 0264 Isukai 0218 JVC 0036 0053 0190 0192 0371 0653 Kaisui 0009 0216 0217 0218 0282 Kamp 0216 Kapsch 0163 0206 Kawasho 0216 Kendo 0037 Kingsley 0216 Kneissel 0259 Korpel 0037 Koyoda 0009 Leyco 0037 0072 0264 0294 Liesenk Tter 0037 Lloytron 0032 Loewe 0075 Luma 0206 M Electronic 0009 0037 0068 0105 0109 0163 0217 0287 0374 Magnadyne 0102 0247 Magnafon 0076 0102 0213 Manesth 0217 02...

Page 61: ...0307 0348 0352 Akai 0041 0053 0106 0315 Akiba 0072 Alba 0020 0072 0209 0278 0315 0352 Ambassador 0020 Amstrad 0000 0278 0325 0332 Anitech 0072 Asuka 0037 Baird 0000 0041 0104 0107 Basic Line 0020 0072 0278 Blaupunkt 0003 0006 0016 0034 0154 0162 0195 0226 0227 0403 Brandt 0187 0320 0321 Brandt Electronic 0041 Bush 0072 0209 0278 0352 CGE 0000 Catron 0020 Cimline 0072 Clatronic 0020 Combitech 0352 ...

Page 62: ...041 0067 Sanyo 0046 0104 Saville 0352 Schaub Lorenz 0000 0005 0041 0104 Schneider 0000 0072 0081 Seleco 0041 Sentra 0020 Sharp 0048 Shintom 0072 0104 Shorai 0004 Siemens 0003 0006 0016 0037 0054 0081 0104 0195 VCR 4 4 Manufacture Code Silva 0037 Singer 0045 Sinudyne 0004 0081 Solavox 0020 Sonolor 0046 Sontec 0037 Sony 0011 0032 0033 0034 Sunkai 0348 Sunstar 0000 Suntronic 0000 Tashiko 0000 Tatung ...

Page 63: ...4 FRONTECH 452 FUNAI 441 GBC 414 GENERAL 452 GOLDSTAR 411 GOODMANS 411 441 448 452 453 GRAETZ 417 444 GRANADA 414 444 GRANDIENTE 441 GRANDIN 411 441 453 HCM 453 454 HINARI 445 446 453 454 HYPSON 453 IMPERIAL 441 INTERFUNK 414 ITT 417 428 442 444 ITV 411 448 KAISUI 453 KENDO 424 444 KORPEL 453 LEYCO 453 LOEWE 411 414 LUXOR 409 442 444 M ELECTRONIC 441 MANESTH 405 453 MARANTZ 414 MATSUI 424 445 446 ...

Page 64: ... 644 ADMIRAL 631 AKAI 632 635 642 AKUBA 641 ALBA 607 639 641 644 AMSTRAD 642 644 647 ANITECH 644 ASA 645 ASUKA 641 AUDIOGONIC 607 636 BASIC LINE 641 644 BAUR 607 631 642 BEKO 638 BEON 607 BLUE SKY 641 BLUE STAR 618 BPL 618 BTC 641 BUSH 607 641 642 644 647 656 CASCADE 644 CATHAY 607 CENTURION 607 CGB 642 CIMLINE 644 CLARIVOX 607 CLATRONIC 638 CONDOR 638 CONTEC 644 CROSLEY 632 CROWN 638 644 CRYSTAL ...

Page 65: ...BR 607 634 SCHAUB LORENZ 642 SEG 642 646 SEI 632 640 649 SELECO 631 642 SIAREM 632 649 SINUDYNE 632 639 640 649 SKANTIC 643 SOLAVOX 631 SONOKO 607 644 SONOLOR 631 635 SONTEC 607 SOUNDWAVE 607 STANDARD 641 644 STERN 631 SUSUMU 641 SYSLINE 607 TANDY 631 641 648 TASHIKO 634 TATUNG 607 648 TEC 642 TELEAVIA 636 TELETECH 644 TENSAI 640 641 THORN 607 631 642 645 648 TOMASHI 618 TOWADA 642 ULTRAVOX 632 64...

Page 66: ...hout notice due to improvements Amplifier Section Continuous Power Output STEREO MODE FRONT 80 W 80 W DIN 1 kHz THD 0 9 8Ω Continuous Power Output SURROUND MODE FRONT 80 W ch 1 kHz THD 0 9 8Ω CENTER 80 W 1 kHz THD 0 9 8Ω SURROUND 80 W ch 1 kHz THD 0 9 8Ω Above specifications are applicable when the power supply is 230V Input Sensitivity Impedance VCR DVR DVD LD TV SAT CD AUX CD R TAPE MD VIDEO 200...

Page 67: ...67 En Additional Information ...

Page 68: ...California 90801 1540 U S A PIONEER ELECTRONICS OF CANADA INC 300 Allstate Parkway Markham Ontario L3R OP2 Canada PIONEER ELECTRONIC EUROPE N V Haven 1087 Keetberglaan 1 9120 Melsele Belgium TEL 03 570 05 11 PIONEER ELECTRONICS AUSTRALIA PTY LTD 178 184BoundaryRoad Braeside Victoria3195 Australia TEL 03 9586 6300 PIONEER ELECTRONICS DE MEXICO S A DE C V San Lorenzo Num 1009 3er piso Desp 302 Col D...

Reviews: