background image

4

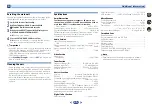
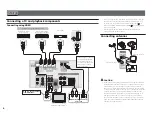
Connecting a TV and playback components

Connecting using HDMI

HDMI  OUT

HDMI IN

DIGITAL AUDIO OUT

OPTICAL

HDMI  OUT

HDMI  OUT

R

L

ANALOG AUDIO OUT

HDMI  OUT


• If the TV supports the HDMI Audio Return Channel function, the 

sound of the TV is input to the receiver via the HDMI terminal, 
so there is no need to connect an optical digital cable (

A

). In 

this case, set ARC at HDMI Setup to ON 

I

 “The HDMI Setup 

menu” on page 32.


• Please refer to the TV’s operation manual for directions on 

connections and setup for the TV.

Connecting antennas

2

1

3

4

HDMI/DVI-compatible TV

Select one

DVD player, HDD/

DVD recorder

Blu-ray Disc player, 

Blu-ray Disc recorder

Set-top box

Game console

HDMI/DVI-compatible components

AM loop antenna

FM wire antenna

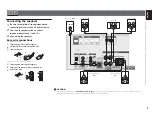
 CAUTION


• Handle the power cord by the plug part. Do not pull out the plug 

by tugging the cord, and never touch the power cord when your 
hands are wet, as this could cause a short circuit or electric 
shock. Do not place the unit, a piece of furniture, or other object 
on the power cord or pinch the cord in any other way. Never make 
a knot in the cord or tie it with other cables. The power cords 
should be routed so that they are not likely to be stepped on. A 
damaged power cord can cause a fire or give you an electric 
shock. Check the power cord once in a while. If you find it dam-
aged, ask your nearest Pioneer authorized independent service 
company for a replacement.

If the TV does not support
the HDMI Audio Return
Channel function, this
connection is required to
listen to the TV sound 
over the receiver.

OSD can only be output 
from HDMI Out.

Summary of Contents for VSX-530-K

Page 1: ... reference in the event of an insurance claim such as loss or theft Improve product development Your input helps us continue to design products that meet your needs Receive a free Pioneer newsletter Registered customers can opt in to receive a monthly newsletter Receive free tips updates and service bulletins on your new product AV Receiver VSX 530 K Operating Instructions ...

Page 2: ...nt and receiver Connect the equipment into an outlet on a circuit different from that to which the receiver is connected Consult the dealer or an experienced radio TV technician for help D8 10 1 2_A1_En Information to User Alterations or modifications carried out without appropriate authorization may invalidate the user s right to operate the equipment D8 10 2_A1_En WARNING This equipment is not w...

Page 3: ...e normally or has been dropped D3 7 13 69_En 11 12 13 14 CAUTION The STANDBY ON switch on this unit will not completely shut off all power from the AC outlet Since the power cord serves as the main disconnect device for the unit you will need to unplug it from the AC outlet to shut down all power Therefore make sure the unit has been installed so that the power cord can be easily unplugged from th...

Page 4: ... Internet service provider or network device manufacturer A separate contract with payment to an Internet service provider is required to use the Internet This equipment complies with FCC radiation exposure limits set forth for an uncontrolled environment and meets the FCC radio frequency RF Exposure Guidelines This equipment has very low levels of RF energy that it deemed to comply without maximu...

Page 5: ...lecting the audio input signal 19 Playing a USB device 21 Basic playback controls 21 Compressed audio compatibility 21 Music playback using Bluetooth wireless technology 22 Pairing with the unit Initial registration 22 Listen to music on the unit from a Bluetooth capable device 22 Radio wave caution 23 Listening to the radio 23 Improving FM sound 24 Saving station presets 24 Listening to station p...

Page 6: ...e colors of the steps indicate the following Required setting item Setting to be made as necessary 1 Connecting the speakers Where you place the speakers will have a big effect on the sound Placing the speakers page 11 Connecting the speakers page 12 2 Connecting the components For surround sound you ll want to hook up using a digital connection from the Blu ray Disc DVD player to the receiver Abo...

Page 7: ... component lights when the component is connected page 15 6 Remote sensor Receives the signals from the remote control see Operating range of remote control on page 10 7 MASTER VOLUME dial 8 STANDBY ON 9 PHONES jack Use to connect headphones When the headphones are connected there is no sound output from the speakers The listening mode when the sound is heard from the headphone can be selected onl...

Page 8: ...ded audio signals is detected HD Lights when a source with DTS EXPRESS or DTS HD encoded audio signals is detected 96 24 Lights when a source with DTS 96 24 encoded audio signals is detected NEO 6 When one of the NEO 6 modes of the receiver is on this lights to indicate NEO 6 processing page 25 22 Dolby Digital indicators D Lights when a Dolby Digital encoded signal is detected D Lights when a sou...

Page 9: ...TEREO Press to select stereo playback page 25 ALC STANDARD SURR Press for standard decoding and to switch between the modes of Pro Logic II and NEO 6 and the Auto level control stereo mode page 25 ADV SURR Switches between the various surround modes page 26 ECO Switches between ECO Mode 1 ECO Mode 2 When ECO Mode is turned ON the display will go dark page 26 9 Receiver and component control button...

Page 10: ...with Pioneer TVs Use to turn on off the power of the TV INPUT Use to select the TV input signal CH Use to select channels VOL Use to adjust the volume on your TV 15 VOLUME Use to set the listening volume 16 MUTE Mutes unmutes the sound 17 DISP Switches the display of this unit The listening mode sound volume or input name can be checked by selecting an input source Loading the batteries The batter...

Page 11: ... you re using a center speaker place the front speakers at a wider angle If not place them at a narrower angle Place the center speaker above or below the TV so that the sound of the center channel is localized at the TV screen Also make sure the center speaker does not cross the line formed by the leading edge of the front left and right speakers It is best to angle the speakers towards the liste...

Page 12: ...onnections CAUTION These speaker terminals carry HAZARDOUS LIVE voltage To prevent the risk of electric shock when connecting or disconnecting the speaker cables disconnect the power cord before touching any uninsulated parts Make sure that all the bare speaker wire is twisted together and inserted fully into the speaker terminal If any of the bare speaker wire touches the back panel it may cause ...

Page 13: ...tions Video CD Super VCD and CD This receiver incorporates High Definition Multimedia Interface HDMI technology This receiver supports the functions described below through HDMI connections Digital transfer of uncompressed video contents protected by HDCP 1080p 24 1080p 60 etc 3D signal transfer Deep Color signal transfer x v Color signal transfer Audio Return Channel see The HDMI Setup menu on pa...

Page 14: ...rd RCA video cable for coaxial digital connections Standard RCA video cables These cables are the most common type of video connection and are used to connect to the composite video terminals The yellow plugs distinguish them from cables for audio About video outputs connection This receiver is not loaded with a video converter When you use HDMI cables for connecting to the input device the same c...

Page 15: ...nections and setup for the TV Important When the ARC function is ON and the receiver is connected to a compatible TV with an HDMI cable and you switch the input of the TV to composite the input of the receiver may automatically switch to TV If this happens switch the receiver s input back to the original input or turn OFF the ARC function see The HDMI Setup menu on page 32 Note In order to listen ...

Page 16: ... listen to the audio from the source component that is connected to this receiver using an optical cable first switch to the DVD DVD player or SAT CBL set top box then press SIGNAL SEL to choose the audio signal O1 OPTICAL1 see Selecting the audio input signal on page 19 You can only connect one component to the coaxial input terminal If connecting other devices please use a different method to co...

Page 17: ...fig b 3 Place the AM antenna on a flat surface and in a direction giving the best reception 4 Connect the FM wire antenna into the FM antenna socket For best results extend the FM antenna fully and fix to a wall or door frame Don t drape loosely or leave coiled up Using external antennas To improve FM reception Use an F connector not supplied to connect an external FM antenna To improve AM recepti...

Page 18: ... a short circuit or electric shock Do not place the unit a piece of furniture etc on the power cord or pinch the cord Never make a knot in the cord or tie it with other cords The power cords should be routed such that they are not likely to be stepped on A damaged power cord can cause a fire or give you an electrical shock Check the power cord once in a while When you find it damaged ask your near...

Page 19: ... source discs you may only get digital 2 channel stereo and analog sound In this case the receiver must be set to a multichannel listening mode if you want multichannel surround sound 5 Use VOLUME to adjust the volume level Turn down the volume of your TV so that all sound is coming from the speakers connected to this receiver Selecting the audio input signal The audio input signal can be selected...

Page 20: ...erminal select the input by doing the following CD TUNER DVD SAT CBL DVD SAT CBL DVD BD SAT CBL GAME DVD SAT CBL C1 SIGNAL SEL TV TV 1 O1 2 SIGNAL SEL A SIGNAL SEL A SIGNAL SEL CD TV Audio Audio Audio Audio Video Audio HDMI Video Other than TV input TV input ANALOG IN1 audio input terminal is assigned to CD under factory settings If you want to change this to TV input please change the settings in...

Page 21: ...vices Press USB to switch the remote control to the USB operation mode Important If a USB Error message lights in the display try following the points below Switch the receiver off then on again Reconnect the USB device with the receiver switched off Select another input source like BD then switch back to USB Use a dedicated AC adapter supplied with the device for USB power For more information on...

Page 22: ...ng Bluetooth wireless technology to take place pairing must be performed on both the unit and the Bluetooth capable device After pressing the BT and switching to BT Audio function perform the pairing procedure on the Bluetooth capable device If pairing has been performed correctly you will not need to perform the pairing procedures for the unit as shown below Please refer to the user s manual for ...

Page 23: ...cation equipment using the same frequency band 2 4 GHz as this unit such as a 2 4 GHz wireless LAN device IEEE802 11b g or microwave oven If you live in a heavily populated residential area apartment townhouse etc and if your neighbor s microwave is placed near your system you may experience radio wave interference If this occurs move your unit to a different place When the microwave is not in use...

Page 24: ...cted from the AC power outlet for over a month the station memories will be lost and will have to be reprogrammed Stations are stored in stereo When the station is stored in the FM MONO mode it shows as ST when recalled Listening to station presets You will need to have some presets stored to do this See Saving station presets above if you haven t done this already Press PRESET to select the stati...

Page 25: ... the options available will depend on your speaker setup and the type of source you re listening to If the source is Dolby Digital DTS or Dolby Surround encoded the proper decoding format will automatically be selected and shows in the display When you select STEREO ALC Auto Level Control stereo mode this unit equalizes playback sound levels if each sound level varies with the music source recorde...

Page 26: ...woofer has a phase control switch set it to the plus sign or 0 However the effect you can actually feel when Phase Control is set to ON on this receiver depends on the type of your subwoofer Set your subwoofer to maximize the effect It is also recommended you try changing the orientation or the place of your subwoofer Set the built in lowpass filter switch of your subwoofer to OFF If this cannot b...

Page 27: ...OFF recognizes the PCM signal on a CD for instance When ON is selected noise may be output during playback of non PCM sources Please select another input signal if this is a problem OFF ON DRC Dynamic Range Control Adjusts the level of dynamic range for movie soundtracks optimized for Dolby Digital DTS Dolby Digital Plus Dolby TrueHD DTS HD and DTS HD Master Audio you may need to use this feature ...

Page 28: ...feature is only available when the connected display supports the automatic audio video synchronizing capability lip sync for HDMI If you find the automatically set delay time unsuitable set A DLY to OFF and adjust the delay time manually For more details about the lip sync feature of your display contact the manufacturer directly h Only available with 2 channel sources in DOLBY PLII MUSIC mode i ...

Page 29: ...r Down menu on page 31 HDMI Setup Set the audio return channel function and set the HDMI input signal to Standby Through output or not during standby see The HDMI Setup menu on page 32 Manual speaker setup This receiver allows you to make detailed settings to optimize the surround sound performance You only need to make these settings once unless you change the placement of your current speaker sy...

Page 30: ...ARGE or the subwoofer and bass sounds playing back from those selected as SMALL It also decides where the cutoff will be for bass sounds in the LFE channel For more on selecting the speaker sizes see Speaker Setting on page 29 1 Select Manual SP Setup from the Home Menu 2 Select X Over from the Manual SP Setup menu 3 Choose the frequency cutoff point Frequencies below the cutoff point will be sent...

Page 31: ...ou re finished press RETURN You return to the Manual SP Setup menu The Input Assign menu ANALOG IN1 audio input terminal is assigned to CD under factory settings but this can be changed to TV input 1 Select Input Assign from the Home Menu 2 Select Analog Input from the Input Assign menu 3 Select the desired input option for the ANALOG IN1 audio input terminal 4 When you re finished press RETURN Yo...

Page 32: ...to 4 4 4 video output from the source device may turn red no audio may be output by the source device or a 3D signal may not be output by some of the devices In these cases set the HDMI terminal to 4 2 0 5 When you re finished press RETURN You return to the Home Menu Before starting ARC operation When starting ARC operation put the TV and this unit in STANDBY mode after connecting this unit with t...

Page 33: ... digital or A analog according to the type of connections made page 19 Make sure the component is connected correctly see Connecting your equipment on page 11 Check the audio output settings of the source component Refer to the instruction manual supplied with the source component No image is output when an input function is selected Make sure the component is connected correctly see Connecting yo...

Page 34: ...ble If they are not please connect them using the composite video jacks Depending on the connected source component it s possible that it will not work with this receiver even if it is HDCP compatible In this case connect using the composite video jacks between source and receiver If video images do not appear on your TV try adjusting the resolution Deep Color or other setting for your component T...

Page 35: ... 80 W Power output 1 kHz 6 1 140 W per channel Guaranteed speaker impedance 6 to 16 Measured pursuant to the Federal Trade Commission s Trade Regulation rule on Power Output Claims for Amplifiers Measured by Audio Spectrum Analyzer Audio Section Input Sensitivity Impedance LINE 200 mV 47 k Signal to Noise Ratio IHF short circuited A network LINE 98 dB Signal to Noise Ratio EIA at 1 W 1 kHz LINE 79...

Page 36: ...ud and harmful to your hearing Guard against this by setting your equipment at a safe level BEFORE your hearing adapts ESTABLISH A SAFE LEVEL Set your volume control at a low setting Slowly increase the sound until you can hear it comfortably and clearly without distortion Once you have established a comfortable sound level set the dial and leave it there BE SURE TO OBSERVE THE FOLLOWING GUIDELINE...

Page 37: ...otice and disclaimer of warranty keep intact all the notices that refer to this License and to the absence of any warranty and give any other recipients of the Program a copy of this License along with the Program You may charge a fee for the physical act of transferring a copy and you may at your option offer warranty protection in exchange for a fee 2 You may modify your copy or copies of the Pr...

Page 38: ... conditions are different write to the author to ask for permission For software which is copyrighted by the Free Software Foundation write to the Free Software Foundation we sometimes make exceptions for this Our decision will be guided by the two goals of preserving the free status of all derivatives of our free software and of promoting the sharing and reuse of software generally NO WARRANTY 11...

Page 39: ...erved PIONEER HOME ELECTRONICS CORPORATION 1 1 Shin ogura Saiwai ku Kawasaki shi Kanagawa 212 0031 Japan PIONEER ELECTRONICS USA INC P O BOX 1540 Long Beach California 90801 1540 U S A TEL 800 421 1404 PIONEER ELECTRONICS OF CANADA INC 340 Ferrier Street Unit 2 Markham Ontario L3R 2Z5 Canada TEL 1 877 283 5901 905 479 4411 PIONEER EUROPE NV Haven 1087 Keetberglaan 1 B 9120 Melsele Belgium TEL 03 5...

Page 40: ...ps us continue to design products that meet your needs Receive a free Pioneer newsletter Registered customers can opt in to receive a monthly newsletter Protégez votre nouveau matériel Les renseignements relatifs à votre matériel seront conservés pour référence en cas de sinistre tel que la perte ou le vol Recevez des conseils des informations d entretien et de mise à jour sur votre nouveau matéri...

Page 41: ... improve heat radiation at least 40 cm at top 20 cm at rear and 20 cm at each side WARNING Slots and openings in the cabinet are provided for ventilation to ensure reliable operation of the product and to protect it from overheating To prevent fire hazard the openings should never be blocked or covered with items such as newspapers table cloths curtains or by operating the equipment on thick carpe...

Page 42: ...and insert exposed wire 3 Tighten terminal 1 2 3 10 mm 3 8 in Center and surround speaker terminals 1 Twist exposed wire strands together 2 Push open the tabs and insert exposed wire 3 Release the tabs 1 2 3 10 mm 3 8 in LINELEVEL INPUT CAUTION These speaker terminals carry HAZARDOUS LIVE voltage To prevent the risk of electric shock when connecting or disconnecting the speaker cables disconnect t...

Page 43: ...le components AM loop antenna FM wire antenna CAUTION Handle the power cord by the plug part Do not pull out the plug by tugging the cord and never touch the power cord when your hands are wet as this could cause a short circuit or electric shock Do not place the unit a piece of furniture or other object on the power cord or pinch the cord in any other way Never make a knot in the cord or tie it w...

Page 44: ...R for several times to select EXT STEREO In order to listen to the audio from the source component that is connected to this receiver using a coaxial or an optical cable choose the C1 coaxial or O1 optical input Press SIG SEL If there s no sound from the subwoofer When the front speaker is set to LARGE then in some cases no sound may come from the subwoofer Change the front speaker setting to SMAL...

Page 45: ...tronics com In Canada Aux Canada http www pioneerelectronics ca S018_B1_EnFr PIONEER HOME ELECTRONICS CORPORATION 1 1 Shin ogura Saiwai ku Kawasaki shi Kanagawa 212 0031 Japan PIONEER ELECTRONICS USA INC P O BOX 1540 Long Beach California 90801 1540 U S A TEL 800 421 1404 PIONEER ELECTRONICS OF CANADA INC 340 Ferrier Street Unit 2 Markham Ontario L3R 2Z5 Canada TEL 1 877 283 5901 905 479 4411 PION...

Page 46: ...eturn Channel ARC Phase Control Pioneer Sound Enhancements Advanced Sound Retriever 2ch Auto Level Control 2ch Midnight Listening Mode Loudness Advanced Surround Modes Action Drama Advanced Game Sports Classical Rock Pop Front Stage Surround Extended Stereo Phones Surround ECO Mode 1 ECO Mode 2 Video Features HDMI 4 in 1 out 3D Ready Blu ray Disc Broadcast and Games Deep Color 36 bit x v Color Ult...

Page 47: ...ymbol are registered trademarks of Dolby Labo ratories DTS DTS HD DTS Neo 6 and the Symbol are registered trademarks of DTS Inc DTS Inc All Rights Reserved The Bluetooth word mark and logos are registered trademarks owned by Bluetooth SIG Inc and any use of such marks by PIONEER CORPORATION is under license x v Color is a trademark of Sony Corporation Blu ray Disc is a trademark of the Blu ray Dis...

Page 48: ......

Page 49: ...eme si le brouillage est susceptible d en compromettre le fonctionnement 08 9 10 1_A1_Fr Cet equipement est conforme aux limites d exposition aux rayonnements enoncees pour un environnement non contr61 e et respecte les regles d exposition aux frequences radioelectriques RF CNR 102 de I IC Cet equipement emet une energie RF tres faible qui est consideree conforme sans evaluation de exposition maxi...

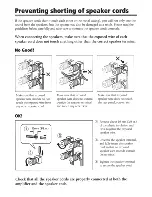
Page 50: ...re that exposed speaker wire strands do not touch the exposed wire from any other speaker cord OK Make sure that exposed speaker wire does not extend outside the speaker terminal and touch any other wire Make sure that exposed speaker wire does not touch the rear panel screws etc CD Remove about 10 mm 3 8 in of the plastic insulation and twist together the exposed speaker wire Unscrew the speaker ...

Page 51: ...er une copie une diffusion une transmission publique une traduction une vente un pret ou toute autre action non autorisee qui sort des limites de utilisation personnelle ou d une citation com me defini par les lois sur les droits d auteur peut etre sou mise ades actions penales t autorisation d utiliser ce CD ROM est donnee sous licence de PIONEER HOME ELECTRONICS CORPORATION Avis de non responsab...

Page 52: ...ified by the manufacturer or sold with the apparatus When a cart is used use caution when moving the carVapparatus combination to avo1d in1u ry from l ip over 13 Unplug this apparatus during lightning storms or when unused for long periods of time 14 Refer all servicing to qualified service personnel Servici ng is required when the apparatus has been damaged in any way such as power supply cord or...

Page 53: ... 2 1 1b_A2_Es PRECAUCI6N El interruptor de Ia alimentaci6n STANDBY ON de este aparato no corta por completo toda Ia al imentaci6n de Ia toma de corriente de CA Puesto que el cable de al1 mentaci6n hace las funciones de d1spositivo de desconexi6n de Ia corriente para el aparato para desconectar toda Ia alimentac16n del aparato debera desenchufar el cable de Ia toma de corriente de CA Por lo tanto a...

Page 54: ...USA au de POC sans que vous deviez payer pour les pieces ou les travaux de reparation Les pieces induses en vertu de Ia presente garantie peuvent Ire neuves ou remises aneuf au cholx de PUSA ou de POC LAPR SENTE GARANTIELIIMTt ES APPUQUEAUPROPRifTAIRE INITlALAINSIQU A TOUTPROPRIETAIRESUBS QUENTDU PRESENTPRODUITPIONEERPENDANTLAPERIOOEDEGARANTIE ACONDITIONQUE LE PROOUITAIT TEACHETECHEZUN OISTRIBUTEU...

Reviews: