3333
Use Decks C and D as Track Decks
1
1
1
1.... Delete
Delete
Delete
Delete the following sample d
the following sample d
the following sample d
the following sample deck control mappings
eck control mappings
eck control mappings
eck control mappings
by following
by following
by following
by following the procedure
the procedure
the procedure
the procedure “Deleting Settings Files”
“Deleting Settings Files”
“Deleting Settings Files”
“Deleting Settings Files”
on page
on page
on page
on page 2
2
2
2
.
.
.
.
“Pro 2_1 Sample Deck 1- Pioneer.DDJ-T1.....”
“Pro 2_1 Sample Deck 2- Generic MIDI…..”
2
2
2
2.... D
D
D
Disconnect the D
isconnect the D
isconnect the D
isconnect the DDJ
DJ
DJ
DJ-
-
-
-T1
T1
T1
T1 from the PC/Mac
from the PC/Mac
from the PC/Mac
from the PC/Mac and
and
and
and
reconnect it
reconnect it
reconnect it
reconnect it again
again
again
again.
.
.
.
* Problems may arise with TRAKTOR PRO 2 control if the DDJ-T1 is
reconnected while TRAKTOR PRO 2 is running.
It is recommended that you reconnect the DDJ-T1 by the following
procedure:
1) Quit TRAKTOR PRO 2.
2) Disconnect DDJ-T1 from the PC/Mac and reconnect it again.
3) Relaunch TRAKTOR PRO 2.
3.
3.
3.
3. Click
Click
Click
Click the
the
the
the alphabet
alphabet
alphabet
alphabet on
on
on
on the deck
the deck
the deck
the deck where
where
where
where you want
you want
you want
you want to
to
to
to
change the assignment
change the assignment
change the assignment
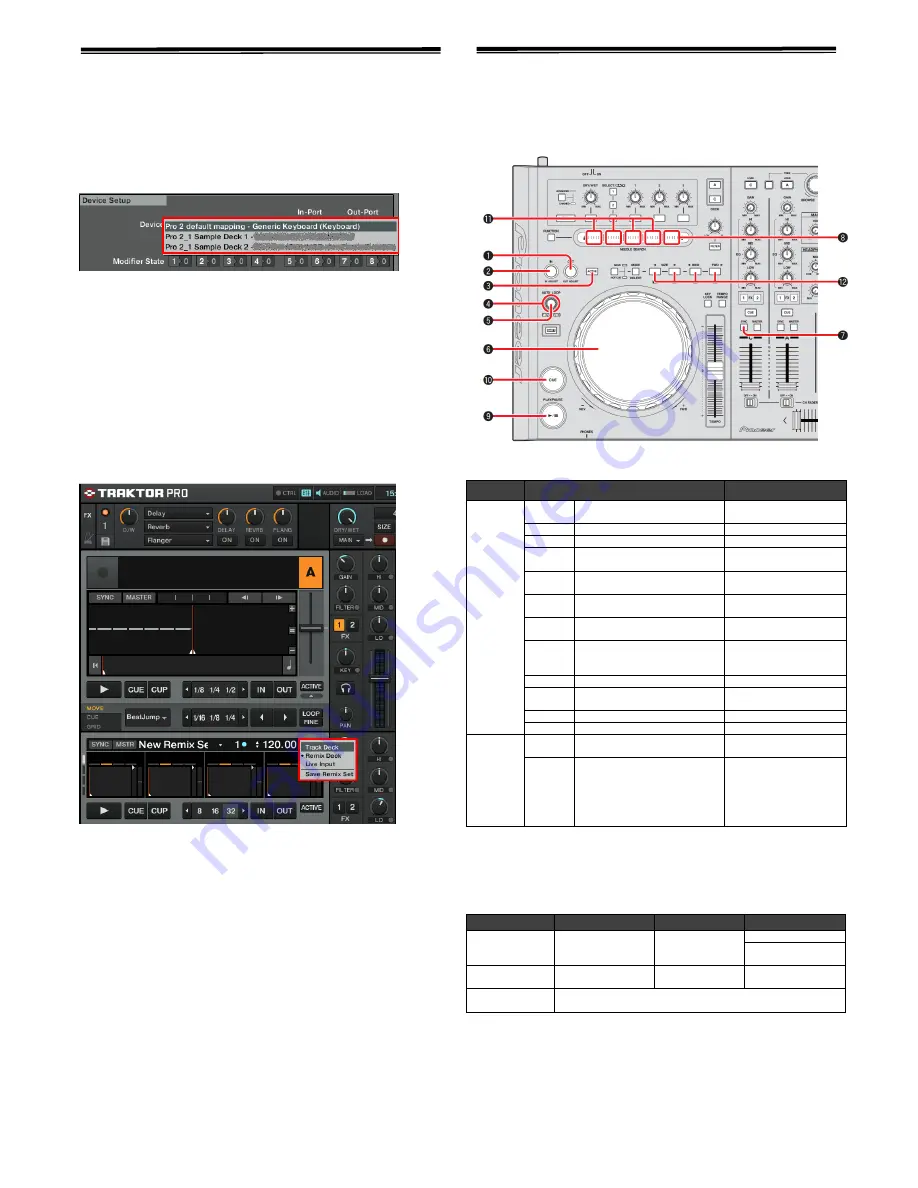
change the assignment and select [Track Deck].
and select [Track Deck].
and select [Track Deck].
and select [Track Deck].
Operating “TRAKTOR PRO 2”
Using the Buttons of This Unit
The default settings are as follows:
When Decks C and D are
When Decks C and D are
When Decks C and D are
When Decks C and D are selected
selected
selected
selected::::
DDJ-T1 button
Function
Control
all 4
slots at
once
①
OUT (OUT ADJUST)
button
-
②
IN (IN ADJUST) button
-
③
ACTIVE button
-
④
AUTO LOOP (MOVE
GRID) knob <rotate>
-
⑤
AUTO LOOP (MOVE GRID)
knob <Press>
-
SHIFT
+
④
AUTO LOOP (MOVE GRID)
knob <Rotate>
-
SHIFT
+
⑤
AUTO LOOP (MOVE GRID)
knob <Press>
-
⑥
Jog dial
Slot Scratch On
Slot Scratch
Slot Tempo Bend
⑦
SYNC button
Sync On/Off
⑧
When [FUCTION] is ON
NEEDLE SEARCH pad
Group Play/Stop *
1
⑨
PLAY/PAUSE button
Group Play/Stop
⑩
CUE button
Group Trigger
Control
a single
slot
⑪
When [FUCTION] is ON
NEEDLE SEARCH pad
Play *
1
⑫
MOVE PANEL/HOT CUE
PANEL
[1]/[5] button
[2]/[6] button
[3]/[7] button
[4]/[8] button
See “About HOT CUE
Assignment” below.
*
1
: Even when decks A and B are selected, if the [FUNCTION] button is
turned on, the remix decks can be controlled by the [NEEDLE SEARCH]
pad.
HOT CUE
HOT CUE
HOT CUE
HOT CUE Assignment
Assignment
Assignment
Assignment::::
Not Load
Load
Play
HOT CUE
Load From Deck
Play
One-shot : Stop
Looped:
Mute/Unmute
SHIFT
+HOT CUE
Load From List
Retrigger
Retrigger
MOVE/DELETE
+HOT CUE
Delete
Note: For various functions of the remix decks, see the TRAKTOR 2 manual,
which can be accessed from [Help] menu of the TRAKTOR PRO 2 by selecting
[Open Manual].


